Big Island and Kauai Exotic Beaches

Big Island beaches-2

Hawaii is known for many things, and beautiful beaches are at the top of the list. There are too many beaches to count, and so many of them aren’t just the garden variety golden sand beaches, but rather green beaches, black beaches and others as well.

Mom and I aren’t dedicated beach goers in the sense that we will go to a beach and stay there all day. We simply like to do too much on vacation and don’t stay in any one place too long. As I always joke, you know you had a good vacation when you need another vacation to recover when it is all over.

Even though we had visited most of the best beaches on the Big Island and Kauai on our first trip, there were still some beaches to see on our second trip. The Big Island offers many different types of beaches, just because that island is younger than the other Hawaiian islands, so it is still transforming (and the ever erupting Kilauea ensures that the island is frequently changing landscapes).

I had visited Green Sand Beach on our first trip to the Big Island, but my mother elected not to go at the time, and regretted it later. Since I enjoyed the trip the last time, I had no problem doing it again.

This beach takes more effort to get to than most beaches, because there is no road near it, so you have to hike over two and a half miles from the parking lot to get there. To get to the parking lot, you take the turnoff for South Point Road between mile markers 69 and 70 on Hwy 11. You then drive down several miles, and follow the signs to Green Sands Beach. You can’t really miss the makeshift parking lot, and there should be plenty of cars already parked.

Big Island beaches-1

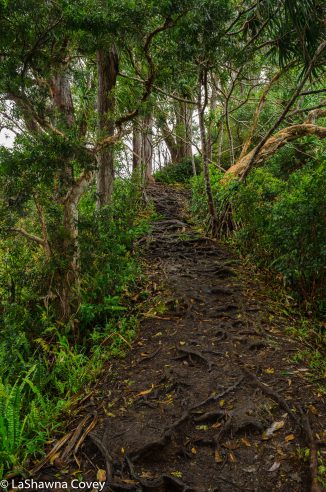
From the parking lot, you have a decision to make. You can walk all the way to the beach if you desire. The walk isn’t difficult, but it can feel longer than it is at times, and it is exposed to sun and wind. If you choose to walk, most of the path is fairly easy to traverse, though there are sections where you have to negotiate rocks. There isn’t one path per say, but rather you just pick the best  of the available paths, which is usually the one that is flattest. Basically you just walk east and head toward Green Sands Beach. Eventually you will see the cliffs surrounding the beach, so you know you are almost there.

Big Island beaches-3

Like I said, it isn’t HARD, but the walk can feel long and if the sun is beating down on you or the wind is strong, you will feel it. So make sure you take a lot of water and sun protection with you if you decide to walk the way.

However, you don’t have to walk out there if you don’t want. There is a cottage industry of locals and their 4WD vehicles who will gladly take you out to the beach and back, for a fee of course (roughly $10 per person for a round trip). Mom and I decided to walk out there, to get the full experience and some exercise, but we decided to take a truck back to save time and energy.

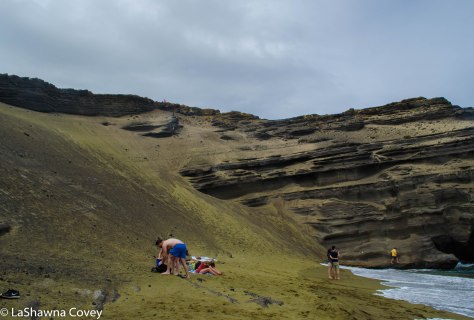
Once we got to the cliffs overlooking the beach, we just spent some time marveling at the beauty. The cliffs are rather magnificent in and of themselves, and the green sand of the beach just makes it all the better. The green sand comes from olivine, and its really only found in Hawaii on this beach. It’s not a bright green, but the sand definitely has a greenish tint.

Big Island beaches-4

It’s fairly easy to make your way down to the actual beach, because of the steps and ladders. It is possible to swim in the ocean, though you need to be careful not to swim too far out, because there can be strong currents in the area.

If you like beautiful nature and unique beaches, you’ll probably like Green Sands Beach. It’s not a stop you can just spend a little time at, just because of the time it takes to get there (even if you take a truck). So if you plan to go, definitely allot enough time to get there, enjoy the beach for as long as you want, and get back. But it really is worth your time.

Big Island beaches-5

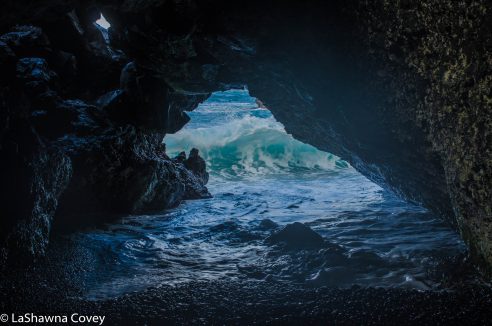
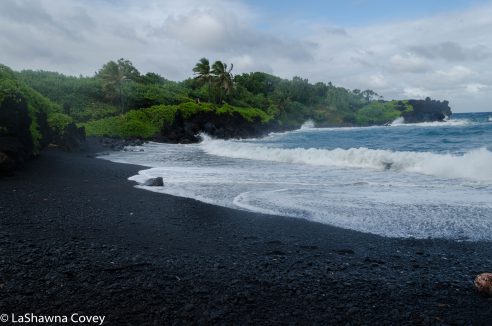
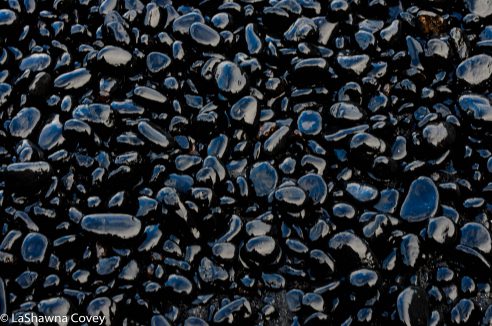
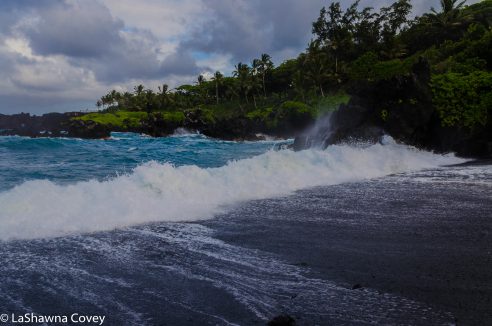
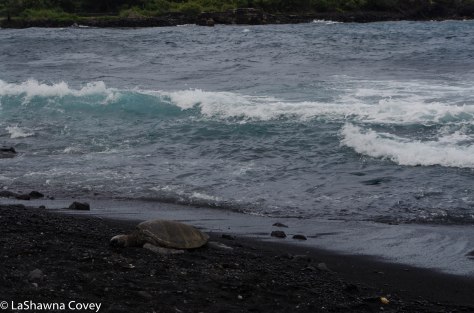
About a 30 minute drive from the turnout to Green Sands Beach is the turnout for Punalu’u Beach, or Black Sand Beach. This beach is much easier to reach, because the parking lot is only a short walk from the beach itself. It’s located between mile markers 56 and 57 on Hwy 11 off Alanui Road. The road to the beach is well marked and easy to follow.

Big Island beaches-6

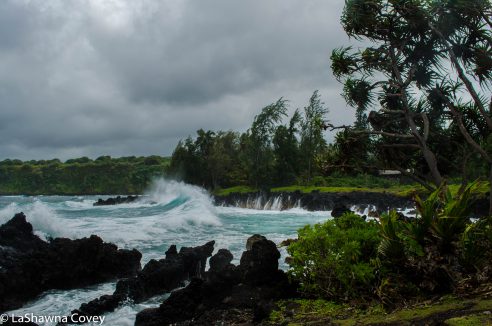
Punalu’u Beach is a nice contrast with Green Sands Beach, both in the ease of access and the color of the sand. At the time we visited, the weather was a bit overcast and it was windy, so the waves were a bit too strong for me to want to swim. But it was pleasant to walk along the beach, admire the view and even take in the sight of a turtle.

Big Island beaches-8Big Island beaches-7

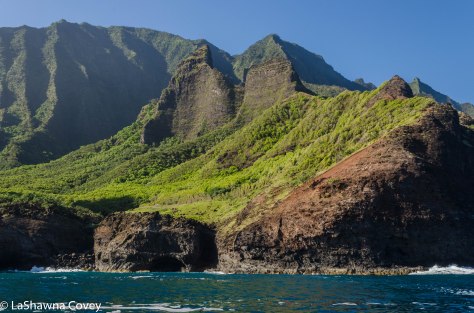
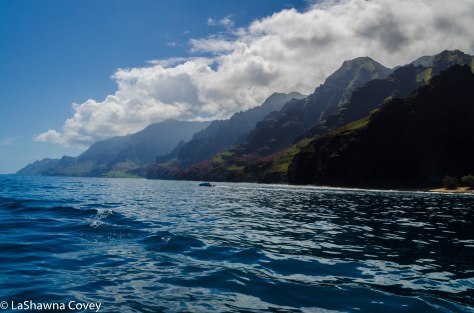
The beaches of Kauai are very beautiful, but almost uniformly a golden sand. However, there is one beach that takes more of an effort to reach. At least a beach that is not off the Na Pali Coast, because those beaches are much, much harder to reach.

Mom and I debated visiting Waimea Canyon on this trip, even though we visited it at length  during our first trip. However, we got a late start on our designated travel day, and we could see the dark clouds rolling in, so we figured it would not be worth our time to make the long drive up, only to have the surrounding views obscured.

Kauai beaches- Polihale State Park-5

Instead, we decided to visit Polihale State Park, which we had not visited before. Polihale State Park is on the west side of the island, and it is about as far west as the road goes before it peters out, just before it reaches the Na Pali Coast. It’s not exactly EASY to get to Polihale, but it is worth your time if you have the time. Getting to the turnoff is easy, because you follow Hwy 50 all the way down the road, until you see the turnoff for the park. However, this is when the trip becomes more of an adventure. The access road to the beach is approximately five miles over an unimproved dirt road. I honestly don’t know why money isn’t spent to improve the road, but for whatever reason, the road is decidedly unimproved, though I read there is periodic maintenance to make it somewhat driveable.

Kauai beaches- Polihale State Park-3

Generally speaking it is recommended that you take a 4WD vehicle to the park, though it isn’t absolutely required. You can take a 2WD vehicle like we did (though I wouldn’t recommend one if it is wet outside, because I can just see how the road would turn into mud when the rain falls). The road is deeply rutted in places, so you have to drive carefully, but eventually you will get there. Even though the road goes further up for camping access, it is easier to park at the spaces for the Queen’s Pond. There isn’t a parking lot per say, but rather you just pull your car off the road into the sand. Just make sure that the sand isn’t too loose, so you won’t get stuck trying to leave.

Kauai beaches- Polihale State Park-2

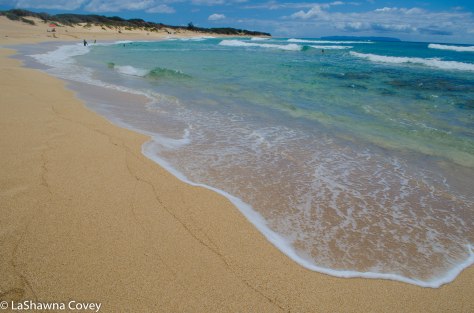
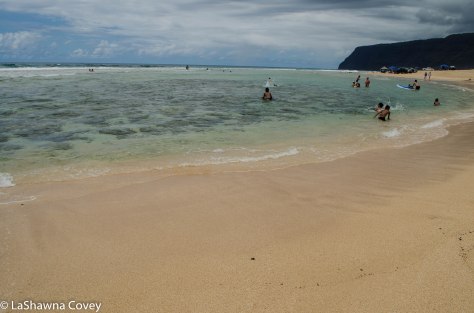
From where you park, you just follow the road until you hit the beach. Once you arrive, it is pretty much up to you. Polihale State Park makes up several miles of golden sand, and if you come during the week, you are liable to have the park to yourself. We visited on the weekend, and there were plenty of locals camped out, but it was definitely not crowded.

If you want to swim on the beach, the safest place is within the reef of Queen’s Pond. Outside of it, the waves and current are a bit stronger. There really isn’t much else to do on the beach, but relax, swim if you want, and walk up and down taking in the views. We saw the dark clouds were getting closer and the rain was threatening to come down, so we left before the road was too difficult to traverse.

Kauai beaches- Polihale State Park-4

If you choose to go to Polihale State Park, just know that it is out of the way for most other sites (though you could combine it with a day trip to Waimea Canyon), and the road is somewhat difficult to traverse. But you aren’t likely to find many more isolated places on Kauai (though some of the most isolated Na Pali Coast beaches would give it a run for its money).

Kauai beaches- Polihale State Park-1


Hawaii Waterfall Fun- Big Island and Kauai

Big Island waterfalls and caves-1

I have always been drawn to running water, such as rivers, streams and the ocean. I just found something so fascinating and peaceful about running water. I could listen to it for hours. But my favorite natural water will forever and always be waterfalls. The best waterfalls never cease to amaze me, and they are one of my favorite places to visit when I hike or go on vacation.

Luckily for me, Hawaii is rife with waterfalls that will astound you with their beauty, and a good chunk of them are easily accessible from the road. We had visited most of the waterfalls on our first visit to Big Island, but of course we wanted to see them again.

Since the Hilo side of the Big Island is much greener and wetter than the Kona side of the island, because of all the rain, it stands to reason that the Hilo side of the island has the best waterfalls. And a few of the best ones are all within short driving distance of each other.

One of the best ones is Akaka Falls. This waterfall is 422 ft and set within a lush, green park. The trailhead to the waterfall is close to the road with pay parking within the parking lot, though if you don’t want to pay, there is plenty of parking on the road as well. Usually, there are a couple ways to access the viewpoint, because there is a trail that goes down and around and affords multiple views and obstructed views of another waterfall. However, at the time we visited, part of the lower trail was blocked off, due to trail maintenance, so only the most direct trail was available to the viewpoint. It’s less than .5 mile from the trailhead to the viewpoint, and the path is paved and pretty easy to traverse. You can’t miss the wide viewpoint that looks at the waterfall from the distance. The most challenging thing is jockeying for the best view among the throngs of tourists and their cameras.

Big Island waterfalls and caves-2

Another readily accessible waterfall is Rainbow Falls. How powerful this waterfall is, depends on the time of year, since after plenty of rain, the waterfall with naturally have more water than during drier periods. This one is also very popular, so there is a large parking lot and the walk is short to the viewpoint. A farther away view of the falls is right off the parking lot, whereas there is a short hike that takes you to the overlook of the top of the falls. I saw some people walking out on the rocks to the top of the falls, but my fear of slipping and falling off the cliff prevented me from doing the same.

Big Island waterfalls and caves-3

Since we were already in the area, we decided to drive the short way up the road to view Wai’ale Falls. They aren’t heavily advertised, and I wouldn’t consider them a “must do.” However, if you like waterfalls and are in the area, the falls are worth the minutes it takes to drive there on Waianuenue Avenue, past the junction to Hwy 200 (Saddle Road), and then just past the Wailuku River Bridge.

Big Island waterfalls and caves-5

The view of the falls are located right off the road, with parking available just off the road. There is supposed to be  a faint trail to get closer to the falls, and apparently the locals like to swim in the falls pool.

Big Island waterfalls and caves-4

Even though it isn’t a waterfall, the last stop of the day before heading back to our hotel was a local lava cave, easily accessible off the road. The lava cave is called Kaumana Caves, with a well marked parking lot located between mile markers 4 and 5 off Hwy 200. If you like lave caves, it is worth your time, and the visit doesn’t take too long.

Big Island waterfalls and caves-8

Even though the parking lot is across the street from the caves, we didn’t see too much traffic on Hwy 200, so it is pretty safe to make your way across. Once across the street, the sign for the cave is well marked, and there is no admission to the caves. Stairs lead down into the cave. There are actually two parts of the cave.

Big Island waterfalls and caves-7

The left side of the cave is more like a small ampitheater and the opening has plenty of green plants.

Big Island waterfalls and caves-6

The right side of the cave affords the opportunity to walk a bit ways into the cave before the way becomes too small. If you do want to make your way into the cave, make sure you have a light source, because there is no light in the cave.

Big Island waterfalls and caves-9

Over on Kauai, a good chunk of the most beautiful waterfalls are easy to visit, though there are plenty of waterfalls that aren’t readily accessible to the viewing public.

Kauai waterfalls-4

Wailua Falls are probably the most beautiful waterfalls on Kauai, and there is a well marked road (Hwy 583) that literally ends at the parking lot for Wailua Falls. There isn’t a ton of parking spots considering how popular the falls are, but there are parking off the road, and turnover is usually pretty quick. However, if you are visiting Kauai during high tourist season, it might be worth your while to go earlier in the morning or later in the afternoon.

Kauai waterfalls-3

We had the opportunity to see a couple other Kauai waterfalls during a half day kayak and waterfall adventure. Mom and I enjoy kayaking, and there are opportunities for both sea and river kayaking on Kauai. We decided against sea kayaking, just because of some of the strong ocean currents in places, and river kayaking sounded very pleasant.

Even though you can do guided or unguided river kayaks on different rivers, we elected for a guided tour, the Kayak Waterfall Adventure offered at Island Adventures tour company, just because in many ways it was easier, and it also afforded an opportunity to view a couple of pretty waterfalls that are located on private property, so they aren’t accessible to the public.

After kayaking a few miles up the Huleia River (a generally easy and peaceful trip among a lush green setting), we were transported to the overlook site and hiked down to the waterfalls. The first waterfall was the 30 foot Bamboo Falls. We only had a side view of the falls, but they were pretty nonetheless.

Kauai waterfalls-1

After hiking a short time past that, we came to our destination, the 60 foot Papakolea Falls. We were able to sit and relax by the falls, swim in the pool, or climb up partway for pictures on a ledge behind the falls. The company also offers another tour that involves rappelling down the falls. I thought about doing the rappel tour, but since I figured my mom wouldn’t be into rappelling down the waterfall (I was right), we went with the gentler trip instead.

Kauai waterfalls-2

The last waterfall I visited on Kauai was Ho’opi’i Falls. These falls were a bit harder to find, and aren’t really considered a “must do”. However, I was looking for an easy hike, and this one fit the bill and was a short drive from our hotel. The falls are located just up the road from the town of Kapa’a. I initially had a hard time finding the trailhead. It is located on Kapahi Road in a residential area. However, the trailhead isn’t really well marked, and my guide book gave some confusing directions. Just when I was about to give up and go back to my hotel, I looked on other hiking sites for better directions, and realized where I went wrong. The trailhead might not be marked, but you can see the yellow gate on the side of the road, that is overgrown with vegetation, and a short way before the road ends. Just past that is the parking area on the side of the road. You aren’t supposed to park on private property, because your car will be towed, but there are enough spaces for several cars off the side of the road.

Kauai waterfalls-6

From the trailhead, it was an easy walk down to the river. Once you hit the river, take the trail to the right and a short ways after that, you will come to a turnoff that will lead you down to the upper Ho’opi’i Falls. These falls are nice and the viewing area affords some nice views and places to sit on the rocks. My guide book talked about lower falls, so I continued to follow the directions from my book, but I never did find the falls. At some point, I came to a fence blocking the trail and marked private property. I tried walking down to the river, but the trail along the river was hard to follow and eventually petered out. I tried walking around the blocked path, but never did find the lower falls. Eventually I turned back, because I was afraid of getting cited if I was caught on private property. Even though I didn’t see the lower falls, the hike was still pleasant enough.

Kauai waterfalls-5

So if you like waterfalls, the whole state of Hawaii affords so many gorgeous views, and Kauai and the Big Island have some of the best waterfalls. Don’t miss them if you are on the island.

Na Pali Coast- The Exquisite Splendor of Kauai

Na Pali Coast-15

The last time we were on Kauai, we saw most of the “must do’s” for the island, but not all of them. One of the absolute, no kidding “must do’s” for Kauai is visiting the Na Pali Coast. Pound for pound, there are few more astoundingly beautiful stretches of land on this Earth than the Na Pali Coast. It is just endless folded mountains, green lush trees, golden sandy beaches and bright blue ocean.

Na Pali Coast-7

Due to the nature of the terrain, and the wisdom of the Kauai government, this is the one part of the island where there are no roads. Sure, you can drive up to the Kalalau Valley Lookout that is part of Waimea Canyon and Koke’e State Park to get a good overhead view of part of the Na Pali Coast. You could also take a (very expensive, but ultimately worth it) helicopter ride a wide look at the Na Pali Coast from above. And of course, you can see the Na Pali Coast from the ground by hiking the Kalalau Trail in whole or at least in part. But it requires much more effort to see the coast, because you can’t just drive to it.

Na Pali Coast-9

The last time we visited, I hiked two miles on the Kalalau Trail out to Hanakapi Beach. The entire trail is 11 miles one way, which is a hike you can’t really do in one day due to the difficult nature of the trail. You can’t even stay overnight at any of the coast beaches unless you have a camping permit. However, the two miles and back to Hanakapi Beach is an eminently doable day hike if you are in at least moderate fitness. The trail isn’t easy, because the trail isn’t well maintained. It’s often muddy and slippery and there are significant inclines and declines in parts. But the ground views of the Na Pali Coast and Hanakapi Beach make the journey worth the time and effort.

Na Pali Coast-13

While hiking gives you a nice intimate view of the coast, you can’t REALLY appreciate the full, exquisite splendor of the Na Pali Coast unless you take a step back and take it all in. The Na Pali Coast rewards a more expansive view, just because it is the mountains, trees and beaches altogether that makes the coast so special, and not any one specific feature.

Na Pali Coast-2

This time around, we elected to take a boat and snorkel tour along the coast. We hadn’t done one of those in Kauai before. It would give us a chance to see a wider view of the coast at a more leisurely pace, and afforded an opportunity to snorkel just off one of the beaches. After careful consideration of the different tours offered, we went with Na Pali Catamaran company. Again, they were the most recommended, but there are many good tours offered on the island. The company offers a morning and afternoon snorkel tour (among others), and we went with the morning tour, since the island weather is often better during the morning, with clouds more likely to roll in during the afternoon.

Na Pali Coast-6

While there are many tour companies offering Na Pali Coast boat tours, one of the biggest things to consider when choosing a company is where the tour departs. Typically, tours either leave from Hanalei Bay on the North Shore or from the western side of the island at Port Allen. If you can swing it, definitely choose a Hanalei Bay departure. The boat trip goes all the way across the Na Pali Coast, to the designated snorkel spot, which is usually around one of the farthest beaches. Ultimately you see more of the Na Pali Coast if you depart from Hanalei Bay, rather than Port Allen. Since none of these tours are exactly cheap, it makes sense to get most bang for your buck.

Na Pali Coast-5

If you take the morning tour, your day will start early, because you have to check in around 0645. Afterward you are transported to the beach, where you board the boat and start the trip.

Na Pali Coast-1

The view is always beautiful, but there is something extra special when you pass Ke’e Beach and officially enter the Na Pali Coast. Then the just regular beautiful mountains, become the gorgeous folded mountains of the coast. Everywhere you look, you just want to take pictures, because you can’t believe how amazing this place is and can’t get enough of the view.

Na Pali Coast-8

Our tour guide announced when we passed named beaches, such as Hanakapi Beach. We also saw parts of the Kalalau Trail overhead, and even waved to a couple hikers making their way along the trail.

Na Pali Coast-3

Since we were on a smaller catamaran, it enabled us to get closer to the shore. We got up close and personal with some cliffside waterfalls, and we even got to enter some larger sea caves.

Na Pali Coast-4

Even though it is not guaranteed on the trip, these boat tours offer the opportunity to see local wildlife. This particular morning offered a wealth of nature viewing. Luckily we ran into a pod of dolphins and they playfully accompanied us half the way to the turnaround point. We also saw a few sea turtles splashing around the ocean as well. Turtle viewings are a rare opportunity, though they are a protected species in Hawaii.

Na Pali Coast-10Na Pali Coast-11Na Pali Coast-12

Eventually we got to the turnaround point, which also was our snorkel site. We weren’t allowed to approach any of the beaches, but we did some snorkeling along one of the coastal reefs. As snorkeling trips go, it was reasonably decent. I have seen better and more colorful reefs teeming with life and color, but this reef did get the job done. At times, we had to gently fight some of the waves, but for the most part, the snorkeling wasn’t too rough (I’ve snorkeled in areas in the past, where it felt like I was fighting the ocean the entire time). There were schools of brightly colored fishes, and we could get a little more up close and personal (but not TOO personal) with some of the sea turtles.

Na Pali Coast-14

After snorkeling, we headed back to Hanalei Beach. All told, the tour lasted about four hours, which is enough time to take in all of the Na Pali Coast, and get a decent amount of snorkeling done. If you want a more intimate view of the Na Pali Coast, I HIGHLY recommend taking a boat tour. You definitely won’t regret seeing some of the most beautiful nature the world has to offer.

Hawaii Zipline Adventure Fun

Hawaii zipline adventure-13

I have always had a love of adrenaline activities, such as skydiving, bungee jumping and canyon swinging, but those activities are typically only found in a few areas (though skydiving is more commonly found). So to feed my inner adrenaline junkie, I will often check out the “softer” adrenaline activities in the area, and one of my favorites is ziplining. Ziplining is both easy to do, provides some thrills, and often affords beautiful views of the surrounding countryside.

Hawaii zipline adventure-1

If I choose to zipline, I always go for the one that provides the most thrills with the longest zips, just to make it worth my while. If there isn’t at least one zip that is 1200 feet or longer, then I won’t even bother. I want high. I want fast. I want fun. I have even roped my mother into ziplining with me, and I could NEVER coax her to bungee jump (I’m still working on tandem skydiving), and now she is as hooked as I am. So for our last trip to Hawaii when we visited the Big Island and Kauai, of course I was going to check out the best ziplining on each island.

Hawaii zipline adventure-2

Both islands offer multiple companies that have zipline tours, but I elected to go with the most recommended ones in our guide books. Those tours offered the longest and highest zips, and they seemed to be set in beautiful nature areas for great views. After all, none of these tours are cheap, so I wanted to make it worth our while.

Hawaii zipline adventure-3

We visited the Big Island first, and I selected Umauma Falls and Zipline Experience, since it was so highly recommended. The course was set over a lush, beautiful valley, as you descended the course through nine different ziplines. It came both recommended, and the website looked great, so we figured why not? The tour offered access to viewing the Umauma Falls, which are only available to see through a paid tour.

Hawaii zipline adventure-4

Driving there was a bit long, but still pretty easy. We had based ourselves at a resort in Kailua-Kona (the western side of the island), and Umauma Falls is on the eastern side of the island. So unlike our first trip, we did a LOT of driving to get where we needed to go everyday. But even though the Big Island is the biggest Hawaiian island, it is still easy enough to drive to most sites (assuming  you aren’t fighting too much town traffic in parts).

Hawaii zipline adventure-5

We even got there with enough time to spare to go on an earlier tour, which played into our favor, because the weather was iffy. It always is on the Hilo side of the island with the extensive rain it receives. Throughout our tour, we saw the dark clouds threatening to open up on us, but thankfully, they never did.

Hawaii zipline adventure-7

Four of the Umauma Falls zips are dual line, so if you are visiting with a partner, you can race down the line to see who gets to the end faster. Just due to the fact that I outweigh my mother, AND I would launch myself off the platform to get as much speed as possible, I always came in first.

Hawaii zipline adventure-6

Some of the zips afforded views of beautiful lakes and small waterfalls, and even a glimpse or two at a lava cave. And the most touted view was on zip eight, where you can finally stop and take in the actual Umauma Falls. All in all, it was a great tour, and a lot of fun. It combines beautiful views and thrilling zips, to make it worth your time and money. Of the ziplining we have done in Hawaii, the Umauma Falls tour is probably the most picturesque, and one of the most picturesque of any zipline tours I have done.

Hawaii zipline adventure-8

So after that fun trip, I was hoping our zipline tour on Kauai would live up to the same standards. This time, we chose Koloa Zipline for the same reasons: it looked like it combined the most fun zips with the most beautiful nature (though if there was ever forced to choose, I would always choose to most thrilling over the most beautiful).

Hawaii zipline adventure-9

Koloa Zipline tour is set within the Waita Reservoir not far from the town of Poipu, so as you travel around the course, you get beautiful views of the lush, green countryside. This particular tour provides a more vigorous workout than is advertised on the website, so know before you go. All zipline tours have a certain amount of walking, because that is how you get from zip to zip. However, Koloa Zipline’s zips are a bit farther apart at times, and there was one short but steep and strenuous hike between two zips. Let’s just say I was feeling the humidity, and was thankful it wasn’t hotter than it was (though the tour provides plenty of cold drinks and snacks to satiate you).

Hawaii zipline adventure-12

Even though the Koloa Zipline setting is beautiful, it still doesn’t beat out Umauma Falls for sheer beautiful nature. I love trees and lakes, but I love waterfalls more. However, I do think Koloa Zipline is more thrilling than Umauma Falls, in a couple key ways. Sure, Koloa Zipline is only eight zips compared to Umauma Falls’ nine zips, but the adrenaline factor is a bit higher with Koloa.

Hawaii zipline adventure-11

Koloa Zipline offers the most opportunities for tricks and alternate positions than any other zipline I have done up to this point (and with this trip, I finally broke into the double digits for zipline tours I’ve completed). Sure, you can do the standard sitting zipline position that other tours offer, but you can also do so much more. This is a company that actively encourages people to try new positions, such as upside down, spinning, and my absolute favorite, the prone position. One of the tours in Maui allowed participants to do one zip upside down, but they were clear that this was not something they wanted to get out. But crazy positions seems to be part of the package deal with Koloa Zipline. I had done one prone position zipline before this, but it was in Las Vegas, and it was heavily controlled. Out on this tour, it really felt more like you were flying over the jungle. It was the most thrilling and provides panoramic views for the longer, more beautiful zips.

Hawaii zipline adventure-10

If you like ziplining already or even just thinking of trying it, I highly recommend both zipline tours. You can never have too much zipline, and the beautiful views and soft adrenaline thrills provides an opportunity to see part of the island in a new way.

Summit and Stars at Mauna Kea

Mauna Kea Summit Adventure-7

When we started planning our second trip to the Big Island, one of the few “must do’s” on our list was visiting Mauna Kea summit to view the sunset. It was originally on our list on our first trip, but due to weather (one of the few days it snowed up at the summit, since it was December), we weren’t able to go the night we had scheduled, and due to our hectic schedule, we weren’t able to go on another night.

So this time around, we made sure that we could do this. We were visiting in the spring, so the chance of snow was remote, and we were based out of one hotel on our second trip, and our schedule was flexible enough to go on a second night if we could’t get our preferred date.

We made the decision to take a tour to the summit, rather than go on our own. Yes, it is possible for individuals to visit the summit. However, they MUST have a 4WD vehicle to drive up there, because there is no way a 2WD vehicle will last all the way up and down the winding, gravel road. Since we didn’t rent a 4WD vehicle, it just made everything easier to do a tour.

Mauna Kea Summit Adventure-3We selected a tour with Maui Forest and Trail because it was well recommended in our guide book, their Summit and Stars  Adventure Tour in particular. We wanted to see the sunset from the mountain, and have the opportunity to see some of the stars from the visitor center. Due to the lack of light pollution on Mauna Kea and the surrounding area, it is very easy to see many, many stars on clear nights. Mauna Kea Summit Adventure-2
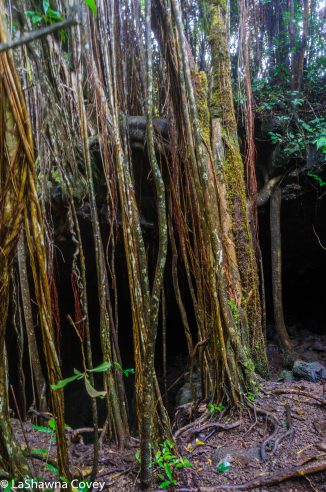
The tour lasts several hours, because it first involves a stop at an abandoned sheep shearing station to eat a nice, picnic dinner. The sheep shearing station reminded me of one of those abandoned, haunted farms that come alive during the Halloween season. All the place needed was a corn maze and a psycho with chainsaw to complete the eerie, creepy atmosphere.Mauna Kea Summit Adventure-1
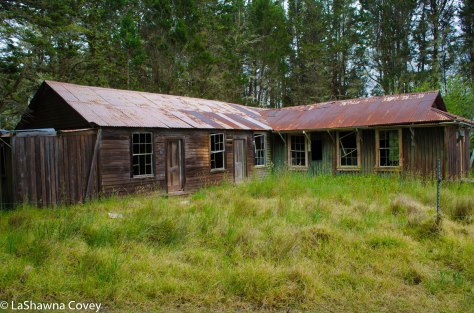
After dinner, our van headed up the mountain road, with only a brief stop at the visitor center at 9,000 feet. The ride up is slow, but steady. The road is paved up to the visitor center, but the road from the center to the summit (about five miles) is not paved for the most part, (except for the final stretch just before you reach the summit).Mauna Kea Summit Adventure-5
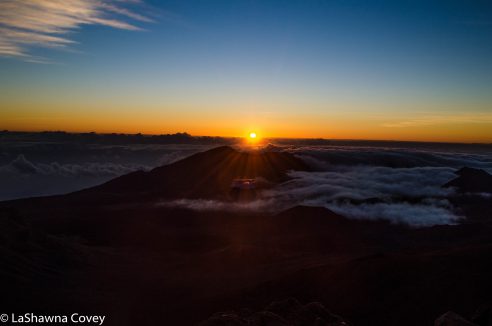
We got up there about 30 minutes before sunset, so we had some time to walk around and look at the panoramic view. Of course, due to the fact that the summit is around 13,803 feet, you can’t really move too fast without feeling the effects of the altitude. The sun was still bright on the horizon, but the shadows were lengthening. Mauna Kea Summit Adventure-8
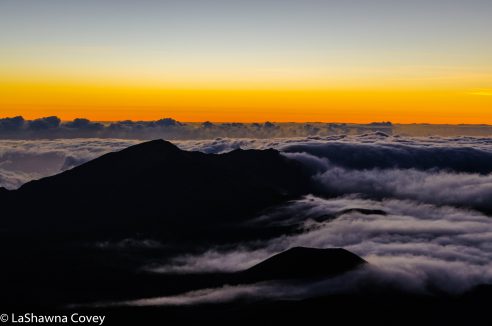
Because of the high altitude, the clear air, and the lack of light pollution, Mauna Kea is home to many powerful telescopes to look at the sky. The summit is surrounded by them, and you can see them everywhere. It was also a remarkable change from being down at the beach. It was warm (somewhere in the 80s)  at sea level, but it is very cold (near freezing) at the summit. Make sure you dress warmly, because you are going to need it (my tour offered up winter parkas and warm gloves for the duration of the tour).Mauna Kea Summit Adventure-4
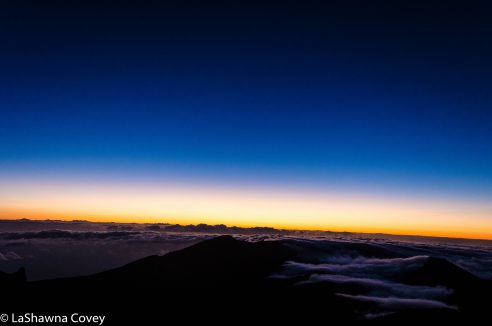
After the sun slipped below the horizon, darkness fell pretty quickly. We didn’t have too much time to stay after the sun set, because all visitors must descend from the summit no later than 30 minutes after sunset, so vehicle lights don’t interfere with the work of the telescopes.Mauna Kea Summit Adventure-6
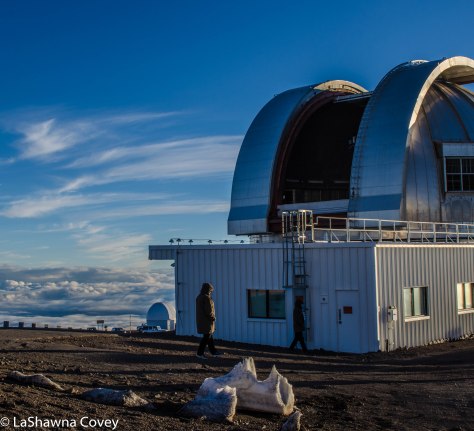
By the time we descended to the visitor center, it was completely dark. At first, we were a bit skeptical that we would be able to see any stars, because of the cloud cover. However, after a while, the clouds lifted enough for us to see the stars. Our guide set up his telescope, and we took turns looking at all the different heavenly bodies he pointed out to us. Mauna Kea Summit Adventure-9
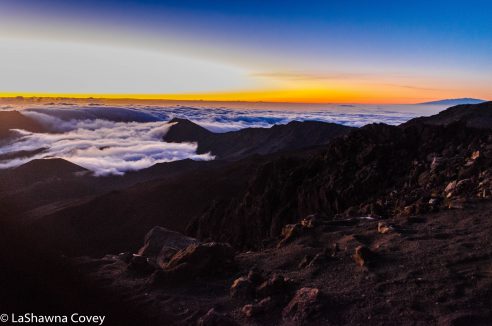
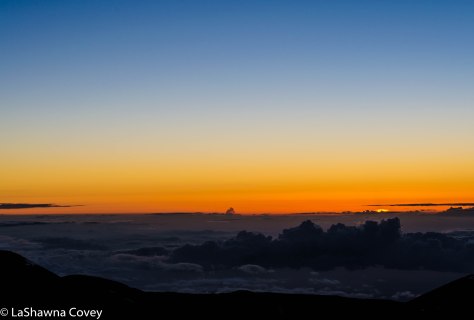
A tour will last around eight hours from afternoon pickup, to a dropoff late at night. However, we felt the cost (around $200 per person) and the time were worth it, since we were finally able to see the colorful majesty that is a Mauna Kea sunset.


Hawaii Big Island Volcano Lava Viewing


Big Island volcano viewing-20Several years ago, my mother and I were able to visit the Big Island of Hawaii and while we loved it, we didn’t get to see everything we wanted to see on my Big Island bucket list. One of those was lava viewing at Volcanoes National Park. The time we visited just didn’t have much in the way of flowing lava, so while the park was amazing to see, we missed out on some critical things we really wanted to see.

Big Island volcano viewing-6

I didn’t mind it TOO much, if only because it gave us a reason to go back to the Big Island at some point in the future. Thankfully, that opportunity arose this spring, since I had to use a vacation package before it expired and decided to use it on the Big Island.  Luckily, for this vacation, there was an active lava flow from the volcano. Sure, it’s not like the lava was flowing from a place that was close to any roads and you can just walk up to it, but it was still possible to view the lava.

The easiest way to see any lava at all was by viewing the Halema’uma’u crater near the Jagger Museum at Volcanoes National Park. The Jagger Museum is a short drive from the national park visitor center and has some interesting exhibits, but one of the biggest draws is viewing the lava in the crater.

Big Island volcano viewing-10

When we visited in 2011, it was possible to see a red glow in the crater after dark, but the lava pool wasn’t particularly high at that time. Combine that with some fog and rain (we visited in December, so the weather was raining most of the time we were at Volcanoes National Park), there wasn’t much in the way of lava viewing back then.

Big Island volcano viewing-1

I was thrilled when I was reading up on the lava flow before our most recent vacation, so I figured there was a pretty good opportunity to see some lava, even if it was from a distance. We spent one very long day at Volcanoes National Park, and that enabled us to view the lava flow from a couple different vantage points.

Big Island volcano viewing-2
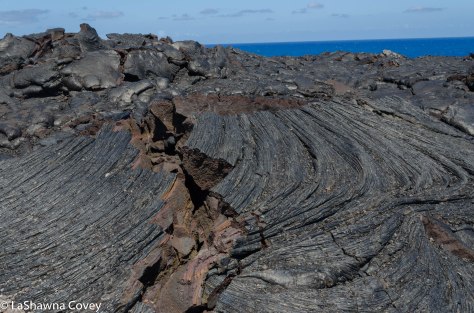
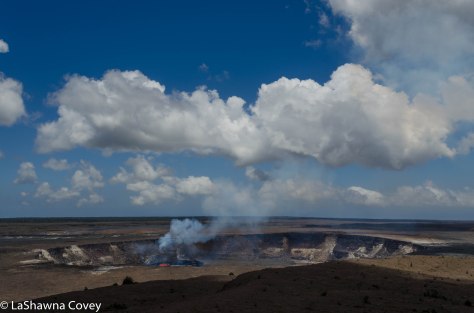
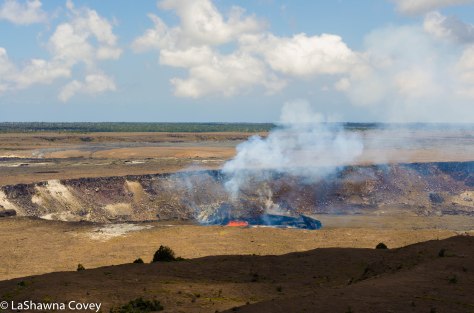
The lava view from Halema’uma’u crater was much better this time around, since the lava flow was much more active. It was even possible to see some lava during the day. The viewpoint at Jagger Museum is about a mile from the crater itself, and is positioned well to see inside the crater. Big Island volcano viewing-11
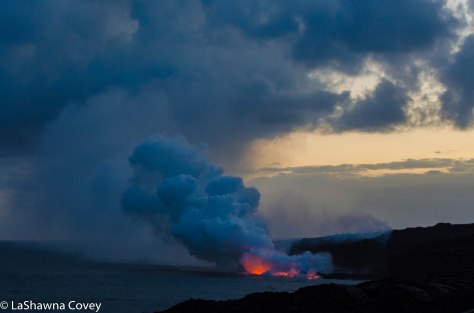
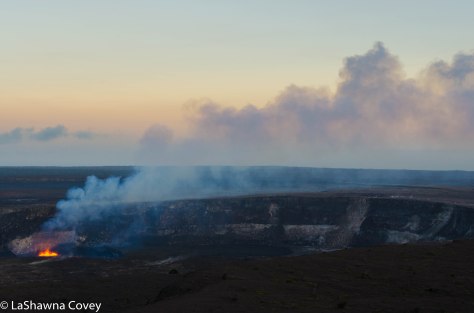
At night, the lava glow was even brighter than during the day. We got to the museum well enough before sunset, so we would have a good viewing spot before the hordes of crowds arrived. As the sun was setting, the moon was rising over the crater, with the cool white glow of the moon contrasting well with the warm red-orange glow of the lava.


Big Island volcano viewing-12

Big Island volcano viewing-13

However, if you want to view a more active lava flow (even from a distance), it is currently possible.  It just requires a bit more preparation and physical effort to make happen. The lava is currently flowing into the sea between the border of the Volcanoes National Park to the west and the Kalapana housing subdivision to the east, and it’s possible to approach the lava viewing sites from either direction.

Big Island volcano viewing-4
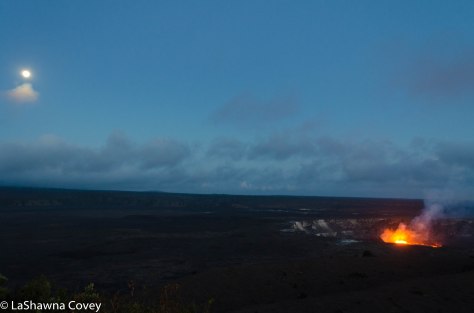
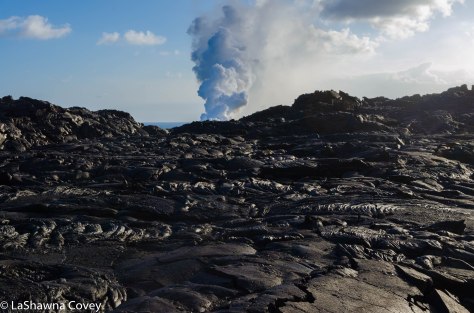
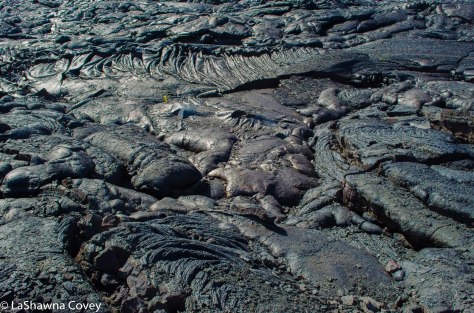
Either way is going to involve a multi mile trek to the lava viewing areas. When we visited Volcanoes National Park, we started walking from the visitor center at Chain of Craters Road (the farthest you can take your car before the road is blocked off to normal vehicular traffic).  This stopping point is a great point to get a view of the steam rising off the lava flow as it meets the ocean way off in the distance, and get a good look at the effect of the multiple lava flows over the years on the surrounding area. Big Island volcano viewing-3

The area was actually a bit different from our 2011 visit. At the time, the lava flow went all the way across Chain of Craters Road so the road was blocked in the same place as now, though it was possible to walk over the lava. It was very interesting to see all the cooled and hardened lava, but it was pretty hard to walk and we didn’t stray far from roadblock. However, a few years back, the road was scraped of the lava and replaced with a gravel road. The point of this was for any potential emergency evacuations, but the end result is that it is possible to walk the road to about a mile from the lava viewing site.

Big Island volcano viewing-7

From the Chain of Craters road, it is about a five mile walk to the lava viewing area, with about four of those miles on the scraped gravel road. Initially the walk was simply a lark to see how far we could go. When we started out, we didn’t quite realize the road was scraped all the way in, so we were just strolling along, figuring we would hit the end of the road soon enough and we’d turn around. We were definitely unprepared for any sort of distance walk (since neither of us expected to actually walk all the way to the lava viewing area), because we started out mid day when the sun was pretty fierce (the weather was actually warm and gorgeous every day we were in the park area) with minimal water. After about a mile, my mother turned back to the car, and I kept going, just to see how far I could get. However, I turned back after about 2.5 miles. I just didn’t have the supplies to make it there and back again safely. But that wasn’t the end of it, because we decided to try the other way to view the lava.

Big Island volcano viewing-8

The Chain of Craters road approaches the lava flow from the national park in the west, but it is also possible (and right now easier), to approach the lava flow from the east. This land is on county land is a remnant of the former Kalapana housing subdivision that was eventually destroyed by multiple lava flows over the years. This approach is not only easier in a few ways, it is also more fun, and it results in a somewhat closer view than approaching from the national park side.

Big Island volcano viewing-9

I read up online in advance that it is possible for visitors to walk the four miles on the scraped gravel road to the viewing site (which is a pleasant change from when county officials used to bar visitors from walking on the road due to safety and liability reasons), but many companies also rent bikes from the entrance point. Mom and I figured that it would be quicker to rent bikes, and pretty good workout in and of itself.

Big Island volcano viewing-15

We headed out a couple hours before sunset, so would get to the lava viewing site with enough time to enjoy the view during daylight and watch it at night before biking the four miles back. I am glad we biked out there (because it took half the time of walking), though I would not say it was an easy ride (but then again, I am not the fittest person around, so a fitter person would have an easier time of it). I hadn’t ridden an actual bike (as opposed to a stationary bike) in a few years, and the road was not paved, but rather gravel. As we biked out there, we could see the steam clouds getting closer and closer as we approached the viewing site. The surrounding area looks much the same as the view from the national park with undulating rolls of hardened black lava as far as the eye could see.

Big Island volcano viewing-16

Big Island volcano viewing-17

However, we still made good time out to the lava viewing area. Due to the unpredictable nature of the lava flow, and potential danger if you approached too closely, the gravel road is blocked off at about the four mile mark and you are directed to an overlook area observing the lava flow into the sea from about a one mile vantage point.

Big Island volcano viewing-18

We found a good seat and settled in to enjoy the view. At first all we could see was the white steam rising from where the lava flowed into the ocean. Occasionally, the wind would part the steam clouds and we were able to get a glimpse of a red lava glow. However, once darkness fell, the view got much better as we watched the red glow grow bigger and bigger. While we weren’t close enough to actually see the lava flowing into the ocean, we were able to see the lava itself and it was an awesome sight to behold.

Big Island volcano viewing-19

Of course after we were done viewing, we had to bike back to the entrance point. Sure it was dark out, but the rental companies make sure your bike has a flashlight to light the way. Yeah, it wasn’t an easy ride back, but we did it. We got to check off a big item on our Big Island bucket list. Sure, you can book a lava hiking tour and a lava boat tour and get closer to the actual lava, but they are not cheap (one of the top boat tours we looked at was priced at $250 dollars per person, and spent about 20 minutes near the actual sea lava flow). But it was still a lot of fun (and a great workout) to see the lava viewing independently. Just make sure you are prepared for either the multi-mile walk or bike and have plenty of water and sun protection, since there is no shade out there or any sort of facilities. But it was definitely worth the time and effort for the opportunity to see some lava.

Big Island volcano viewing-21


Haleakala National Park Sunrise and Summit Hiking

Halekala National Park summit-10

When I did my research in preparation for my Maui trip, one of the experiences that was considered a “must do” was watching the sun rise from the summit of Haleakala. I read breathless accounts of how beautiful and almost spiritual the viewing experience could be. Based on the fact that it can take a while to drive to the top of the summit, Mom and I elected to stay closer to the mountain by staying upcountry in the town of Makawao. The town of Kula is closer to the base of Haleakala, but it wasn’t THAT far away to add too much to the driving time.

Halekala National Park summit-3

We were visiting in the spring, so sunrise was around 6 am and the drive from our hotel was projected to take about 60 minutes. So to leave enough time to drive up the mountain, get a parking spot and be waiting for the sun to peek over the horizon, we left our hotel around 4 am. The drive to the entrance of the national park was quick and isolated, but as we drove the long, dark, twisty road up to the summit, we saw more and more cars and there was a line of cars ahead of us. We figured there would be plenty of time to get to the summit to enjoy the pure darkness and stargaze a bit, and since it was a weekday in the spring and it wasn’t spring break, the crowds would be minimal. How wrong we were on both accounts.

Halekala National Park summit-6

The highway up to the summit of Haleakala National Park is Highway 378, and it is really only 21 miles to the top of the summit, which doesn’t sound like it would take long at all. However, the road is a bit narrow in places (though it is a well paved road) and it is extremely twisty at points with very narrow shoulders winding around very steep drop offs. The effect is exacerbated by the inky darkness, so I slowed down a bit to make sure we didn’t drive off the mountain to our deaths. When we started the journey, it was so beautifully dark out. I mean, a pure darkness you just don’t see in cities, because there was no ambient light around, so all the stars just popped. I was hoping to get some time to enjoy it before sunrise, but there was a very long pre-dawn, and when we were about halfway to the summit, we saw it getting lighter. No, sunrise wasn’t happening earlier than we thought, but the sky was brightening up in preparation for sunrise.

Halekala National Park summit-4

Then when we arrived at the upper visitor center, which is located between mile markers 20 and 21 (the summit itself is just past mile marker 21), we saw that the parking guards were directing us to park at the visitor’s center, because the summit parking lot was full already. As it was, the visitor center parking lot was stacked multiple cars deep and they were stuffing them into the bus lanes.

Halekala National Park summit-7

There were still ample makeshift parking spaces left, but the crowd by the fence facing the crater and sunrise was packed to the gills. People were stacked up on rocks to get a higher vantage point. I walked around hoping to find an open spot that would afford a quality view, and was about to despair of finding one and settling for a blocked view behind a bunch of taller people, when Mom worked her magic. Amazingly enough, Mom is shorter than me and at times she takes advantage of the fact that she is a very short, sweet looking older lady to get what she needs. And what she needed this morning was a clear spot on the fence. So all Mom had to do to get us some good spots was politely ask some very tall gentlemen if we could stand in front of them. Since we are both so freaking short, their view wasn’t blocked in the slightest and we all got an amazing view to enjoy the sunrise.

Halekala National Park summit-9

Halekala National Park summit-8

As I said before, this morning was an extremely long pre-dawn, so we watched the colors on the horizon shift from dark blue to lighter blue to red, pink, orange and then yellow. For the most part, the sky was clear, though there were some clouds that just added to the colorful scenery. When reading up on a Haleakala sunrise visit, one of the accounts I read said that how good the experience would be depended on if there were any clouds. Meaning that if there wasn’t a cloud in the sky, sunrise is pretty but not exactly awe inspiring. However, the addition of clouds makes for more of a majestic experience as the sunlight plays across the shapes and adds depth. So I was very glad to see that there were some nice clouds, but it wouldn’t block the view of the sunrise.

Halekala National Park summit-11

Sunrise itself almost felt like a teasing experience, because it seemed like the sky was going to keep getting brighter and brighter, but no sun would emerge. However, our waiting was rewarded when the sun peeked over the horizon and shone across the clouds and the Haleakala crater. It was definitely worth the wait, the long drive and the hideously early wake up time to experience. We stood there taking it all in and capturing it with photos until the sun rose high enough that the light was basically bright and not as colorful.

Halekala National Park summit-12

At that point, crowds started dispersing, but we elected to stay and do a little bit of hiking. There are plenty of hiking opportunities on the mountain, though unless you are already acclimated to altitude, you probably want to take it a bit easy. The altitude around the upper visitor’s center is between 9,740 feet and we felt it immediately upon exiting the vehicle, along with the bracing cold of the spring morning. I have spent a fair amount of vacation time in the past at altitude, so I recognized the feelings of lightheadedness and near drunkenness. I typically adjust to altitude reasonably quickly, but even so, this is not an environment I want to run in or even walk too fast, because it is easy to feel lightheaded again and run out of breath. Since it was still just past 6 am and we had a light itinerary planned, there was no need to rush or anything. So Mom and I strolled around some of the trails to another vantage point about 1/2 mile away.

Halekala National Park summit-15

Halekala National Park summit-14

At this point, Mom had reached her fill of summit hiking and just wanted to relax. However, I wanted to hike a bit down Sliding Sands Trail which descends into the Haleakala Crater and is located a short walk from the upper visitor’s center (there are clearly marked signs directing you where you need to go). The full trail is about four miles, but it descends 2,400 feet over the course of the trail. Now while that means descending the trail is reasonably easy (though a bit hard on your knees at times), you have to be mindful that you will be ascending that entire time, and hill climbing at altitude can be a physically taxing experience if you aren’t pretty physically fit.

Halekala National Park summit-13

Halekala National Park summit-16

I knew I wasn’t going to do the entire trail, but I wanted to see some different views of the crater from inside rather than just overlooking it from a distance. I figured I would walk until I was ready to come back. The walk down wasn’t too bad. For the most part, the trail is well groomed and maintained. The initial descent was a switchback (keeping in mind I would have to come back up that way on the return) and then it straightens out. The surrounding view was for miles and distances a bit deceptive, but the different colors of the sand were just so entrancing. Every time part of me wondered if I should turn back now, I would spot another landmark in the distance and say I’ll walk to there and then turn around. Eventually I did decide to turn around after a nice stop at some natural pools and resting a bit to drink in the view and some water to gird me for the long, slow walk back to the trailhead.

Halekala National Park summit-17

I eventually did make it back to the trailhead and Mom and I marveled one last time at the amazing view before us before deciding to head back down. On the way down, we stopped at some different pullouts and viewpoints just to get a different vantage. One particularly worthwhile stop was at Kalahaku Overlook. This stop is only possible when you are DESCENDING the road, since there is no turnoff when you are ascending the road. This spot is located a bit after mile marker 19 and provides more great mountain views after a short walk. It provided a very different, but extremely beautiful view of the crater and is well worth your time.

Halekala National Park summit-18

Halekala National Park summit-19

We stopped at another viewpoint, the Leleiwi Lookout, which is located just after mile marker 17, and it had a short hike (about 1/2 mile round trip) out to a completely different view which was of western Maui, and you could see all the way to the ocean miles away. You can see a good chunk of the island and it puts it all into perspective.

haleakala-national-park-summit-20

If you are visiting Maui, I HIGHLY recommend this as a day trip. I can personally attest to how nice the sunrises can be (though they obviously won’t be on rainy days), and I have heard the sunsets are really nice as well. I can only imagine how spectacular the stargazing is up there on clear nights. We had planned on going back up for stargazing, but the clouds started rolling in, and we didn’t want to take the chance of driving up all that way for nothing, and elected not to go. But stargazing from a Hawaiian mountaintop is very much on my list of remaining must-do activities at some point in my life.

Halekala National Park summit-5

With that being said, there are a couple things to keep in mind. One of the big things is the drive time. If you are coming from upcountry, you need to budget AT LEAST 60 minutes to get to the top. Even more so if you are staying anywhere else. So that means if you want to see a sunrise, you will need to get up VERY early. Also keep in mind that this is a hugely popular activity, even in a supposed off season, so don’t expect you will be alone. Again, another reason you need to leave early. One to get there and two to get a parking spot and three is to get a clear viewing spot. The parking attendants at the upper visitor’s center were adept at dealing with the throng of traffic and managed to squeeze everybody into bus lanes. However, keep in mind that unless you are on the end, you are liable to blocked in for a period of time. The good news is that most of the people visiting for sunrise are there just for the sunrise, so they are likely to leave within 30 minutes of the sun rising. Since we planned on spending a couple more hours up top, we just had to wait for our car to be unblocked and then re-parked in a now available car parking spot. Also keep in mind that it is cold up there. I brought my fleece jacket, warm hat and gloves solely for this trip and they were definitely needed until the sun warmed me up.

Halekala National Park summit-1

If you love sunrises and you love beautiful mountains, a trip to Haleakala National Park summit is not to be missed.


Haleakala National Park Hiking- ‘Ohe’o Gulch to Waimoku Falls (Pipiwai Trail)

Haleakala National Park hiking-1

There are many pleasures to doing the Hana Highway as a two-day or more trip. I have detailed all the number of beautiful nature sights along the highway itself (the sheer number of waterfalls is spectacular, especially during the rainy season). However, there is another benefit, and that is skipping most of the tourist crush. Since most tourists do the Hana Highway as a day trip, that typically means they start early and stop mainly at the big sights or for a short time at each of the sites. That allows the multi-day trippers to start later in the morning so the sites are not as crowded when they arrive. It also allows the tourists who do stay overnight in Hana to reach Haleakala National Park before the crush of tourist vans later in the morning or early afternoon.

When most people hear “Haleakala National Park”, their thoughts assume it is just the mountain summit and immediate areas, but the park also extends from the mountain top down through the valley, the Kipahulu Gap, all the way to the ‘Ohe’o Gulch (also known as the Seven Sacred Pools), which is an absolutely gorgeous series of small waterfalls.

Haleakala National Park hiking-2

The day we went out to this area, the day was a bit cloudy, but it was still warm and a bit humid, so the scenery was not as bright as it is during a bright, sunny day. But it still felt like a lush, tropical wonderland. Since we started early in the morning, all the day trippers were still tooling along the Hana Highway, so it was not as crowded as it would become later in the day. That meant Mom and I could enjoy the waterfalls in relative peace without having to elbow gaggles of tourists aside to get a good photo.

Haleakala National Park hiking-4

After enjoying the ‘Ohe’o Gulch, I decided to hike up the Pipiwai Trail to see the Waimoku Falls. The trailhead for this hike is off the highway toward the ‘Ohe’o Bridge near mile marker 42, and there are well marked signs from the parking lot and ‘Ohe’o Gulch to get to the trailhead. The hike is only two miles from the starting point to the falls, so I decided to ditch the water bottle, which was kind of stupid on my part. While I can easily hike four miles with minimal water, this particular day was warm and a bit humid. While I didn’t come close to passing out from dehydration, I wish I had some cool water, because I was parched by the time I returned.

Since Mom and I had a full day planned, I didn’t want to take too much time ambling up the trail, so I set a fairly brisk pace for me, with a goal of less than an hour to get to the falls. The trail on the way to the falls is nearly all uphill and gains 650 feet in elevation, some of it steeper in parts than others, so I felt it a bit at the beginning. Like many hiking trails I’ve been on, the trail ascended rapidly in the beginning through a series of steps, but the trail did level off around the first mile. Haleakala National Park hiking-8

For the most part, the trail is not filled to the brim with spectacular nature. Yes, there are some very beautiful views on occasion, such as this very nice waterfall, Makahiku Falls which drops 200 feet (not obvious when looking at it from the overlook), that was located about 2/3 mile into the hike. When I was hiking the trail on this day, I didn’t see any lookout to get a very clear view of the entire waterfall, but I was able to get some reasonably good shots through the foliage.

Haleakala National Park hiking-5

Continuing up the trail, I shortly arrived at a huge banyan tree just hanging out on the trail, which is perfect for photo ops. My guidebook detailed numerous side trips from this trail, but I didn’t see the trails for most of them and with my limited time, I wasn’t going to spend too much time hunting around for the trails.

Haleakala National Park hiking-6

Soon after that, I came to a couple of bridges that afforded some really nice views of the stream and some small waterfalls, which makes for a nice stop for photos.

Haleakala National Park hiking-7

After this, all of a sudden you find yourself transported to another land in the form of a thick bamboo forest. I’ve run into these type of forests in Japan, but not as much in my travels of Hawaii. I personally love bamboo forests, as the trees are just so odd looking but streamlined and beautiful. The ground during the bamboo forest was rather muddy, so it was very good that the trail is covered in a wooden boardwalk to keep your shoes clean and make it easy to walk on the trail.

Haleakala National Park hiking-9

I was starting to wonder when I would reach the falls, and shortly after exiting the bamboo forest, I came to the end of the line. The trail ends at Waimoku Falls, which is a narrow 400-foot waterfall down the rock wall. There is a sign near the falls that advise against getting closer to the falls, which many people ignore to get right in the waterfall pool. I was feeling the walk up and wishing I had some water, so I just sat back with a wide view of the falls and took all the beauty in.

Haleakala National Park hiking-10

Thanks to my brisk pace, it took me about 40 minutes to hike the two miles from the trailhead to the falls, which was faster than I had allotted for myself. I took plenty of time to catch my breath and take in the gorgeous view before deciding to head back down. The hike down was even quicker going down than up, because it was all downhill. If you are out in the Hana area, you really NEED to visit this part of Haleakala National Park (which most tourists do on their day trip, so they speed down the Hana Highway to get here before it gets dark), because the nature is just astounding. If you have the time (which I recommend you budget), the Pipiwai Trail is very much worth your time. It’s not THAT difficult, and all you need is a moderate level of fitness to see really beautiful waterfalls (assuming you haven’t overdosed on waterfalls already the time you get to the park). All in all, this was a great stop on your Maui extravaganza.


Journey to Hana and Back (All the Other Beautiful Nature)

Hana Highway #1-7

The absolutely gorgeous Hana Highway is most known for the abundance and variety of waterfalls, but there is also other beautiful nature to behold as well. One of the first stops out on the Hana Highway was at the Waikamoi Nature Trail. It is located between mile markers 9 and 10, and there are a couple nature loops. I did these walks myself, because it was raining and Mom decided to guard the car while I got wet and sort of muddy. It wasn’t pouring down rain, but there was sort of a constant drizzle. Both trails are pretty easy, though like I said, they were a bit muddy when I visited. However, at one point, there was a nice view of the green valley (a common theme at many of the stops along the Hana Highway).

Hana Highway #2-1

Hana Highway #2-2

Thanks to my guide book, Maui Revealed, I knew that you could walk a bit from the main trail and come to a pretty waterfall. Yes, I did say that this post was going to be about everything but waterfalls, but just one more (since my Hana Highway waterfall post was just packed to the gills with them). I followed the directions in the book, where I took the longer trail out to a picnic area and then walked past the “End of Trail” sign. The book said to take the trail to the left and walk a few minutes, where it would lead to a stream an dam. I think I must have missed some critical step because I didn’t find myself where the book described. I took one path down a bit, but then it started getting super steep and slippery so I hiked back up and tried another wider path that was more like a road. I eventually did come to a nice view that overlooked the top of a waterfall, but I don’t think I was where I was supposed to be. However, the rain started picking up and we had many, many more stops along the way, so I turned back and walked to the car.

Hana Highway #2-3

We made a stop in Ke’anae, and the turnoff road is between mile markers 16 and 17. You pass a stand called Aunt Sandy’s selling pretty good banana bread and then come to the end of the road at the Ke’anae Peninsula, which opens up right onto the seas. In the past, there used to be a small village there, but thanks to a massive tsunami in 1946, all the buildings but the stone church were destroyed. However that church still remains standing to this day.

hana-highway-2-12

In addition, the view of the sea is absolutely marvelous from this vantage point, and the day we were there, the sea was churning mightily with some powerful waves crashing against the young lava rocks.

Hana Highway #2-7

Hana Highway #2-8

We made a brief stop at Wailua Valley State Wayside, which is just before mile marker 19. It is a short trip up the stairs, but at the top, you have a wide open view of the Ko’olau Gap with the lush green valley laid out before your eyes and a far off waterfall visible (at least at the time I visited, because it was raining).

Hana Highway #2-10

My next stop is probably the weirdest, and it is extremely easy to miss if you don’t keep your eyes out for it. But there is a small lava tube cave just off the right (mountain side) two turnouts past mile marker 23. But if you know what you are looking for, you will spot it and know you are in the right place.

Hana Highway #1-4

Yeah, on the face of it, it might seem stupid to crawl into a hole off the side of the road when you don’t know what’s down there. But Hawaii really isn’t filled with creatures that can kill you, so you are probably safe. I crawled into the cave (make sure to bring a flashlight, because it does get dark, and there are plenty of loose rocks to fall on if you aren’t paying attention). But inside, you can scramble through the 140 foot long cave and come to an opening in the forest where you can climb out and see inside. Overall, it is a different diversion and a nice break from all the waterfall beauty.

Hana Highway #1-3

Hana Highway #1-2

Just a few miles before you reach the town of Hana, there is a very nice beach stop at Wai’anapanapa Park. The turnoff road for the park is located just after mile marker 32. There is ample parking there, and plenty of signs for things you might want to see. Most of our time was spent enjoying the coastal view and sort of frolicking on the gorgeous black sand beach (sort of frolicking, because the surf was pretty rough that day- even though there were a couple local surfers riding the waves out there).

Hana Highway #2-9

There is an easy trail that leads down to the  volcanic black sand beach, known as Pa’iloa Beach and right when you get down to the beach, there is a small sea arch that looks like a cave. You can walk into it and enjoy the sea view from a different angle.

Hana Highway #1-9

We spent some time just enjoying the texture of the beach and the beautiful black stones.

Hana Highway #1-8

Hana Highway #1-11

We eventually left, because the tide was coming in and we were only a couple hours from sunset and we wanted to get to Hana and settle in at our inn before it got dark. But it was still amazing to witness the awesome power of the ocean crash into the beach. I have always had a thing for stormy beaches and crashing waves, and there was an abundance of both on this day.

Hana Highway #1-10

The town of Hana is small, but nice. There aren’t THAT  many hotels out there (since most tourists do the Hana Highway as a day trip), and most the hotel rooms are sort of inn rooms or Air BnB type rooms in someone’s house. Our particular inn room was very nice with an outdoor shower, which is one of my favorite things when visiting the tropics. We got up early the next morning to head out to Haleakala National Park for some hiking and waterfall viewing (subject of my next blog post), but we had a nice sunny morning to start the day in Hana.

Hana Highway #2-18

If you have the time, I would highly recommend staying overnight at Hana. It gives you that much more time to stop and see the numerous beautiful sights on the Hana Highway. It allows you to really enjoy the scenery rather than just zooming by it or just taking a minute, because you have a packed itinerary to complete in a day. It is also likely to help you avoid the crush of the tourists. Overall, I think taking your time on the Hana Highway will allow for a deeper traveling experience.

Hana Highway Journey to Paradise and Back (Nothing but Waterfalls Edition)

Hana Highway #2-14

When I was researching my trip to Maui, my guide book touted the Hana Highway as one of the “must do’s” on Maui. The 35 mile drive along Highway 360 is considered one of the most iconic drives in the world, since the windy, twisty road is like driving through a  remote tropical paradise, like Jurassic Park (assuming it is not overrun with tourists when you do the drive).

Hana Highway #1-5

A 35 mile one way drive to Hana doesn’t sound like that much, but the trip turns out to be longer than you might think. First off, this road is one of the curviest roads I have ever driven. Supposedly it has 600 turns, though I didn’t really keep count. What I do know is you will probably never go faster than 35 mph for very long, because you are always slowing down for a tight turn, and there are many, many one lane bridges that you have keep a watch out for oncoming traffic.

Hana Highway #2-4

Plus, this is not a road you want to speed. The drive to Hana is very much about the journey and not the destination, because while the drive to Hana (and beyond) is so beautiful, there is not anything exceptional in the village of Hana. There are so many stops of exquisite nature on the road to Hana that it seems like every few minutes, you will be stopping at something to admire and gawk.

Most people do the Hana Highway as a day trip, and it is entirely possible to do it in one day. However, know that unless you start very early and finish late, you will probably not be able to see everything (assuming you want to see as much as possible), so you will have to pick and choose what stops are the most important to you, or at the bare minimum, not allot much time at each stop. Since Mom and I weren’t in any hurry, we decided to make the trip out of Hana into a two day affair and spend the night at Hana. That allowed us to leave a bit later in the morning, thus letting any sort of tourist crush get ahead of us, and then take our time on the way out to see everything we wanted to see, knowing that we would have a full day to see anything we missed on the way back.

Hana Highway #2-5

The day we drove out to Hana was warm, but rather cloudy and rainy. Everything still looked like a lush, green, very wet paradise, but we had to balance it with taking advantage of the breaks in the rain, and in some case, going out to the views myself and taking all the pictures while Mom stayed in the nice, dry car. The nice thing about all the rain though, is that the waterfalls were full, and there were just so many waterfalls to stop and gush at.

We undoubtedly would have missed some critical stops along the highway if it was not for my trip making guide book, Maui Revealed. There are some signs for a few of the sights, but for many of them, you have to know what to look for, because they are easy to drive by and miss. The nice thing about this book is that all the sights are listed in relation to the highway mile markers, so you have a pretty good idea when something is coming up. The ONLY problem we ran into, is that some of the mile markers from 9-16 seemed to be missing, though maybe that problem has been corrected since we visited. That resulted in us having to occasionally guesstimate where to stop, but for the most part, we were able to figure it out.

Hana Highway #2-15

There are so many waterfalls to enjoy that honestly some of the waterfalls start blurring into the next, and it can get a bit difficult to keep track of where you are. If you really want to know which waterfall you are at to remind yourself later, it’s probably best to write down the photo number and the location. Every time you get out of the car, you can barely see any surrounding roads, so it just seems like you are alone in a lush, super green, and while we were there super wet paradise. When we were there, all the foliage around us was thick and green, broken up only by the white of waterfalls, the black of the seaside cliffs and the blue of the sea. And for the most part, we were on our own. I think it was because we were there in the off season, mid week, and it was raining, but we avoided the crush of tourists that are certainly possible during this drive.

Hana Highway #2-17

One of the first waterfall highlights we stopped at was Lower Puohokamoa Falls, just short of the 11 mile marker. There is a tiny pullout on the sea side of the road, and it is easy to miss (look for the telephone pole), so we had to turn around and go back. Right by the pole, there is a muddy trail (assuming it has been raining like it often is) that leads you down the hill. At first, I wondered if the short hike was worth it, but other persons I ran into said to keep going, because it is worth it. You will know when you are in the right place, because the foliage opens up and you see the falls amidst the greenery.

Hana Highway #2-6

What makes the Hana Highway such a fun drive is that a good chunk of the waterfalls are basically just off the roadway, so you can see them very easily from the road, or with just a short walk. The bad thing about all of this goodness, is that there are few very parking spots alongside the road, and the road is often narrow. You can often find a pullout for a car or two near the bridges, but other times, you might have to park a bit away from the waterfall and then walk along the road back to the site. That is when it is nice that most people (or at least most tourists) drive pretty slowly along the highway.

Hana Highway #2-11

One of the easily photographed waterfalls are the Upper Waikani Falls (sometimes called the Three Bears Falls), which are located between the 19 and 20 mile markers. These falls will vary fairly dramatically, depending on the time of year and the flow of water. This particular time, the water was flowing pretty well, so it all looked like one falls.

Hana Highway #2-12

Just short of the 21 mile marker, we drove by the Wailua Iki Falls. The falls viewable directly off the road are pretty, but the true majesty of the falls isn’t viewable until you walk (or drive) up a little further on the road toward Hana. The road twists a bit and rises a bit in altitude, and that vantage point shows the truly wondrous view of the lush valley and full falls above and below the road. That view is the title photo for this blog post.

Hana Highway #2-13

A quick and easy stop for some light and easy waterfall viewing is at Pua’a Ka’a State Park, located between mile markers 22 and 23. Unlike most stops along the Hana Highway, there is plenty of parking and even a bathroom. The waterfalls are small, but still pretty to enjoy for a bit.

Hana Highway #1-1

The Hana Highway doesn’t actually end in Hana. Highway 360 continues, though the mile markers shift and start counting down from mile marker 50 once you get past Hana. On the first day of our trip, we just went as far as Hana, because we were staying overnight. I am glad we made the choice to stay overnight, because it gave us the opportunity to just relax and take it all in. The last major waterfall we stopped at on the Hana Highway was Wailua Falls. We saw it the next morning as we were driving out to Haleakala National Park to see the sights there and do some hiking (which will be in another blog post). Wailua Falls is right off the road, right around mile marker 45 and is the bridge over Wailua Stream. This is a major stop on the highway, so there is a decent sized parking lot. However, since it is a popular stop, many tour vans and buses will stop there, so don’t be surprised if you see a crowd. Luckily they usually don’t stay there long and will disperse.

Hana Highway #2-16

If you love waterfalls, you should just adore the Hana Highway. There are just so many waterfalls in so many different configurations, and none of the waterfalls look the same.