Queen Charlotte Track Day 3- Punga Cove Resort to Portage Resort Hotel

Queen Charlotte Day Three-8

The third day of the Queen Charlotte Track happened to be the longest, hardest slog of the track, AND it also happened to be Christmas Day. So this day was sort of a day of treats. The first treat was Mother Nature’s Christmas gift to us hikers. The day was bright, warm and sunny- a complete contrast from the day before. It’s amazing how much some sunshine can transform a natural setting from blah to astounding. The second treat was the “treat” I gave my body that day, though I’m sure it eventually thanked me later after it stopped aching and I got some deep sleep.

Queen Charlotte Day Three-1

Queen Charlotte Day Three-4

Queen Charlotte Day Three-3

Like I said earlier, today was the longest day of the track. It was 24.5 kilometers and it took me eight hours to get to my next destination of Portage Resort Hotel, though granted, that time included stops for rest, photo opportunities and lunch. I was particularly grateful today to only have to carry a day pack, and even though Cougar Line doesn’t operate on Christmas Day, they transferred my pack to my hotel the night prior. The sun was hot and bright for the duration of the walk (sometimes it felt too hot and bright). Part of the walk was under well-shaded forest trees, and other parts were on top of the exposed ridge line. The views of Endeavor Inlet, Kenepru Sound, Marlborough Sound and the like were astounding.

Queen Charlotte Day Three-2

Queen Charlotte Day Three-6

Queen Charlotte Day Three-7

This walk also had some of the steepest inclines, and my poor calves were screaming at me to stop at times. In particular, they nearly rebelled during the short, but VERY steep climb up to Eatwell’s Lookout that gave me a panoramic view of the sounds. Lunch was also on a bench in front of a particularly scenic view.

Queen Charlotte Day Three-11

Queen Charlotte Day Three-10

Queen Charlotte Day Three-9

The worst part was the last two hours. It wasn’t difficult. In fact, it was mainly a gentle ascent and descent of the trail. But by that point, I had been walking six hours and I was hot, tired, and fantasizing about a good shower and a massage. But I made it to my destination, which was my third treat of the day.

Queen Charlotte Day Three-6

I spent the night at the Portage Resort Hotel, and it was wonderful to indulge in a small bit of luxury amid all the huts and hostels I normally stay at. My hotel room had an excellent view of the sound, and I capped off the day with a cool swim in the unheated pool by the beach. My day ended with a very tasty (though rather pricy) Christmas Day buffet. Though it was kind of funny how the maitre’ d didn’t even have to ask my name when I showed up to be seated. After all, I was the only one who booked a seating for one. By the end of the evening, I pretty much crashed into my bed for a long summer’s nap (I was in the South Hemisphere after all).

Queen Charlotte Day Three-12

Queen Charlotte Track Day 2- Furneaux Lodge to Punga Cove Resort

Queen Charlotte Day Two-4

The second day of the Queen Charlotte Track was an easy day of walking, and I originally intended for it to be a relaxing day outside by the shores of the sound, maybe even do some kayaking. But a little thing called Mother Nature had different plans. The morning was gray and cloudy with a chance of rain.

Queen Charlotte Day Two-3

I set out early, wanting to arrive at my next destination, Punga Cove Resort by lunchtime. I also hoped it would stay dry for the entirety of the walk, but it was not to be.

There were intermittent sprinkles to mild showers for my entire walk. But amazingly enough, it wasn’t actually cold. It actually felt cooler the day prior with the wind and bright sunshine.

Queen Charlotte Day Two-1

The trail was actually very easy. Most of it was flat and near the shore, and the ascents and descents were very gentle. The trail was mainly coastal forests, but there were many glimpses and views of Endeavor Inlet. However, the colors of the foliage and of the water weren’t nearly as bright today, thanks to the gray pallor and clouds that hung over the Sound.

Queen Charlotte Day Two-2

This day’s hike was 12 kilometers and took me three and a half hours. The weather didn’t really unleash until I arrived at the Punga Cove Resort, thankfully. The rest of the afternoon consisted of increasing rain and harsh gusts of wind. I safely and dryly enjoyed the gorgeous view from my room balcony. Instead of partaking in outdoor activities, I curled up with a good book.

Queen Charlotte Day Two-5

the view from my hotel room at Punga Cove Resort

I capped off the day with a melt-in-your-mouth dinner of venison in blackberry sauce and some more local wine (I adore New Zealand wine). It was certainly a sedate Christmas Eve, unlike my typical ones where I booze up alone and watch Bad(der) Santa on DVD.

Punga Cove venison dinner

Queen Charlotte Track Day 1- Ship Cove to Furneaux Lodge

Queen Charlotte Day One-1

Picton Harbor

Like usual, the day started early (I say that a lot, but whatever, it’s true), because I was scheduled to start the four-day Queen Charlotte Track. This was the second of three multi-day tramps I was doing in New Zealand. I only had a one full day between the Abel Tasman and Queen Charlotte tracks, but I was ready. This track is set in the Marlborough Sounds, which is in the northeastern part of the South Island. This track takes you through lush, coastal forests, but these forests are different than the ones on the Abel Tasman Coastal Track. This track is also filled with steep uphills and downhills, wide open views of the Marlborough Sounds from exposed ridge lines, and the occasional mountain biker (though I only saw them on the last day).

Queen Charlotte Day One-9

This walk is more difficult than the Abel Tasman Coastal Track. This one is four days (though if you wanted to, you COULD shave some time by combining the first and second days’ worth of walking into one long day of walking, if you so desired). The track length is 71 kilometers, the changes in altitude are also greater, and the trail grades are sometimes steeper and less well-benched. However, in other ways, I almost consider the Queen Charlotte Track to be a luxury walk. Most of the other multi-day tramps require you to stay in campsites, or huts (which like I said before is basically camping indoors), and you have to carry your own pack (no Sherpas available for hire in New Zealand) with everything in it (e.g. food, bedding, stoves) to last you for the entire hike.  But not the Queen Charlotte Track. This track has plenty of  very nice, private hotels available to stay in. Accommodations with quality rooms, real beds, electricity, real bathrooms and showers, wireless Internet, and restaurants. Even better, there are water taxi services, like Cougar Line, that will transport your packs from accommodation to accommodation for a fee, so all you have to do is carry a day pack on the track with you.

Queen Charlotte Day One-10

The track starts at Ship Cove, which is about a one hour’s boat ride from Picton. The boat ride was very pleasant, because the weather was sunny and warm enough. On the way, we stopped to watch a pod of dolphins (including some baby dolphins) swimming toward Picton.

Queen Charlotte Day One-3

Queen Charlotte Day One-2

There is no road access for a decent chunk of this track, and the start is no different. At Ship Cove there was a monument to Captain Cook who stayed there four times over the years. It was also a nice place to enjoy some breakfast at picnic tables, while I let all the other walkers get ahead of me.

Queen Charlotte Day One-4

The track ascended very quickly and steeply for the first 45 minutes to the lookout over Motuara Island, Queen Charlotte Sound, and Resolution Bay. My poor calves woke up screaming during the initial ascent, and I was glad I had my walking sticks with me.

Queen Charlotte Day One-5

Queen Charlotte Day One-6

After that, the track dropped steeply to Schoolhouse Bay campsite and Resolution Bay cabins. While the track did ascend again, the trail grade was much gentler, so I found the trail rather easy to ascend. At the top of the saddle, I was rewarded with an astoundingly beautiful view over Endeavor Inlet. In fact, I could see the area where Punga Cove Resort was, which was my lodging for my second night on the track. This was a perfect spot for lunch to give me more time to drink in the view.

Queen Charlotte Day One-7

Queen Charlotte Day One-8

From here, it was only a 90 minute walk to my lodging at Furneaux Lodge. The trail descended just as gently and I was treated to occasional views of Endeavor Inlet on my way down.

Queen Charlotte Day One-11

Queen Charlotte Day One-14

Soon I found my way to Furneaux Lodge, which was a very nice establishment right on the shores of Endeavor Inlet. The lodge has a sort of British-style charm to it. I stayed in one of the backpackers cabins, which was a rather comfortable four-person room, though I had the room to myself, with a nice view of the water.

Queen Charlotte Day One-12

Queen Charlotte Day One-13I capped off the day with an absolutely scrumptious dinner of gourmet chicken burger (w/ smoked bacon, brie cheese, avocado, and apricot relish) and a refreshing glass of local Gurwurtztraminer white wine (one of my favorites). The first day of the track was 15 kilometers of walking and took me around five hours, but that included an extended lunch break and numerous photo stops. The weather was perfect, and it was nice to sleep in a real bed.

Abel Tasman Coastal Track Day 4- Awaroa Bay to Totaranui Beach

Abel Tasman Day Four-3

You guessed it: I started early this morning, but this time it was required. Right in front of Awaroa Hut is Awaroa Inlet, and it MUST be crossed. There is no all tidal track alternative like every other part of the track, so it must be crossed two hours on either side of low tide. In this case, low tide was around 0630. So when I woke up early, for the first time, I wasn’t alone.

Abel Tasman Day Four-1

This crossing will get your feet wet, so I initially decided to cross in my beach shoes. However that quickly proved untenable, because my shoes became filled with rocks and shells. It was less painful to cross barefoot, though I had to be careful where I put my feet. Fording shallow tidal rivers was easy, but I didn’t enjoy the rocks and shells underneath my feet. My feet are rather sensitive to pain, which is a bit surprising considering how hideous they can look if they haven’t been exfoliated in a while.

Abel Tasman Day Four-2

Abel Tasman Day Four-4

It took about 20 minutes to cross the inlet. Once across, I donned my hiking boots for the final six kilometers to Totaranui Beach, which was the final end spot for me. You can add another day of hiking out to Wainui Bay, but I elected not to when I realized that getting transportation out of that site was rather difficult. Most of the hike was again in lush coastal forests and up hills and down hills. Occasionally a sea view would emerge and then the final beach trek at Waiharakeke Beach.

Abel Tasman Day Four-5

Abel Tasman Day Four-7

Knowing only 30 minutes of walking remained made the very last series of steep switchbacks easier to bear. The final look out was at Skinner Point, and I could overlook the promised land- or at least my final destination of Totaranui Beach.

Abel Tasman Day Four-8

10 minutes later, I gratefully dropped my pack in the shade of trees as I finished and arrived at the beach. It was four days and 38 kilometers of beautiful coast walk. There are busses and water taxis for the return journey, but I elected for the bus, because it would take me back to Nelson in less time and less money than it would have cost me to take a water taxi back to Marahau and then a bus back to Nelson. The only thing that stood between me and a refreshing shower (which I needed very much) was a three hour bus ride back to my hostel. But I did it. I completed my first multi day hike and I was ready for more.

Abel Tasman Day Four-6

Abel Tasman Day Four-9

Abel Tasman Coastal Track Day 2- Anchorage to Bark Bay

Abel Tasman Day Two-2

This morning , the second day of hiking, was even earlier for me than normal. It’s funny that when I am at home on normal weekends, I often like to sleep in. But on vacations, I am usually up early to take advantage of the day. Of course it is also easier, because I tend to fall asleep earlier, because I don’t go out and party. And since there was no electricity or Internet at the Anchorage hut (or any of the Department of Conservation huts for that matter), and I was hiking alone, I was down for the count by 2100 to get a full night’s rest.

Abel Tasman Day Two-1

I woke up at 0530, shortly after sunrise. In fact the moon and the sun were out at the same time. This morning was earlier than normal, because I wanted to use the low tide track across Torrent Bay to shave off 3 kilometers or one hour of walking. It doesn’t sound like a lot, but my foot was still hurting from the previous day’s blister, and my body was still getting used to carrying a multi-day pack. The day’s walk was only 9.5 kilometers, which equated to only three hours of walking. But I needed to be across the bay by 0730 before the tide rose too high for me, since I could only use the low tide track two hours on either side of low tide, and I had to take the all tidal track.

Abel Tasman Day Two-3

So away I went, and it was an excellent decision. It was the first time to walk across a tidal track at low tide. I crossed Torrent Bay by following the orange disks which mark the trail in places like beaches and tidal flats when the trail isn’t obvious. But most of all, the reason my early start was a good one, was because I had the track nearly entirely to myself. Most people were still sleeping when I started walking. In fact, I only saw one other person on the track until I had nearly completed my day’s walk. It was awesome to practically have the park to myself, and enjoy the beautiful nature in peace and solitude.

Abel Tasman Day Two-4

Abel Tasman Day Two-6

The track wended its way up and down hills and across the river. Most of the time I walked in lush, beautiful coastal forest, but every so often, the trail would open up to spectacular vistas of the sun, sea, and gorgeous coastline.

Abel Tasman Day Two-5

Abel Tasman Day Two-7

I set out so early that I arrived at my destination shortly after 0900. In fact, I couldn’t even occupy a bunk, because the previous night’s occupants were still there having breakfast and hadn’t left yet. Another advantage of being so early was getting to pick my bed. This hut had three rooms for bunks. Two of them had space for 14 bunks, but the upper and lower bunks were wide open where all seven mattresses were pressed up against each other. A room tucked in the back had six separate bunk beds, and since I didn’t want to sleep next to a stranger if I didn’t have to, I snagged one of the individual beds.

Abel Tasman Day Two-8

All I had to do all day was relax on a beautiful beach, read a book and be lost in thought. I had hoped to go swimming, but it was too cold that day. The day started out sunny and warm, but turned gray and rainy and chilly by early afternoon. That gave me an excuse to curl up with a good book (I even managed to finish the book that day).

Abel Tasman Day Two-9

Abel Tasman Day Two-11

Later in the evening, the rain stopped and I made my way down to the beach and marveled just how different it looked at low tide. It was very peaceful to watch the waves crash gently on the beach, the tidal force inexorably drawing the waves higher and higher as the tide slowly rolled in.

Abel Tasman Day Two-10

I could close my eyes and just hear the wind, the sea, and the occasional bird call, but no human beings. It was just me and nature.

Abel Tasman Day Two-12

Abel Tasman Day Two-13

Abel Tasman Day Two-14

Abel Tasman Coastal Track Day 1- Marahau to Anchorage

Abel Tasman Day One-1

This day started early (like so many of my days on vacation), because of transportation requirements, since it was a two hour bus ride to the start of the Abel Tasman Coast Track in Marahau. It was my first day walking the Abel Tasman Coastal Track, my first of three multi-day walking tramps in New Zealand. I first visited New Zealand eight years prior, and did all the beautiful nature and adventure sports. But I wanted to come back and do a few of the tramps that New Zealand is famous for.

Abel Tasman Day One-2

Due to scheduling requirements, I chose to do the Abel Tasman Coastal Track first. This proved to be a good choice, because this track is considered much easier than most tracks. The distance is not that excessive. While there are some steep ascents, they are always very short. This is a hike that can even be done in sneakers if so desired and not hiking boots. Now granted, I had to carry my large backpack every day, but the trail wasn’t that difficult. In fact, this trail was the perfect training for other, more difficult multi-day tramps I planned to do during my vacation. It got my body used to walking every day, and carrying a 25-pound pack on my back.

Abel Tasman Day One-3

Abel Tasman National Park is New Zealand’s smallest national parks, but it is one of the most popular. It is located in the Golden Bay area in the northwestern part of the South Island. This particular park is filled with golden beaches and seaside forests that reminded me of the Caribbean and Hawaii.

Abel Tasman Day One-4

The Abel Tasman Coastal Track can be done in three to five days, depending on how far you want to walk and where you want to stay. Since this park is so popular (around 30,000 persons walk at least part of the Abel Tasman Coastal Track per year), persons can’t stay overnight in the park unless they have reserved a place in a Department of Conservation hut or campsite. Since I am not a fan of camping, I went with staying in huts. I elected to walk 38 kilometers over four days. This ensured that I walked no more than four hours a day, which left me ample time to relax on site and enjoy the beautiful beaches and other nature.

Abel Tasman Day One-6

My first day was hiking from Marahau to Anchorage, which was only 11.5 kilometers or four hours of hiking, so I was done with my walking for the day by lunchtime. After years of hiking in Korea, this trail was a dream. It was wide, well-graded, and well-benched. There was no scrambling over boulders or anything like that. It was walking on a well-designed trail that enabled me to fully enjoy the beautiful nature around me.

Abel Tasman Day One-6

There were plenty of people on the track during my walk. Part of it was that I didn’t start walking until mid morning so more people were awake, and I was with a group of people who came on the bus with me. Plus there were a lot of people doing day walks by walking either to Anchorage or from Anchorage. Water taxis went to all parts of the park, so it was easy for day trippers to come and visit and walk part of the track if they so desired.

Abel Tasman Day One-7

At first I thought most of the track would be on the beach, but that is not the case. While small parts of the track are on the beach, most of the track is a bit inland through a shaded lush coastal forest, and every so often emerge to be rewarded with spectacular views of the lush coastline and the pristine blue water.

Abel Tasman Day One-8

Abel Tasman Day One-9

Anchorage was a popular site for visitors, so when I arrived there, there were plenty of people sunning themselves on the beach and enjoying lunch. There wasn’t much else to do, but walk along the beach, swim in the sun-warmed water and relax in peace. A short 15 minute walk from Anchorage is Te Pukatea Bay camp site, which is right on a quiet, isolated beach. If you wanted some solitude, this was the best place to get it.

Abel Tasman Day One-11

My body was surprisingly hurting after the first day. Part of that was undoubtedly because I developed a blister on my heel that would plague me for the rest of the track. But even the rest of my body was a bit sore. While I’ve hiked plenty of day trips, this was the first time in a while I carried a sort of heavy pack on my back.

Abel Tasman Day One-10

While I was staying in a DOC hut, it is basically camping indoors. These huts have mattresses and flushing toilets, but that is about it. There is no electricity, no gas cookers. If you want hot food, you have to bring your own stove and make it yourself, since there is no food sold on site. There are no showers, and of course there is no Internet. So it was just me, beautiful nature, and a fully charged e-reader for when the weather turned south. It meant relaxing on the beach, which is something I don’t typically do for long periods of time.

Abel Tasman Day One-12I ended up falling asleep before the sun went down, which isn’t that difficult when the sun doesn’t set until after 2100 at night. I woke up in the middle of the night. Everyone was asleep, and it was dark and silent outside. The nearly full moon was out in force, shining its cold, pale light over the beach with the lapping waves. It made me feel very connected to the natural world. It was a good way to end my first day of hiking.

Seoraksan National Park Day 1- Searching for Autumn Colors

Seoraksan day 1 beautiful view from Ulsan Bawi

Last weekend I kicked off my autumn hiking season with a long weekend at Seoraksan National Park. My favorite time of the year has arrived in Korea and I intended to enjoy the beautiful nature to the fullest. I have a whole season full of hiking planned at national parks throughout Korea. I have been to Seoraksan National Park the last time I lived in Korea, but that was actually only one day of hiking, so I wanted to enjoy it more and hike many different trails in the park.  Seoraksan National Park is one of the most popular national parks in Korea, for good reason. The hiking is amazing and the scenery is so beautiful. It’s nice any time of the year, but its true charm comes out when the fall colors ablaze everywhere. It’s also when the crowds come out, but that is just something you just deal with to enjoy yourself.

It’s very easy to reach Seoraksan National Park. The nearest large city is Sokcho and there are numerous busses departing from  the Dong Seoul bus station and Seoul Express Bus Terminal (about every 30 minutes during the day). The trip only takes about three hours, so I took an evening bus to Seoraksan Thursday night, so I could start hiking early Friday morning before the crowds hit. To make it easy for hiking, I chose to stay at a motel (The Seorak Morning Inn) in the village of Seorak-dong, which is about a 1.5 km easy, pleasant walk or short bus ride to the park entrance.

I picked Seoraksan as my first hiking weekend, both because I had a long weekend to do all the hikes I wanted in the time available, and it was also supposed to be the first national park to hit peak color for autumn foliage in the middle of October. I had visions of seeing the entire hills covered in red, orange and yellow. What I found was a bit different. Due to the warm weather this, the advent of fall seems to be delayed in Korea. It was the middle of October, and while there were leaves changing, it was not as much as I expected. But I valiantly set out in search of autumn colors.

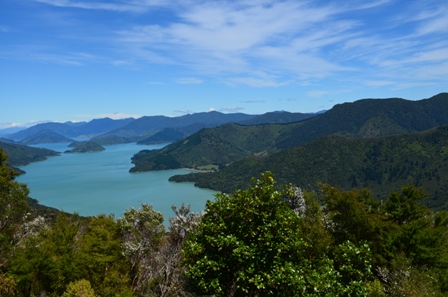
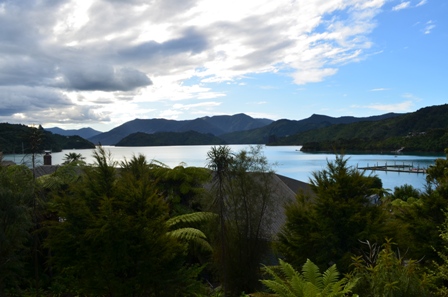
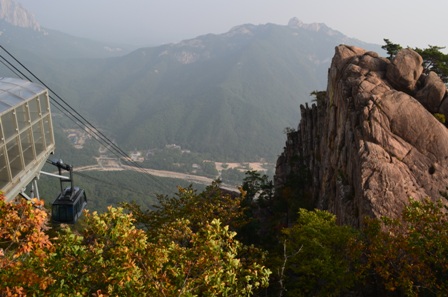
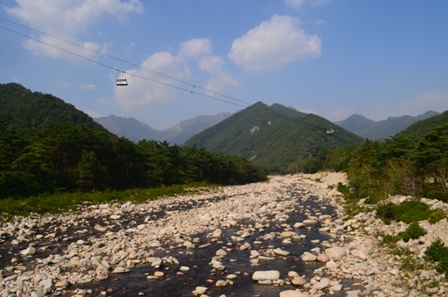
My first day in the park was a Friday, so while there were people there, it certainly wasn’t as crowded as it is on weekends.  Of course it also helped that was I an early bird and arrived at the park shortly after it opened. The first thing I did when I got to the park (before the lines got too long) was take the cable car up to Gwongeumseong (Gwongeum Fortress) which is the ruin site of an old castle. The cable car ride is only about six minutes up, and it takes you to a hill with a beautiful view over the valley below and the mountains surrounding the hill.

Seoraksan day 1 cable car to Gwongeumseong

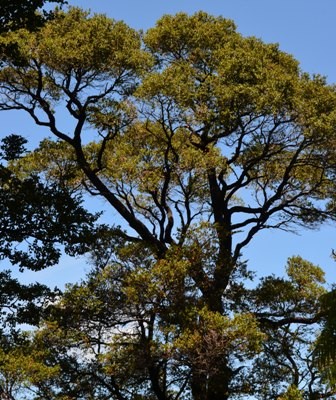
The weather was a bit hazy at first, since it was early morning. But I could see patches of orange and yellow among the abundance of green trees.

Seoraksan day 1 Gwongeumseong view

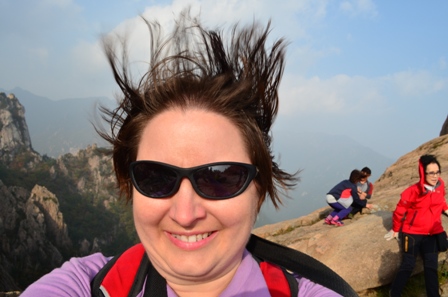
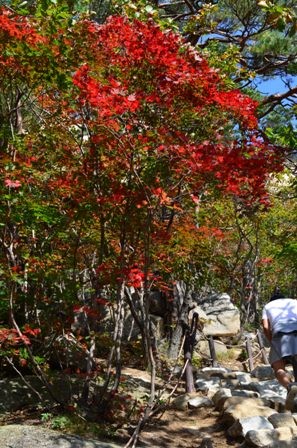
It was SUPER windy at the top of the hill. See the picture below for just a hint at how windy it was. At times the gusts were so strong, I felt like I was going to be blown off the mountain if I lost my footing.

Seoraksan day 1 super windy me on top of Gwongeumseong

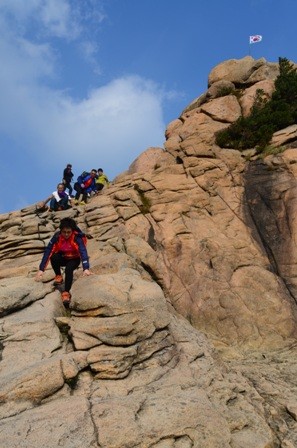
My ultimate goal was the top of Gwongeumseong, which was marked by the Korean national flag blowing in the wind. Getting up was interesting, because the path was a bit narrow in parts, and I had to pull myself along with a rope during parts of the ascent. And it was even windier on top of the mountain.  Like always, I personally found it easier to ascend and climb up rather than descend and climb down. Coming off the mountain was an interesting journey. When you see nimble, able Korean hikers descending on their butt, you KNOW it is a bit treacherous for someone like me who is clumsy and decidedly not sure-footed. But I made it in one piece, ready for more hiking.

Seoraksan day 1 Gwongeumseong treacherous path

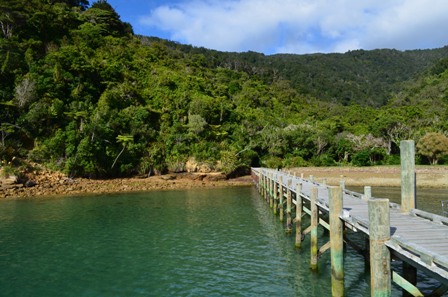
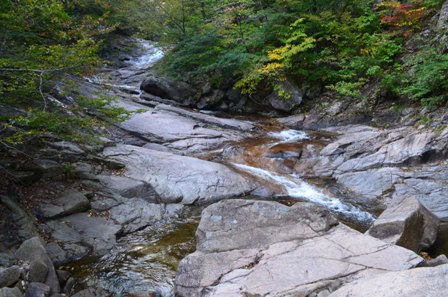
The second hike of the day was an easy hike to Biryong Falls. It was only 2.4 kilometers with no major uphills. Instead it was easy and pleasant to hike along the trail, enjoying the view around me. The hike starts a few hundred meters from the entrance to the cable car, and you can see the cable car ascend as you begin the hike.

Seoraksan day 1 cable view on trail to Biryong Falls

I was very charmed by the numerous, beautiful waterfalls and the colorful foliage during the course of the hike.

Seoraksan day 1 river view on Biryong Falls trail

I even saw more hints of autumn color on the trail. It was beginning to feel a lot more like autumn.

Seoraksan day 1 Biryong Falls autumn view

Seoraksan day 1 trail view on way to Biryong Falls

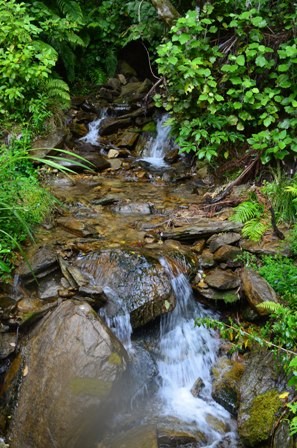
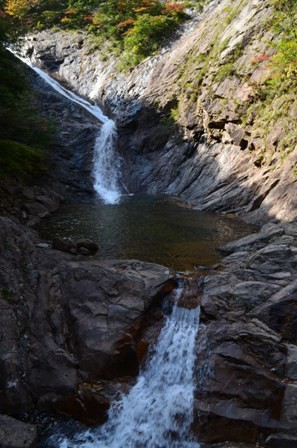
Even though the final destination was a waterfall, that doesn’t mean there was a shortage of waterfalls along the way, such as Youkdam Falls pictured below.

Seoraksan day 1 double falls view on way to Biryong Falls

Seoraksan day 1 overhead view of river

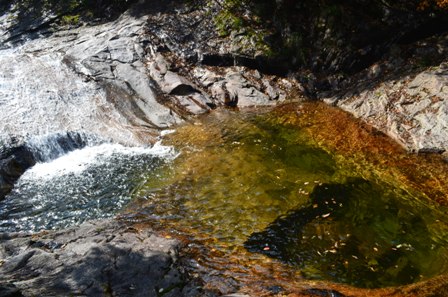
The sun kept peeking in and out from behind clouds and the trees during the walk. That highlighted the leaf colors, but it also produced interesting and beautiful effects on the rippling water.

Seoraksan day 1 shimmering waterfall pool of light

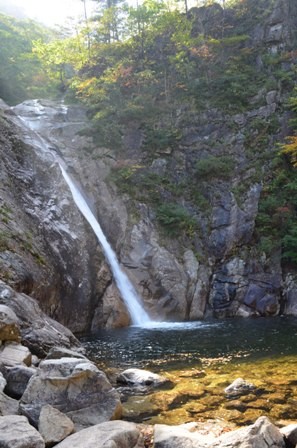
At the end of the hike is the 40m high Biryong Falls, which means “Flying Dragon”, because of the shape the water evokes. It’s a very pleasant place to sit by the water and silently take in the water and scenery or enjoy a picnic lunch with a group of other hikers, or at least partake in some of the food the very nice older women offered me.

Seoraksan day 1 Biryong Falls

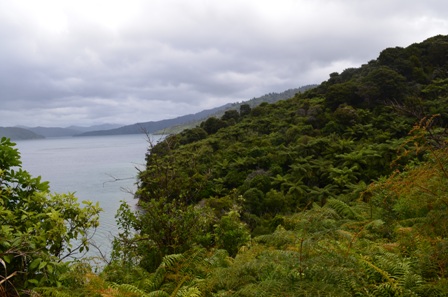
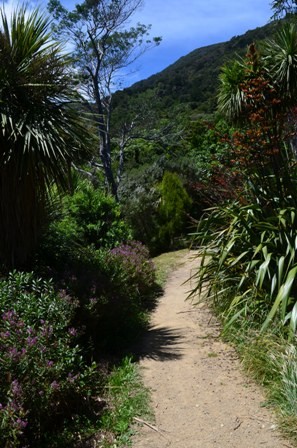
But as beautiful and peaceful Biryong Falls is, I didn’t relax, because I had one more hike planned for the day. And this hike is considered one of the most difficult hikes in Seoraksan National Park. It is also one of the popular ones, because of the beautiful, panoramic view from the top of the 876m high Ulsan Bawi. Because the first two hikes were pretty easy, I wasn’t really tired, which is good, because the Ulsan Bawi is an ass smoker, or more specifically, a thigh smoker. It starts out easy enough with beautiful scenery.

Seoraksan day 1 trail to Ulsan Bawi

But soon enough the hike reveals its true difficulty. The hike gets steeper as it proceeds to the midway point of Gyeojo Hermitage. It’s a nice place to rest, enjoy the scenery and gather your strength for the final ascent to Ulsan Bawi. From the hermitage to the top, it is only 1 kilometer, but it took me about an hour to ascend because of the difficulty and the steepness of the trail. I didn’t realize this until later when I saw a map of the trail, but the final 1 km of the trail is a 30.8% gradient, so at times it felt you needed to climb it and not just hike it. I’m in reasonably good shape, but I had to take numerous short breaks to catch my breath and allow my poor thighs to rest. But even though I was focused on getting to the top, I still was able to enjoy the colorful foliage. The higher I went, the more red leaves I could see.

Seoraksan day 1 autumn colors on Ulsan Bawi trail

I did this hike during my last visit to Seoraksan, and it was interesting to contrast the hikes. Both times the hikes were strenuous, but the trail was much more uneven several years ago. I had to spend a good chunk of my hike with my eyes glued to the ground so I didn’t trip and fall. But in the intervening years, the trail has been improved so it’s not QUITE so uneven. Wooden blocks have been placed among the stones, so it is easier to find steps.  The crowds were also much less this time around. During my last visit, it was on a Saturday afternoon, and there was literally a line waiting to reach the summit, since the summit is not that big and only so many people can fit up top. This time, there was no line, no wait. Maybe it was because it was Friday. Maybe it was because the leaves hadn’t fully changed colors. But either way, it made for a more pleasant journey. Plus a good chunk of the trail was steps, so it a BIT easier. However, when you are faced with a very long stairway UP, you just hope that your legs hold out.

Seoraksan day 1 steep trail to Ulsan Bawi

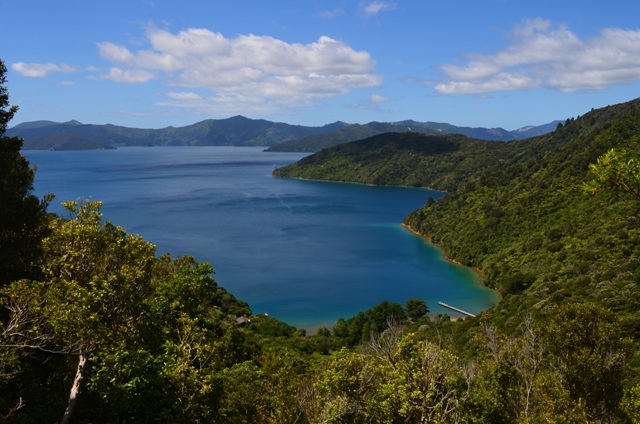
But then, I hit the top. I got to the summit of Ulsan Bawi. I could see for miles around, all the way to the town of Sokcho and the East Sea. Sure it is windy as all get out, but it’s worth it, because I MADE IT. No, it’s not like summiting Everest or anything difficult like that. But my thighs were certainly shaking enough on the way down.

Seoraksan day 1 Ulsan Bawi view summit

All told, I probably hiked over 10 km my first day at Seoraksan National Park. That doesn’t sound like a lot, and it’s really not since it’s only a little over six miles. But Korean hiking is no joke for the most part, particularly for someone short and clumsy like me. By the time I walked back to my hotel, I was ready for a hot bath and long snooze to get ready for day two of my Seoraksan hiking journey.

Bukhansan National Park Red Autumn painting

my painting of Bukhansan National park sunny red trees


Autumn in Korea is my favorite time in the country. The weather is cooler and less humid, which makes hiking so much more pleasant than during parts of the Korean summer when the humidity makes you feel like you just took a shower after stepping outside, and sometimes the monsoon rains gives you a real shower. But most of all, the reason I love Korean autumns is that the landscape come alive with bright, beautiful colors. Korea is a very mountainous country and there are numerous forests populated with trees that change color and foliage for the seasons. These bright colors of nature inspire me to create art.

The art my eye is drawn to, either as a viewer of art or as a creator of art, is bright and colorful paintings. I’ve never been a fan of dark, dreary realist paintings and preferred paintings that pop with color. Likewise the art I want to make is the colorful world around me. This makes autumns the perfect time to capture images to create paintings later.

The mediums I used for this painting were a watercolor under painting in greens and browns, watercolor pencil for the trees, and hard pastels for the foliage. I felt the combination of  mediums would be ideal to achieve the effects I wanted. This was the first time I used an under painting, and I was really pleased with the result for the most part, though next time I should fade out the colors of the under painting more to make the colorful leaves pop to a greater degree. In the past, one of the frustrating things about using white paper for paintings is that the teeth of the paper showed through  and marred the overall effect I was trying to achieve. Putting down the green/brown under painting enabled me to build the trees and leaves on top of the under painting and thus achieve a greater illusion of depth. The viewer can see the green poking through in parts of the painting to look like real nature. The big lesson I did learn for improvement with this painting, is that I should use an under painting for the leaves as well. This became readily apparent when I started to apply the pastels for the leaves. I prefer hard pastels, because I personally find soft pastels to be rather messy. Even though the pastels are hard, they have varying degrees of hardness and softness. The whites, yellows, and even the oranges to a certain degree were reasonably soft and therefore easy to build up layers of color to produce realistic-looking leaves. I ran into trouble with the red pastels though. That color was substantially harder and it was more difficult to apply the red color to the existing under painting. The reds didn’t pop the way I wanted them to, unlike the yellows and oranges, because they didn’t layer well. It was also more apparent for parts of the painting where the leaves overlaid branches. I initially used masking fluid to block out the tree branches before applying the under painting, so when the fluid was removed, the paper was white. Due to the hardness of the pastels, it didn’t build up layers of color easily and the whiteness of the paper can be seen behind parts of the painting. Overall though, I was rather pleased with this effort, since it was the first one like it that I painted. I think I mirrored the reference photo well enough (though it wasn’t a complete duplication), and captured the brilliant reds, oranges and yellows of this landscape.

Bukhansan National Park sunny red trees


This is the reference photo used for the painting. It was taken in Bukhansan National Park on a fine sunny October afternoon. The park is located within the Greater Seoul Metropolitan Area, which makes it readily accessible for urban hikers. Visitors can easily reach the park by taking subway Line 3 to Gupabal station, exit 1 and then Bus 704 or 34 to Bukhansan National Park. Just follow the hordes of people in hiking gear to the trailhead and follow the signs for the trails from there. The park’s location within Seoul means that this park is convenient not just to you, but to everyone (approximately 25 million people) in the Greater Seoul Metropolitan Area. While beautiful, particularly during autumn, this is not a place for solitary hiking, so know before you go. Crowds are numerous on the weekends, though if you want to beat them as much as possible, start very early. Yes, there will be early hikers, but they are the serious hikers and not the slow family walkers. You can walk as much as you want and turn around at any point, since the trail is well marked with signs and distances. The trail can be a bit uneven and steep in places, but for the most part, the trail is suitable to regular hikers. One word of advice though. Since this park is reached via a bus and not a direct subway stop, there is a high potential for running into long lines at the main bus stop for the park. When I went, I made it to the bus stop not long after sunset, and it took me an hour to get on a bus to go to back to the subway. The smart hikers in the know walked further up the road to catch an earlier bus stop and avoid the main bus stop with the very long lines. After all, once a bus was full of people from the early stops, it would just drive by the main stop. If you like hiking and love beautiful nature (particularly in autumn), Bukhansan National Park has much to offer for hikers, nature enthusiasts and landscape artists to be inspired.