Trekking and Canoeing in Tierra del Fuego National Park

One of the highlights and must dos if you are in the Ushuaia area for any length of time, is visit Tierra del Fuego National Park. It is not a far drive from the town of Ushuaia, and it offers a wide range of activities. The particular trip I did was a full day trip that involved both trekking and canoeing.

The same guide company, Canal Fun and Nature, that did my Lago Fagnano trip the prior day also provided the guides for this trip. The group was definitely bigger for this outing, since we were all on a bus. After getting to the park, we got outfitted for our canoe trip down a river, through a lagoon, and ultimately ending at Lapataia Bay. Since it was spring down in Ushuaia, the weather was on the chilly side, and it was good to get some waterproof pants and boots on.

We were broken up into groups and given basic paddling instructions, and then we set off from Lake Acigami and canoed down the Lapataia River. The paddling was pretty easy most of the time, because the current often just took us down the river. There were spots where the water was fairly shallow, and we had to strategically paddle to get through it. But it was a very pleasant journey surrounded by distant mountains and green shores.

After a couple hours of paddling, we ended up at Lapataia Bay, which is where the Pan American Highway 3 ends. The viewpoint was really pleasant, though we didn’t spend too much time lingering, because it was lunch time and we needed to get to our lunch hut.

Setup for lunch was similar as my lunch the previous day, though I missed the abundance of grilled meat, but there was plenty of wine. However, unlike the previous day, I definitely watched my wine intake, because I knew we were only half done with the day’s activities. We still had a hike ahead of us.

The afternoon was a guided 8km hike along the Senda Costera (Coastal Trail). I would rate the hike in the medium difficulty, though fitness fiends would think it was pretty easy. We were dropped off by the side of the road and immediately headed into the forest. There is a lot of good forest cover in the area, and the trail is clearly marked as it wends its way through the woods.

The trail itself goes up and down over the terrain. I personally found some of the uphills to be challenging, and deliberately stuck close to the guide up front, so as not be left behind. The guide was kind enough to help me when we reached big obstacles to traverse (like fallen trees) or some particularly tricky down hill.

The trail can be done in either direction, though I was glad we did it in the direction we did. Both directions will have their share of short but tricky uphill sections, but it looked like the other way would have had more and longer challenging uphills. I may watch my feet carefully on steep downhills, because of my clumsy nature, but it wasn’t hard to do physically.

My body did get tired though, even though it was only 8 km, but we were rewarded with some very nice views of the Beagle Channel, with its blue seas and pretty mountains. We ended the hike at Ensenada Bay, which is where the post office at the end of the world is located. By that point, we were in the open air, and the strong Tierra del Fuego winds ensured we didn’t linger too long at the shore.

It was definitely a good day of physical activity and a variety of scenery to get a taste of what Tierra del Fuego National Park has to offer.

Tierra del Fuego Lago Fagnano Adventure

Lago Fagnano

This past fall, I finally got back into the experience of overseas travel, after not traveling outside of the USA since the fall of 2019. It was nice to get back into the swing of things and experience new places. As it happened, my first trip was to Argentina. To be honest, I had never really given much thought to Argentina in the past. But since I had booked a cruise to Antarctica, and most Antarctica cruises start from Argentina, I was going to be in the country anyway. Since I like to get as much bang for my travel buck as possible, I figured if I am already down at the end of the world, I might as well explore the country and see what it has to offer.

Once I started my research, I realized that Argentina has a wealth of places to see and do and a variety of climates to make travel interesting. Tierra del Fuego sounded really interesting from my travel research, and I knew the terrain would be very different from home and what I am used to. To start my vacation since my Antarctica cruise had a fixed time and I ran the numbers in terms of work vacation days spent, I decided to go to Argentina early enough to give me three full days in Tierra del Fuego and the town of Ushuaia to explore. Working with my travel agent, Tesa Totencgo, she (in conjunction with an amazing Argentina travel agency, Oriunda who made all the arrangements on the ground) recommended some fun activities in Tierra del Fuego. My first full day in Argentina was a trip out to the large Lago Fagnano. It’s on the island of Tierra del Fuego, but not in the national park to my knowledge. It was a good opportunity to see and do something different and get comfortable in the Tierra del Fuego area.

Lago Escondido view from Paso Garibaldi

I was picked up early by my guide from Canal Fun Nature, the group that offers this tour. There were about six of us in this SUV, and we met up with a couple other SUVs and headed out. Our first stop was the mountain overlook, Garibaldi Pass, which gave us a very expansive view of Lago Escondido and the surrounding mountains.

After that, we headed out to Lago Fagnano (a huge lake of around 100 km across) and took advantage of the SUV’s 4×4 capability to navigate some rather rugged trails on the lake shore, and sometimes even in the lake a little bit. This lake is huge, and in fact part of it is in Chile (since both Argentina and Chile share borders on Tierra del Fuego island). Our guides pointed out local flora (such as the fragrant floral calafate berry bush that produced a very pretty yellow flower, and also the berries that were very popular in the region), and castors, which are beavers that have been beavering everywhere and cutting down trees to make numerous dams.

Our guides dropped us off at the lakeshore and instructed us to follow the shore for about a half mile and then turn inland to the hut. They went ahead and prepared the lunch buffet. It was nice to get out and walk along the lake shore. The sun was shining, and the wind picked up every so often to create small white caps on the lake surface. It was pleasantly chilly and the wind is a hallmark of the weather in Tierra del Fuego.

Our easy walk brought us to the hut where this very tasty and expansive lunch buffet was prepared. There were a wide assortment of grilled meats, sausage sandwiches, a variety of sides, and oh so much Argentine wine. By the end of it, we were stuffed and rather drunk, but definitely got our money’s worth. Thankfully the lunch was the culmination of our day’s activity, so we took our time navigating out of the lake on a different road, an actual road within the park. Afterward we took a different road back to Ushuaia to enjoy the view. It was definitely an enjoyable day, and a great start to my multi-week Argentina adventure.

Natural Pleasures of the Maligne Lake Area

Medicine and Pyramid Lakes-4

My last afternoon in Jasper National Park was spent at Maligne Lake. It is a huge lake in the park, though you don’t really get an appreciation for the size of it just standing on the shore. I imagine one of the many, many boat tours would help you get a feel for the scale of it all. I had considered going out on a boat tour when I visited, but the clouds were so thick and the sky so gray (with occasional bursts of rain) that I wouldn’t get a proper feel for the lake. Instead I decided to do a couple short hikes near the lake. 

Medicine and Pyramid Lakes-7

Medicine and Pyramid Lakes-5

Maligne Lake is probably one of the key tourist stops in Jasper National Park. It is the end point of the Maligne Lake Road (so it’s impossible to get lost), and the 13.7 mile drive along the winding road is filled with so many beautiful, nature viewpoints, that it makes for a pleasant and full day trip from Jasper. 

Medicine and Pyramid Lakes-6

This is the same road you access the Maligne Canyon hike (detailed in an earlier blog post), and the Beaver Lake/Summit Lakes hike (also in an earlier post). So you could make a VERY full day if you wanted to do all the sights in one day, though I would recommend taking a couple days so you can take your time and enjoy yourself. 

Medicine and Pyramid Lakes-3

Aside from the stops I listed before, another great stop is Medicine Lake. You can’t miss it, because it is a huge lake, and a good chunk of the road wends its way alongside the lake. Medicine Lake looks like a normal lake, but apparently, looks can be very deceiving. I’ve read it described as a plugless bathtub, because the lake bottom has holes in it, with water filling the lake during the spring and summer runoff, but nearly emptying in the winter time with the reduced water flow. Even though it is not obvious, apparently the water from Medicine Lake flows from the lake bottom into underground rivers and caves, many of which will empty into the Maligne River, of which I saw some on my Maligne Canyon hike. 

Medicine and Pyramid Lakes-1

I stopped many times along my drive, because there are numerous pullouts that provide colorful photo opportunities, with the contrasting bright blue of the lake and the bright yellow fall foliage. Eventually the road pulls away from Medicine Lake and follows along the Maligne River that flows into Medicine Lake. Eventually, I found myself at Maligne Lake, which is where the road ends, and the Maligne River begins. 

Maligne Lake-2

It is hard to convey the size of Maligne Lake, because only part of it can be seen from the dock at the lake. The most popular thing to do at the lake is to take a boat cruise. I considered it as well, but the weather was so crappy, with gray skies, low clouds and intermittent rain, I figured it wouldn’t be worth the time and expense.

Maligne Lake-1

However I did avail myself of a couple short hikes near the lake. Even though both are near the lake, they provide different scenery to enjoy, so it didn’t feel repetitive. The first hike I did was the Moose Lake Loop, which is less than two miles. The trail starts on the opposite side of the parking lot after crossing the Maligne River which feeds from the lake. 

Maligne Lake-3Maligne Lake-4

The beginning of the trail parallels the lake, but soon veers off into the woods. The trail is flat and level, but when I visited, it was super, super muddy. I considered turning back, but I arrived at Moose Lake before I made that decision. Moose Lake is so named, because it is a popular place for moose to feed. I hoped to see some moose, and my patience was soon rewarded when a moose wandered near the lake shore on the other side of the lake. It wasn’t a close view, but still good enough to enjoy. 

Maligne Lake-5

My second short hike was part of the Mary Schaffer Loop. I say part, since I only did the hike along the lakeside, and then walked back the way I came, rather than finishing the loop through the forest. The walk out was a pleasant  half mile out to a nice viewpoint. It was raining a bit, so the views weren’t as pretty as I would like, but what can you do?

Maligne Lake-6

I had one final treat for my day as I was driving back to Jasper. As I was driving back, I saw a line of cars pulled off to the side, which around these parts, often means wildlife sighting. More than once I saw cars pulled off to see sheep, moose, and elk (sadly no bears). In fact, on my drive out of Jasper, traffic stopped completely to see two large male elk, locking horns in the middle of the road before moving off to the side of the road. This time, it wasn’t something so fascinating, but there were a few moose calmly feeding. There is substantial guidance about staying at least 100 meters away from moose, since they can be dangerous, but these moose were calm and enjoying an afternoon snack. It made a pleasant ending to the day. 

Maligne Lake-7

Maligne Canyon Hike- A Verdant Canyon of Waterfalls

Maligne Canyon hike-9

One of the frustrating things when on a hiking vacation is being subject to the vagaries of the weather. Sure I can game it as best as possible by scheduling a vacation during the best weather window, but that also tends to correspond with the window of high tourist season (for obvious reasons). When going off season or even in shoulder seasons, the weather is much more variable. So all I can do is hope that the weather will be good ENOUGH on the day I plan my activities.

Maligne Canyon hike-16

For a good chunk of my Banff vacation, the weather was on the cloudy and occasionally rainy side. For the most part, that didn’t really throw off my vacation plans, since I just rolled with it, and was glad the weather wasn’t worse. But as much as I love rain in my normal life, I do like my vacations to be rain free as much as possible. 

Maligne Canyon hike-13

The weather the day of my Maligne Canyon hike was decent enough. It was on the chillier side and cloudy, but the rain wasn’t really a factor. When planning this hike, it was a matter of where I wanted to start, since there are many possibilities, depending on how far I wanted to hike, and what I wanted to see. 

Maligne Canyon hike-3

I decided to start at the Sixth Bridge, which was the farthest trailhead out, and then hike up the canyon to the First Bridge. That would make my trail start flat and level along the Maligne River, and then gradually ascend through the canyon, passing the different bridges, and a series of waterfalls. It also meant that when I was hiking downhill on the return hike, which is always preferable for me than hiking uphill. 

Maligne Canyon hike-2

Like usual, even though I started my hike early, I wasn’t the only car in the parking lot, though there were less than a handful at that hour. I crossed the Sixth Bridge immediately and started the hike. It’s a pleasant, flat hike along the river, with the trail sometimes paralleling the rushing river, and sometimes veering more into the forest. But always the path would lead along the river. 

Maligne Canyon hike-1

Parts of the trail were soaked in water from the underground springs bubbling into the river, but there were always blocks, logs or stones to carefully make my way and keep my feet dry. The trail is signed when it needed to be, though I made a bit of a mistake once I hit the sign for the Fifth Bridge, which is another trailhead. I assumed that we would have to hike over every bridge on the trail, but quickly realized that it was just another trailhead and turned around. I should have not followed the sign for the Fifth Bridge, which lead to the trailhead, but rather the signs to the Third Bridge. 

Maligne Canyon hike-4

Maligne Canyon hike-10

The trail starts climbing immediately after the sign, and follows the top of the canyon. The ascent widened my view and gave a good photo op of the Fifth Bridge. The initial part of the hike from the Fifth Bridge has a pretty, but not astounding view, as it is a high view of the canyon and the river. For some reason, the trail is not flat and level at this point, but rather heavily slanted by the rock, which made it a bit of a challenge to walk. Soon enough the trail drops down much closer to the river, and there are even some side trails that go right to the river’s edge, though I needed to be cautious, because the rocks can be slippery, and the river is full of churning rapids. Maligne Canyon hike-5

Maligne Canyon hike-11

The stretch of trail from this point to the Third Bridge is probably the most scenic of the trail. The trail follows the contours of the canyon, so sometimes it rises a bit above, but then drops down to be closer to the river. I loved the close views of the river and the verdant green, narrow canyon. The rapids are scenic, and the waterfalls plentiful, though you are much more likely to get wet from the water spray. 

Maligne Canyon hike-6

Maligne Canyon hike-12

Unlike the Fifth and Sixth Bridge, the Fourth Bridge doesn’t lead to a trailhead, but rather just a bridge over the river that provides nice views, but ultimately doesn’t go anywhere. The Third Bridge brought me from one side of the canyon to the other, as the trail continued up to the main parking lot. The waterfall at the Third Bridge is the most towering and beautiful, though any photos taken are better from a nearby viewpoint than from the bridge itself, because the view from the bridge is a bit blocked by the canyon walls.

Maligne Canyon hike-7Maligne Canyon hike-8

If you are feeling rather tired at this point, turning around at the Third Bridge would be perfectly fine, though you can proceed upward. I am often a completest when it comes to my hikes, so I forged on ahead. The trail ascends sharp and steep from the Third Bridge to the Second Bridge. My body was definitely feeling the elevation gain and needed to make use of the benches by the Second Bridge. At this point, I was at the top of the canyon, but because the elevation gain is so great, I was looking WAY down into the canyon and not more intimately closer to the river. At that vantage point, I could see the river way down below, but only in glimpses, because the canyon rock is much drier and curvier. It’s a pretty view of the mysterious ways water can twist and shape rock, but it’s not as beautiful as the waterfalls and the rushing river, and a bit of a letdown after coming from the crashing waterfall at the Third Bridge. 

Maligne Canyon hike-14

After resting, I descended the trail and returned to the Sixth Bridge trailhead, pausing again to take in the gorgeous views from Third to Fifth Bridges (the best parts of the trail in terms of beautiful nature). The trail is fairly easy overall, though there are some moderate stretches of elevation gain, and the trail can be wet and muddy in parts. But if you love beautiful canyons, river rapids and an abundance of waterfalls, this is a great trail to start your day. 

Maligne Canyon hike-15

Jasper National Park- Beaver and Summit Lakes Hike


Beave and Summit Lakes hike-1

There are plenty of places to hike and enjoy nature in Jasper National Park, but a lot of places are wilderness. As much as I love nature, I didn’t come for a backcountry wilderness experience, so I stuck to day hikes that are more popular, so I was rarely completely alone. This hike out was one of the rare times I had almost near solitude. I saw literally no one on my hike out to Summit Lakes, and only saw about three couples on my hike back to my car. It was quiet and peaceful and a good way to engage with nature, though unfortunately I had no wildlife sightings out there. 

There are a wide variety of day hikes to do out in Jasper National Park, but I was looking for some hikes that maximized natural beauty, but weren’t THAT strenuous. That’s the challenge of finding hikes in a mountainous national park- so many of them involve more elevation gain than I was looking for. So I thought it was lovely when I saw the Beaver Lake hike. Truthfully, the trail goes out to Beaver Lake, Summit Lakes (there are two of them), and ends in Jacques Lake. Back when I first started researching this hike, I thought maybe I could hike all the way to Jacques Lake and back, which you can do, but it is one long slog of a day of about eight hours of hiking. I knew the trail was fairly flat all the way out, but when I researched the trail a bit deeper, it was obvious that the trail out to Summit Lakes is pretty good and easy to follow, but the trail gets much rougher out to Jacques Lake, where it is much muddier, rootier, and rockier. Plus the time factor. As much as I love hiking, I didn’t want to spend the entire day doing one hike, when I wanted to maximize my time at Jasper National Park.

Beave and Summit Lakes hike-9

I started my day early the morning of my hike, as I typically do when I am on vacation. Not as early as my days when I visited Lake Louise and Lake Moraine, but still early enough. I was the only car in the parking lot when I got to the trailhead, which surprised me a bit, only because I had never been completely alone out on any of the trails on my vacation up to this point. I saw the sign that cautioned that part of the trail had washed out, but it had been rerouted, and set off. 

The trail out to Beaver Lake especially is pretty flat (a couple very minor elevation gains), and the trail reroute was pretty easy to follow with trail blazes. Since there was still ample water on that part of the trail, I had to cross a cut log bridge, and another temporary bridge set up. But once I got past that, the trail was pretty level and wide. It is more of a pleasant nature walk than anything. 

Beave and Summit Lakes hike-8

Sometimes it’s hard to gauge distance out on a trail, because I think I should have covered more distance in the time available. But even so, I was pretty surprised when I hit the edge of Beaver Lake, because it felt like I hadn’t been hiking out that long. Turns out that Beaver Lake is only a mile out, so that made sense time wise. The edge of Beaver Lake is a nice place to stop and rest and take in the view. It was very pretty lake, surrounded by mountains and casting some lovely tree reflections. You can tell this is a more family friendly stop, just because there are a number of picnic tables near the lake. 

Beave and Summit Lakes hike-2

After taking it all in, I continued on to Summit Lakes. The path remains level and wide. There are occasional spots with mud and puddles I had to skirt, but not that extreme. At this point in my vacation, I had seen my share of mud, so I was used to it by this point. The trail continued along Beaver Lake for a time, though the trail doesn’t really skirt the lake, but I could see the lake through the trees. Once I got past the lake, the scenery was pretty typical woodland with mountains. I kept my eyes out for wildlife such as elk, moose, or even bears, but I didn’t spot any. 

Beave and Summit Lakes hike-3

As I approached Summit Lake, I could see the end of the lake, and I encountered my first sign on the trail. There was a sign that indicated the trail took a right turn toward Jacques Lake, but I kept approaching the shore of Summit Lake. This is another pretty lake surrounded by a meadow, trees blooming in fall foliage, and mountains. 

I knew that there were two Summit Lakes, and the other one lay just beyond the first one. I saw what amounted to a goat trail hugging the right side of the lake, and started to follow it, but was deterred when I ran into some water, as the lake water level had risen. Thinking I must be on the wrong track, I turned back and returned to the trail sign for Jacques Lake. The trail didn’t say specifically it went to the next Summit Lake, but I had looked on a map previously, and knew that the trail would pass by it, so I figured I would take it. It was a mistake, though not a great one.

Beave and Summit Lakes hike-5

Once I took the turn for Jacques Lake, the trail instantly turned narrow, rutted with rocks, roots, and the like. Plus it looked like it MIGHT have been rerouted a bit, because of trees blowing down. In any case, the trail can be followed, but it is eminently more difficult. I knew that eventually it would pass by Summit Lake, so even though my hiking enjoyment diminished instantly, I plowed onward to the next lake.

I had only hiked about 10-15 minutes when I saw the other Summit Lake on my left, and made my way down to it. It wasn’t a clearly marked trail, and I took note of where I came out so I could return to it. The second Summit Lake is nice, though not as big or picturesque as the first one. I knew I wasn’t going any farther, so I took the opportunity to just relax and enjoy the sounds and views of the surrounding nature.

Beave and Summit Lakes hike-6

Behind my resting place, I saw a small goat trail leading not back to the way I came, but it looked like it was a direct route back to the first Summit Lake. I figured I couldn’t go wrong, and if it proved to be nothing, I could just return to the second lake. But lo and behold, it turned out that this was a genuine (if narrow) trail connecting the two lakes. It was the other end of the trail I had started, but then abandoned, because I didn’t think it was an actual trail. 

Beave and Summit Lakes hike-7

It was here when I encountered my first sign of human life as I ran into a hiking group heading to the second Summit Lake. And a few minutes later, I was at the edge of Summit Lake. The trail was very narrow, but visible, and I could see that the lake water level had risen, because at times the trail was now in the water, and I had to skirt it. But this trail was much easier and less frustrating to follow than the trail that headed toward Jacques Lake, and I realized I should have plowed on when I first found this trail. 

Beave and Summit Lakes hike-4

The walk back to my car was as easy as the walk out, though I ran into a few more people, and wasn’t completely alone anymore. But it was still a nice and peaceful walk. It is definitely good if you like beautiful nature, and hope to get some solitude out on the trail, because I was never more alone in my hiking, than I was when I hiked out to Beaver and Summit Lakes. 

Icefields Parkway- One of the Most Beautiful Drives in the World.

Icefields Parkway-36

There are many, many beautiful drives in this world, and one of the best is undoubtedly Icefields Parkway, the colloquial name for Highway 93 that heads north from the Lake Louise area in Banff National Park in Canada, and ends at Jasper National Park. The entire drive is roughly 143 miles, which can take at least three hours but can be much longer, depending on how many places you stop, and how much time you spend in each location. And believe me, there are many, many places to stop along the way. Some of them are just pull outs alongside the road, overlooking a beautiful view. Other places are opportunities to get out and stretch your legs on a short hike. But trust me, you will almost overdose on beautiful nature by the end of this drive (in the best way possible). You will definitely get your fill of mountains, lakes, waterfalls, and in the fall, colorful fall foliage. Roughly half of the drive is still within the confines of Banff National Park, while the other half is within the confines of Jasper National Park. 

Icefields Parkway-17

I had the opportunity to drive the Icefields Parkway twice, once out to Jasper National Park, and upon my return to Banff. It enabled me to maximize my sightseeing. There are many things to like about Icefields Parkway, one of which is that large commercial trucks are banned, which makes for a more peaceful drive. During the high tourist season, the drive is likely to be packed with cars, but during my visit in late September, it was blissfully free of cars. Of course it wasn’t empty by any stretch of the imagination, especially mid day, but there were stretches I didn’t see too many cars, particularly in the morning as I was heading north. It made for a very pleasant day. The drive was my only activity for the day, and I was staying in Jasper National Park, so it wasn’t like I had to rush back to Banff. I could take all the time I needed to see what I wanted. 

Icefields Parkway-18

The weather for the drive out to Jasper National Park was clear and sunny, the perfect day for this drive. It made the lakes that much bluer, the fall foliage that much a brighter yellow, and the mountains just stand out. I started early in the morning, because I wanted to maximize my time, and leave time to do a few short hikes out to waterfalls. Plus starting early meant that much more time encountering few tourists. 

Icefields Parkway-14Icefields Parkway-15

My first stop was at Hector Lake. The sun was up, but the temperature was still cold, so that some steam rose off the lake, producing some very picturesque morning views. 

Icefields Parkway-16

Another short stop was at the roadside pullout opposite the Crowfoot Glacier lookout, so see the glacier nestled among the folds of Crowfoot Mountain. The glacier originally had three toes, but one of them melted away by the 1940s. 

Shortly after, I passed the turnout or Peyto Lake Lookout, which apparently is one of the most popular places to stop along the parkway. However, there was construction in the parking lot, so it was closed. However that didn’t stop many tourists, who just pulled off the road onto the wide shoulder and walked up. I debated stopping, but decided not to, since there were so many other places I intended to stop along the way, and figured that I would consider stopping on my return trip, if the weather was good.

Icefields Parkway-19

My first short hike of the day was down to Mistaya Canyon. The trail head is off the large parking lot. The trail is only .3 miles down from the pullout. The trail was reasonably easy to negotiate, though it was a bit rocky in places. It was a bit steep going down, and I knew I would have to hike it back up on the return. 

At the end of the main trail ends at the bridge over Mistaya River. The river runs rapidly in this area, and the steady pounding of water has eroded the limestone walls over many, many years to form the picturesque, curving walls of the canyon. 

Icefields Parkway-20

My legs were feeling refreshed now, I kept driving down the road. I would often feel compelled to stop along the way, and pull off to admire the beautiful nature. I was especially taken with the frequent scenes of statuesque mountains, topped with snow and ice, and fronted by bright yellow trees, in the full bloom of fall foliage. Luckily, most of the shoulders along the road are wide, so I could easily pull off. Plus the traffic wasn’t overwhelming, so I didn’t feel I was impeding anyone’s travel. 

Icefields Parkway-22

About ⅓ of the way along Icefields Parkway is the only gas station for the entire drive, at Saskatchewan River Crossing. It also has a small restaurant and gift shop, which makes for a nice place to get out and stretch your legs, and get some snacks. The demarcation point between Banff and Jasper National Parks is around the Columbia Icefields Centre, which provides trips to Athabasca Glacier (detailed in an earlier blog post). Since I had already visited the glacier, I just kept driving north into Jasper National Park. 

Icefields Parkway-23Icefields Parkway-25

Among the nice places to stop alongside the road are the numerous waterfalls that are easily viewed from the road. One of them is Bridal Veil Falls, which is a steep, narrow waterfall. It can be reached by a hike, but it can also be viewed from the parking lot (assuming you have good zoom). Another one is Tangle Falls, which is viewable from the road not far north of Athabasca Glacier. To view the falls, the parking lot is just off the road across from the waterfall and I walked across the road to enjoy the splashing waterfall. 

Icefields Parkway-26

As nice as those waterfalls were, they weren’t the highlight of my drive. Those were Sunwapta Falls and Athabasca Falls. Both of these are closer to Jasper, and very popular with tourists. The first one I came to was Sunwapta Falls, which is about a 30 minute drive south of Jasper. This is a very popular stop along the parkway, and next to the Sunwapta Falls Resort.

Icefields Parkway-28

There are viewpoints at the Upper Falls, which is just a short jaunt from the parking lot. The falls are beautiful and rushing. There are viewpoints right at the top of the falls, and at a bridge overlooking the river and falls. If my body was feeling up to it, I would have hiked down to the Lower Falls, which are supposed to provide more solitude among the waterfalls, but I was feeling a bit tired, and my feet were a bit sore for the walk back up the trail.

Icefields Parkway-29

My final stop of the drive was at Athabasca Falls. If you love waterfalls like I do, it can be hard to get enough of them, and all the falls look different, so it doesn’t start to feel repetitive. Athabasca Falls are hugely popular, with a very large parking lot for cars and tourist buses, and the short trail to the falls is filled with tourists, particularly later in the afternoon when I visited. 

Icefields Parkway-32

The trail to the falls is easy and flat to reach. I knew I was getting close to the falls, because I could feel the spray from the falls. There were numerous viewpoints to take great photos of the falls, some of them on the bridge overlooking the falls, and some of them closer to the top of the falls, which produced some beautiful rainbow views.

Icefields Parkway-33

After looking at the top of the falls, I took the trail that descended along the top to the canyon. It provided some nice views of the Athabasca River flowing through the curvy limestone canyon, where it widens out into a wide, blue river. 

After that, my day’s journey was set to come to an end as I approached Jasper. While I didn’t stop at every possible pullout and viewpoint along the way, I saw plenty to fill my appetite for beautiful nature. I was glad I took all the time I did on the drive out, because when I returned just a few days later, the clouds had rolled in, the snow was drifting down at some of the landmarks at a higher elevation, and the naked mountaintops were now dipped in pure white snow. If you have the opportunity to drive Icefields Parkway, definitely take advantage of it. While the road is officially open year round, it can often be closed due to excessive snow between November and March. The road will be clear during summer time, but it can be filled to the brim with tourist cars and buses. But in the shoulder season of September, especially late September, it is a great opportunity to see all the sights the parkway has to offer, with incipient fall foliage, and fewer tourists. Just gas up beforehand, and go. The open road awaits you. 

Yoho National Park- A Very Full Day of Beautiful Nature

Yoho National Park-15

One of the many great things about Banff National Park is how accessible it is from the outside. It is only an easy 90 minute drive from the Calgary airport, and is situated along the Trans Canada Highway 1, which wends its way through the park. In fact, if you keep following Highway 1 past the Lake Louise exit, you will soon find yourself crossing the border into the province of British Columbia  and into Yoho National Park.

When I was planning this vacation, I intended to use the remainder of my work vacation hours, and from that, it was just a matter of crafting an itinerary to fill all those hours. I wanted to have as much variety as possible, while taking into account a desire for hiking and the like. And once I realized just how centrally located Banff is, I realized I could maximize my park visiting experience. I already planned on spending a few days in Jasper National Park to the north, but looking through my travel guide, I realized that there is another national park just west of Banff- Yoho National Park- and it was chock full of beautiful nature to see and do. Once I saw that there were a couple of nice waterfalls to hike to, I was all in.

Yoho National Park is super easy to get to, super easy to navigate, and is well worth your time if you have seen all that you wanted in Banff National Park. I won’t go so far and say that Yoho is as beautiful and awe inspiring as Banff, but it has a lot to offer, and makes for another notch in your national park belt while visiting the area.

Like I said, Yoho National Park is bisected by Trans Canada Highway 1, just like Banff National Park, so it makes it easy to visit all the sites. To make it easy on myself, I visited each site as I came to it, figuring I would save Emerald Lake for my final stop that day. 

Yoho National Park-3

My first stop was just a road pullout, but it had some good views of the Spiral Railway and some good information about it. What is currently Trans Canada Highway 1, used to be the rail line that connected British Columbia and Alberta. While it is a pretty easy highway for a car to drive, it can be very challenging for a train, because of the steepness of ascending to the mountain pass. Hence why the Spiral Railway was completed. 

It is an interesting bit of engineering design, inspired by a Swiss design of the same nature. Essentially, instead of a single straight railway that goes up the mountain and requires a lot of train engines to push the load, an internal spiral railway was cut into the mountainside. It basically doubles the length of track to get up the mountain, but it does so by creating these gradually ascending railways that spiral through the mountain, eventually coming out on top of the mountain pass.

Yoho National Park-2

There are two places you can see the tunnel that is cut into the mountainside- the Upper Railway and the Lower Railway- and if you time your visit properly, you can see trains actually maneuvering through the railway cutouts. As it stands, there are two different areas you can see it cut into the mountain, though most of the railway is hidden, because it was constructed inside the mountain. But is still a fascinating engineering marvel to behold. 

Yoho National Park-1

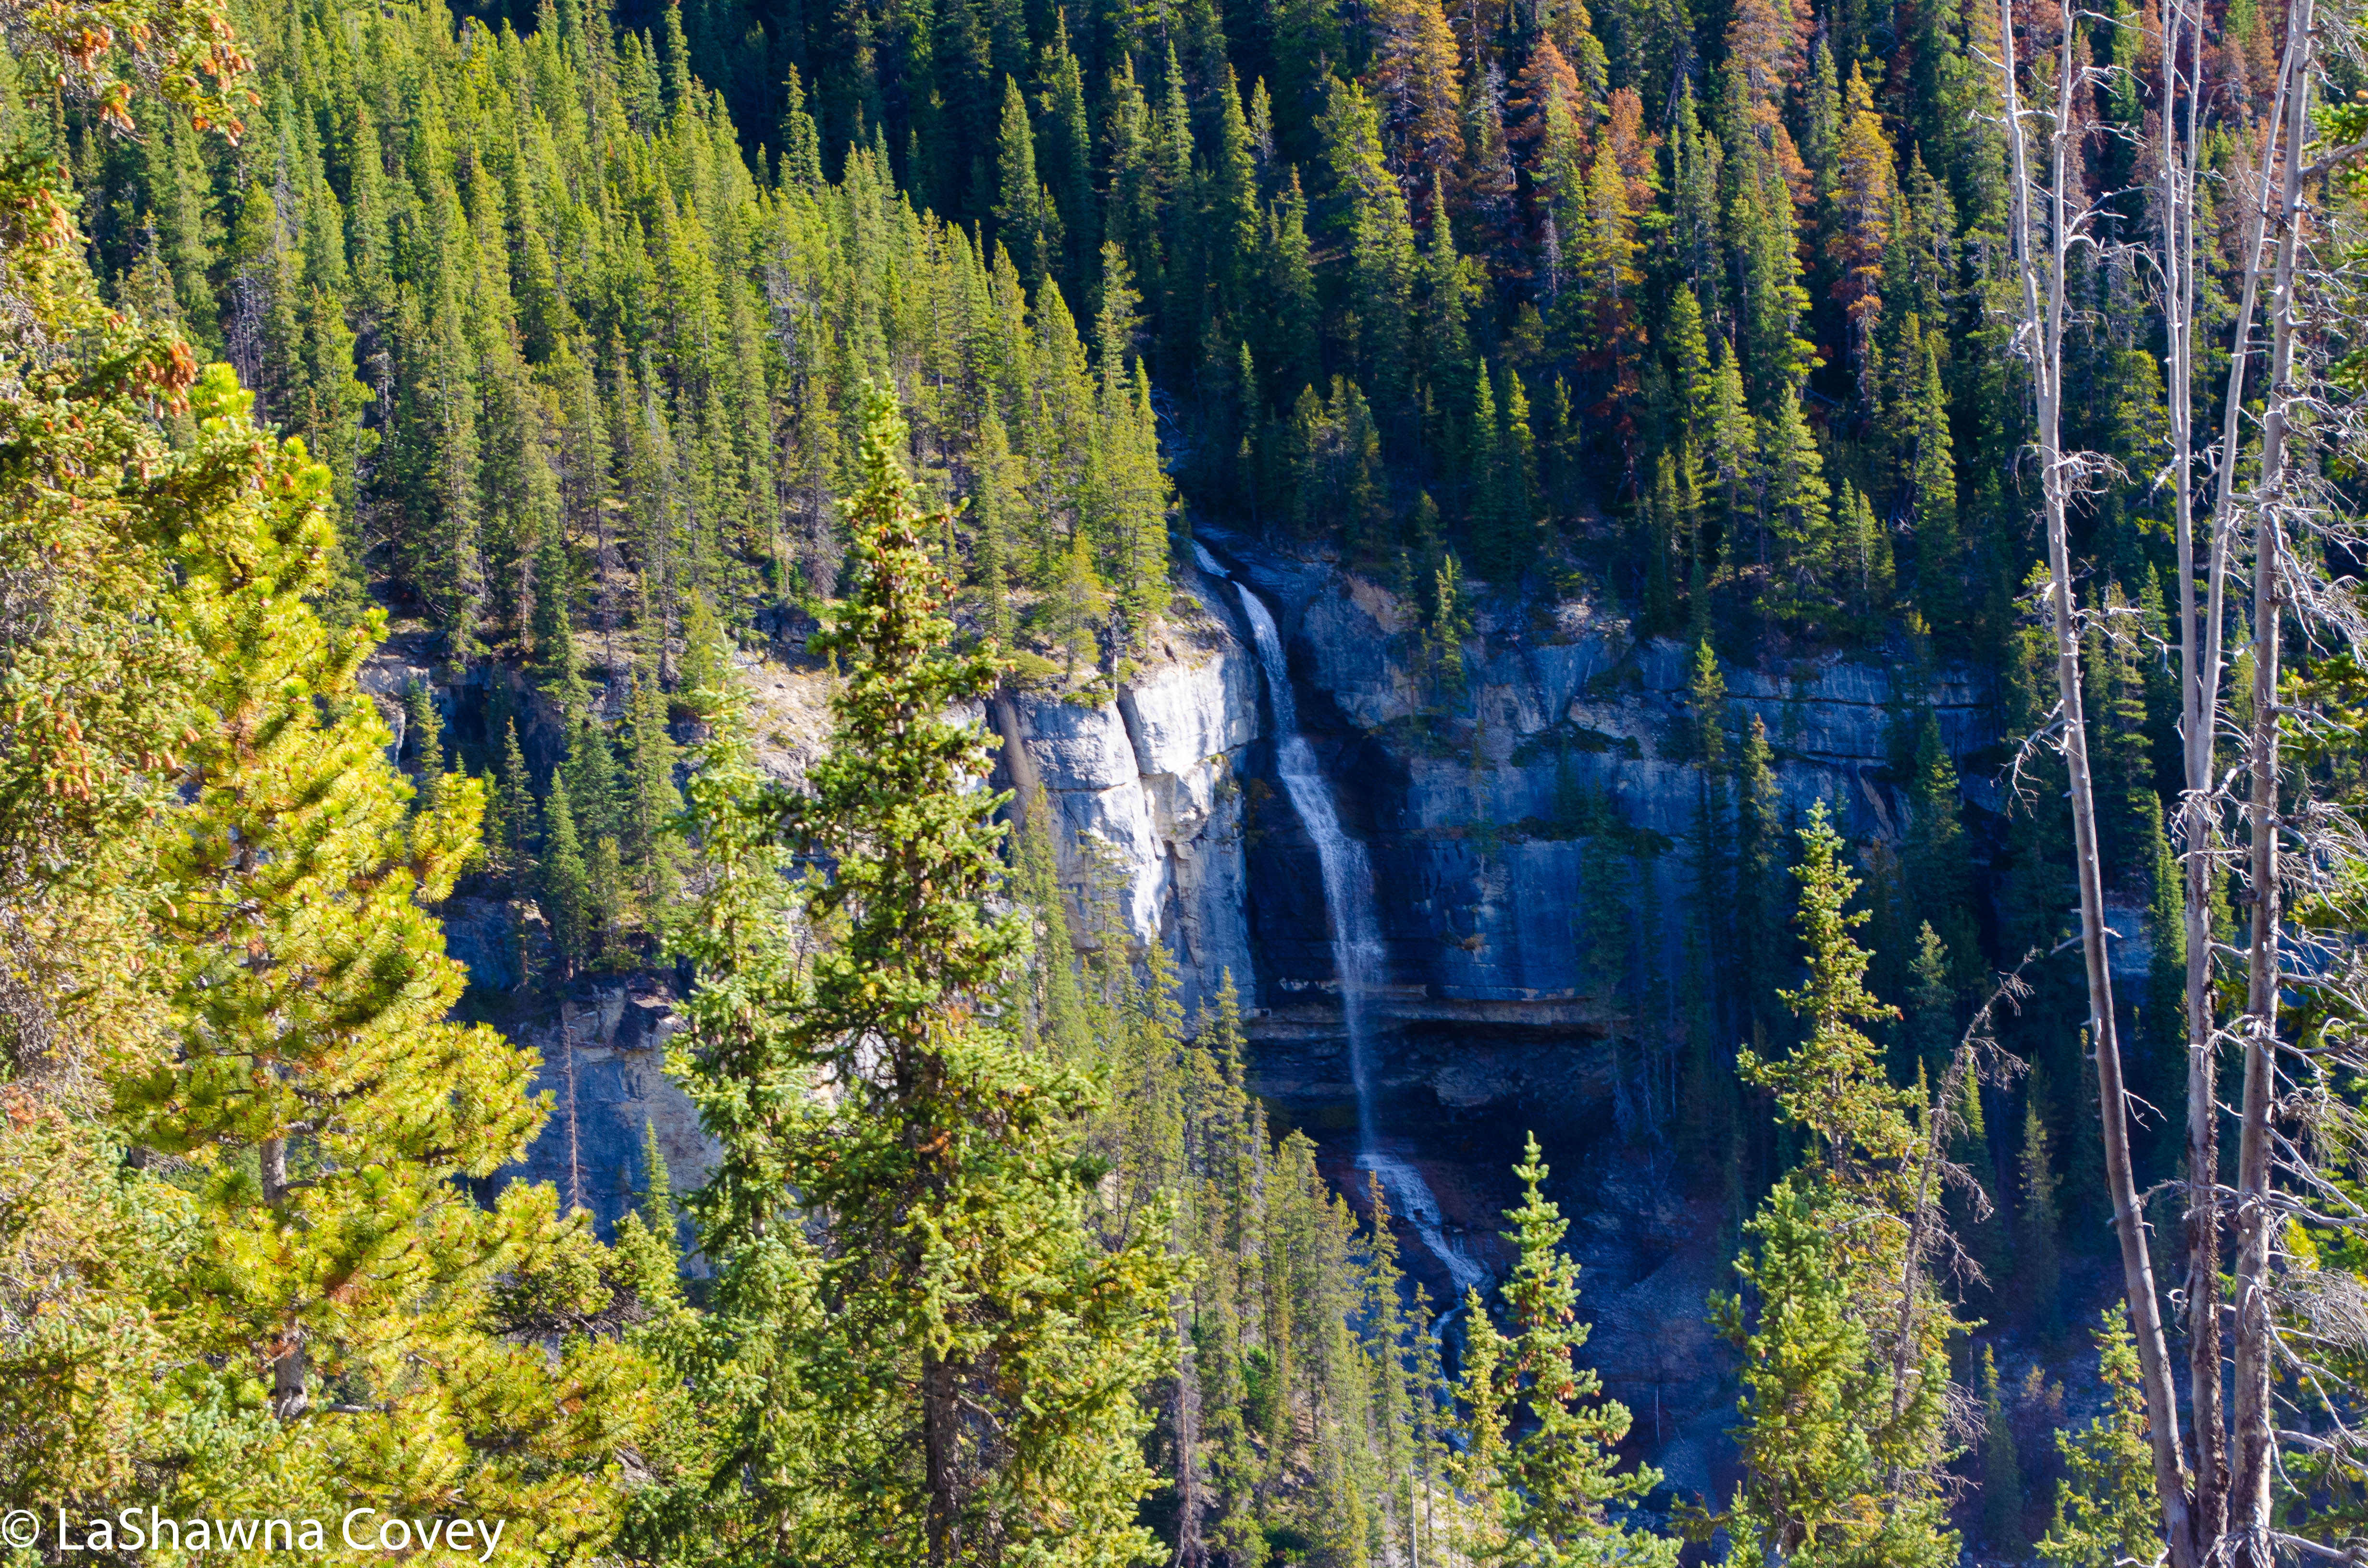
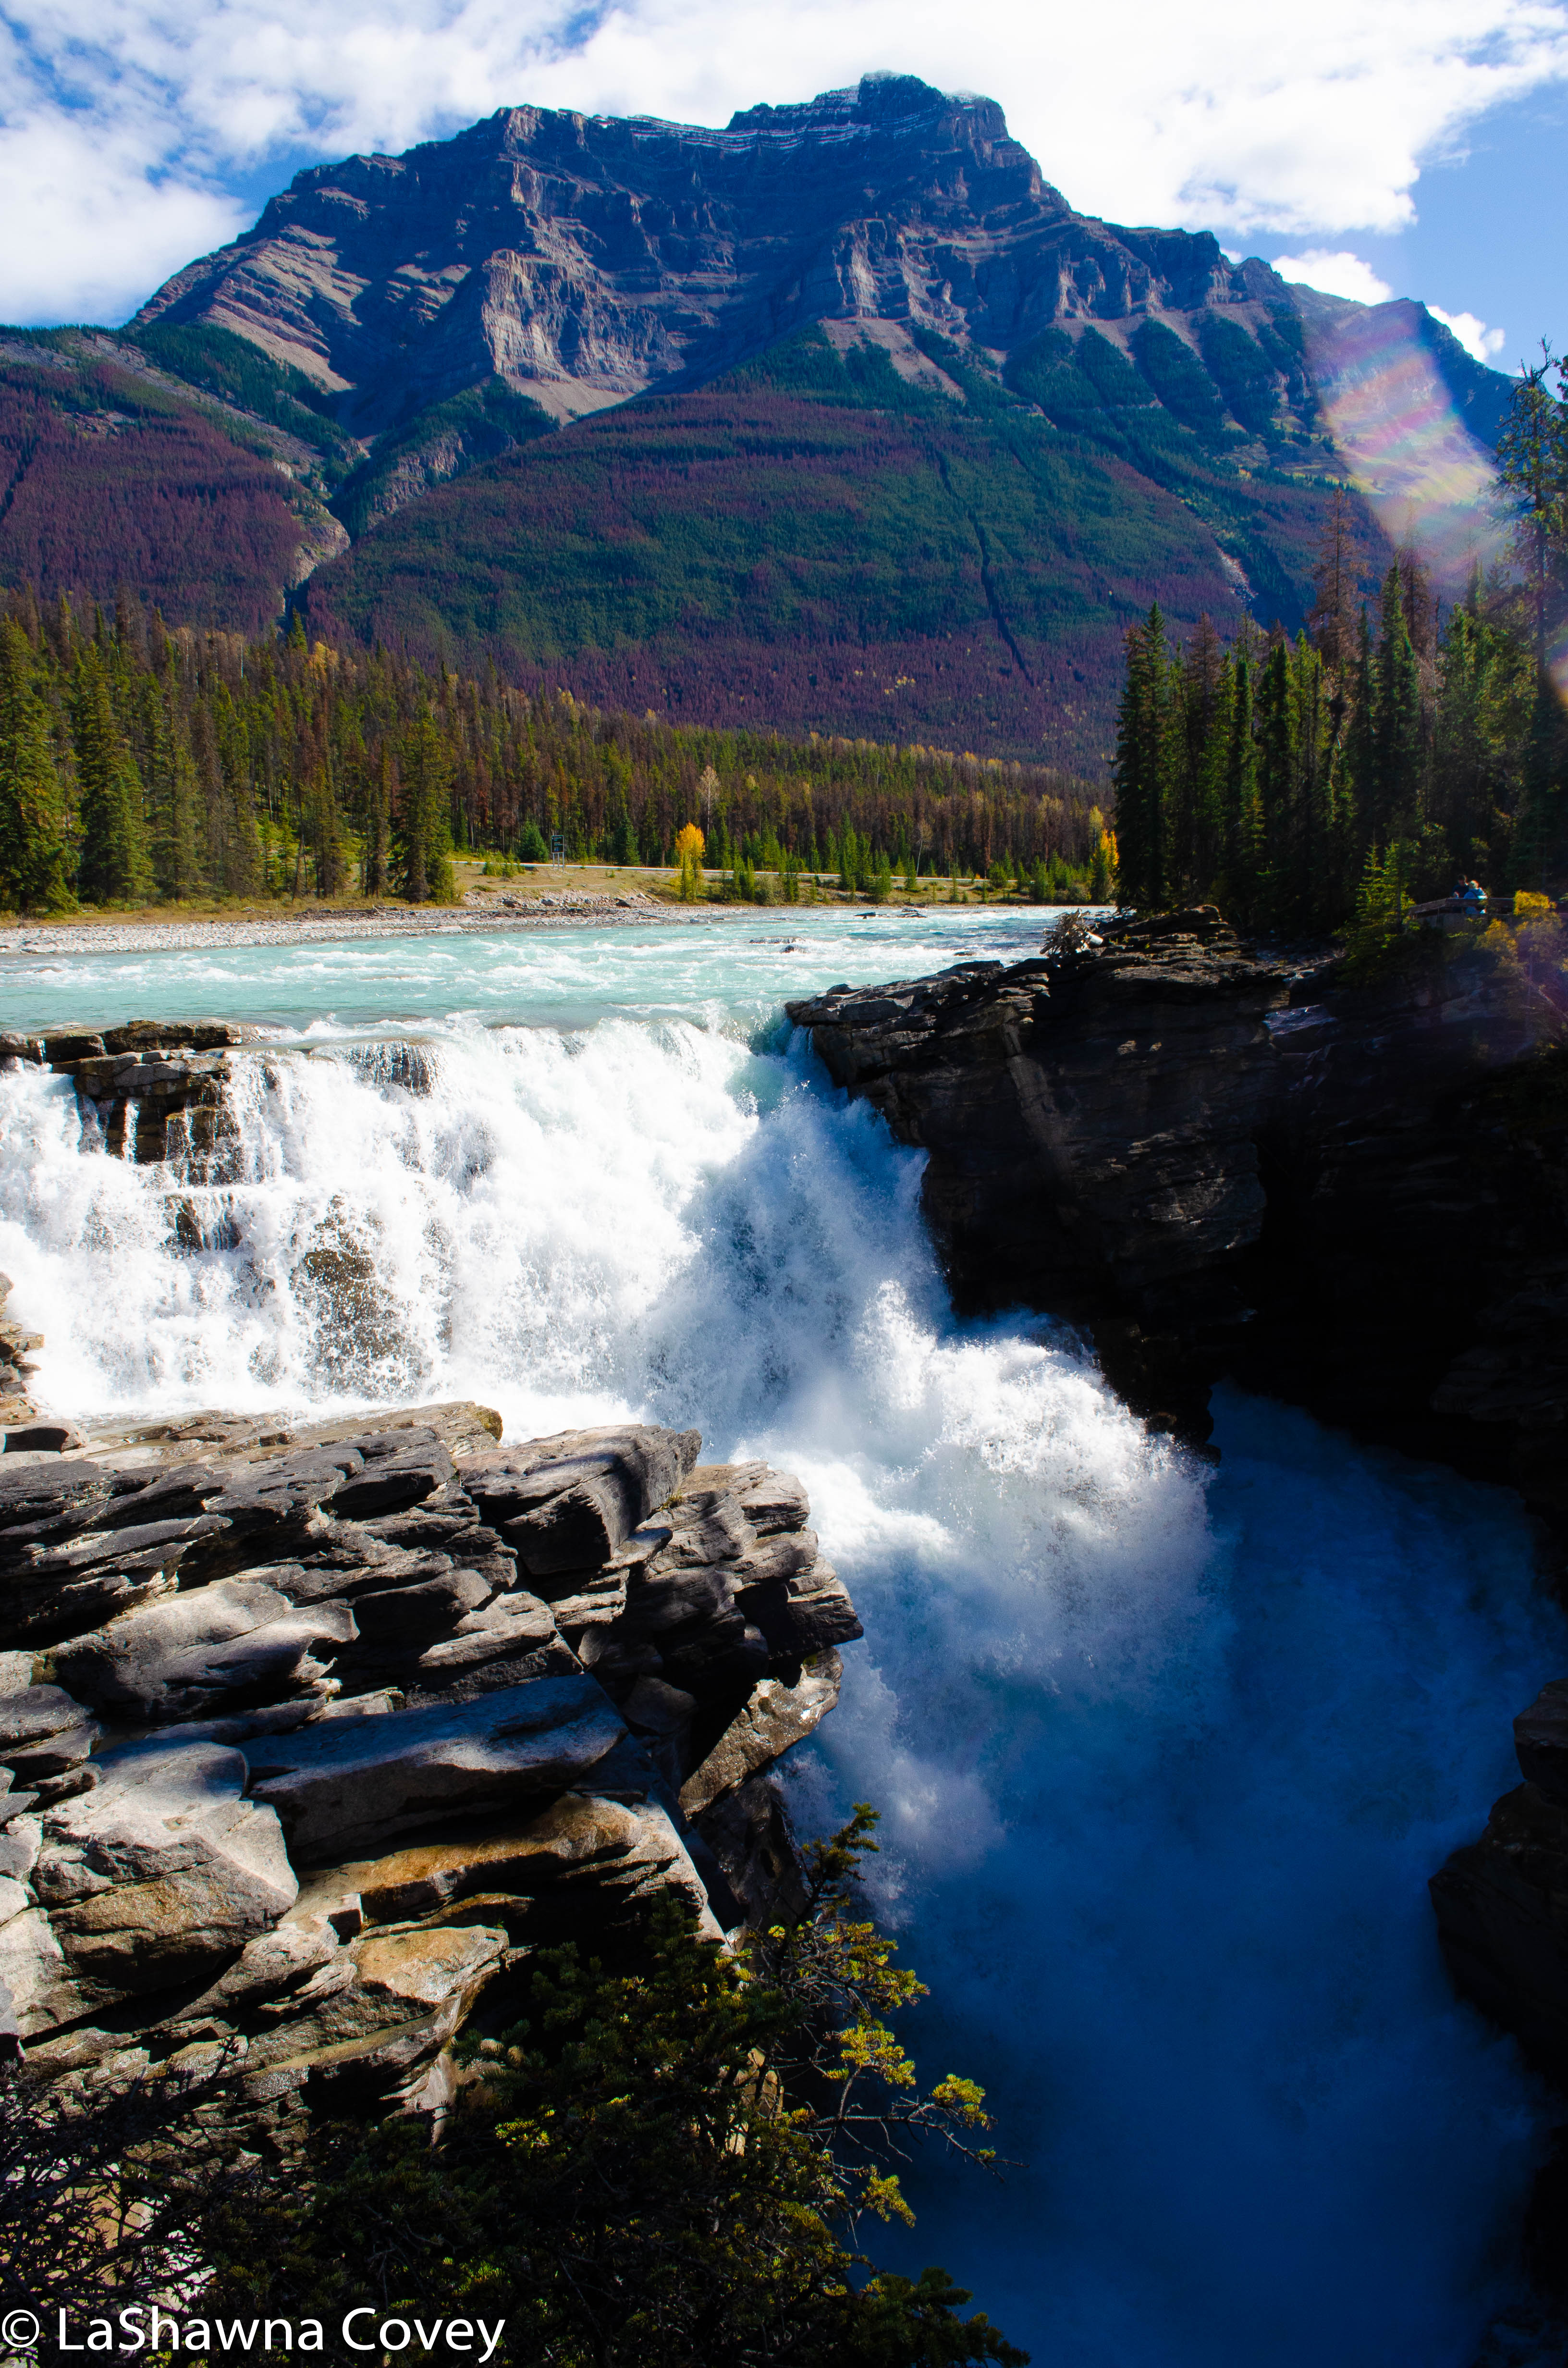
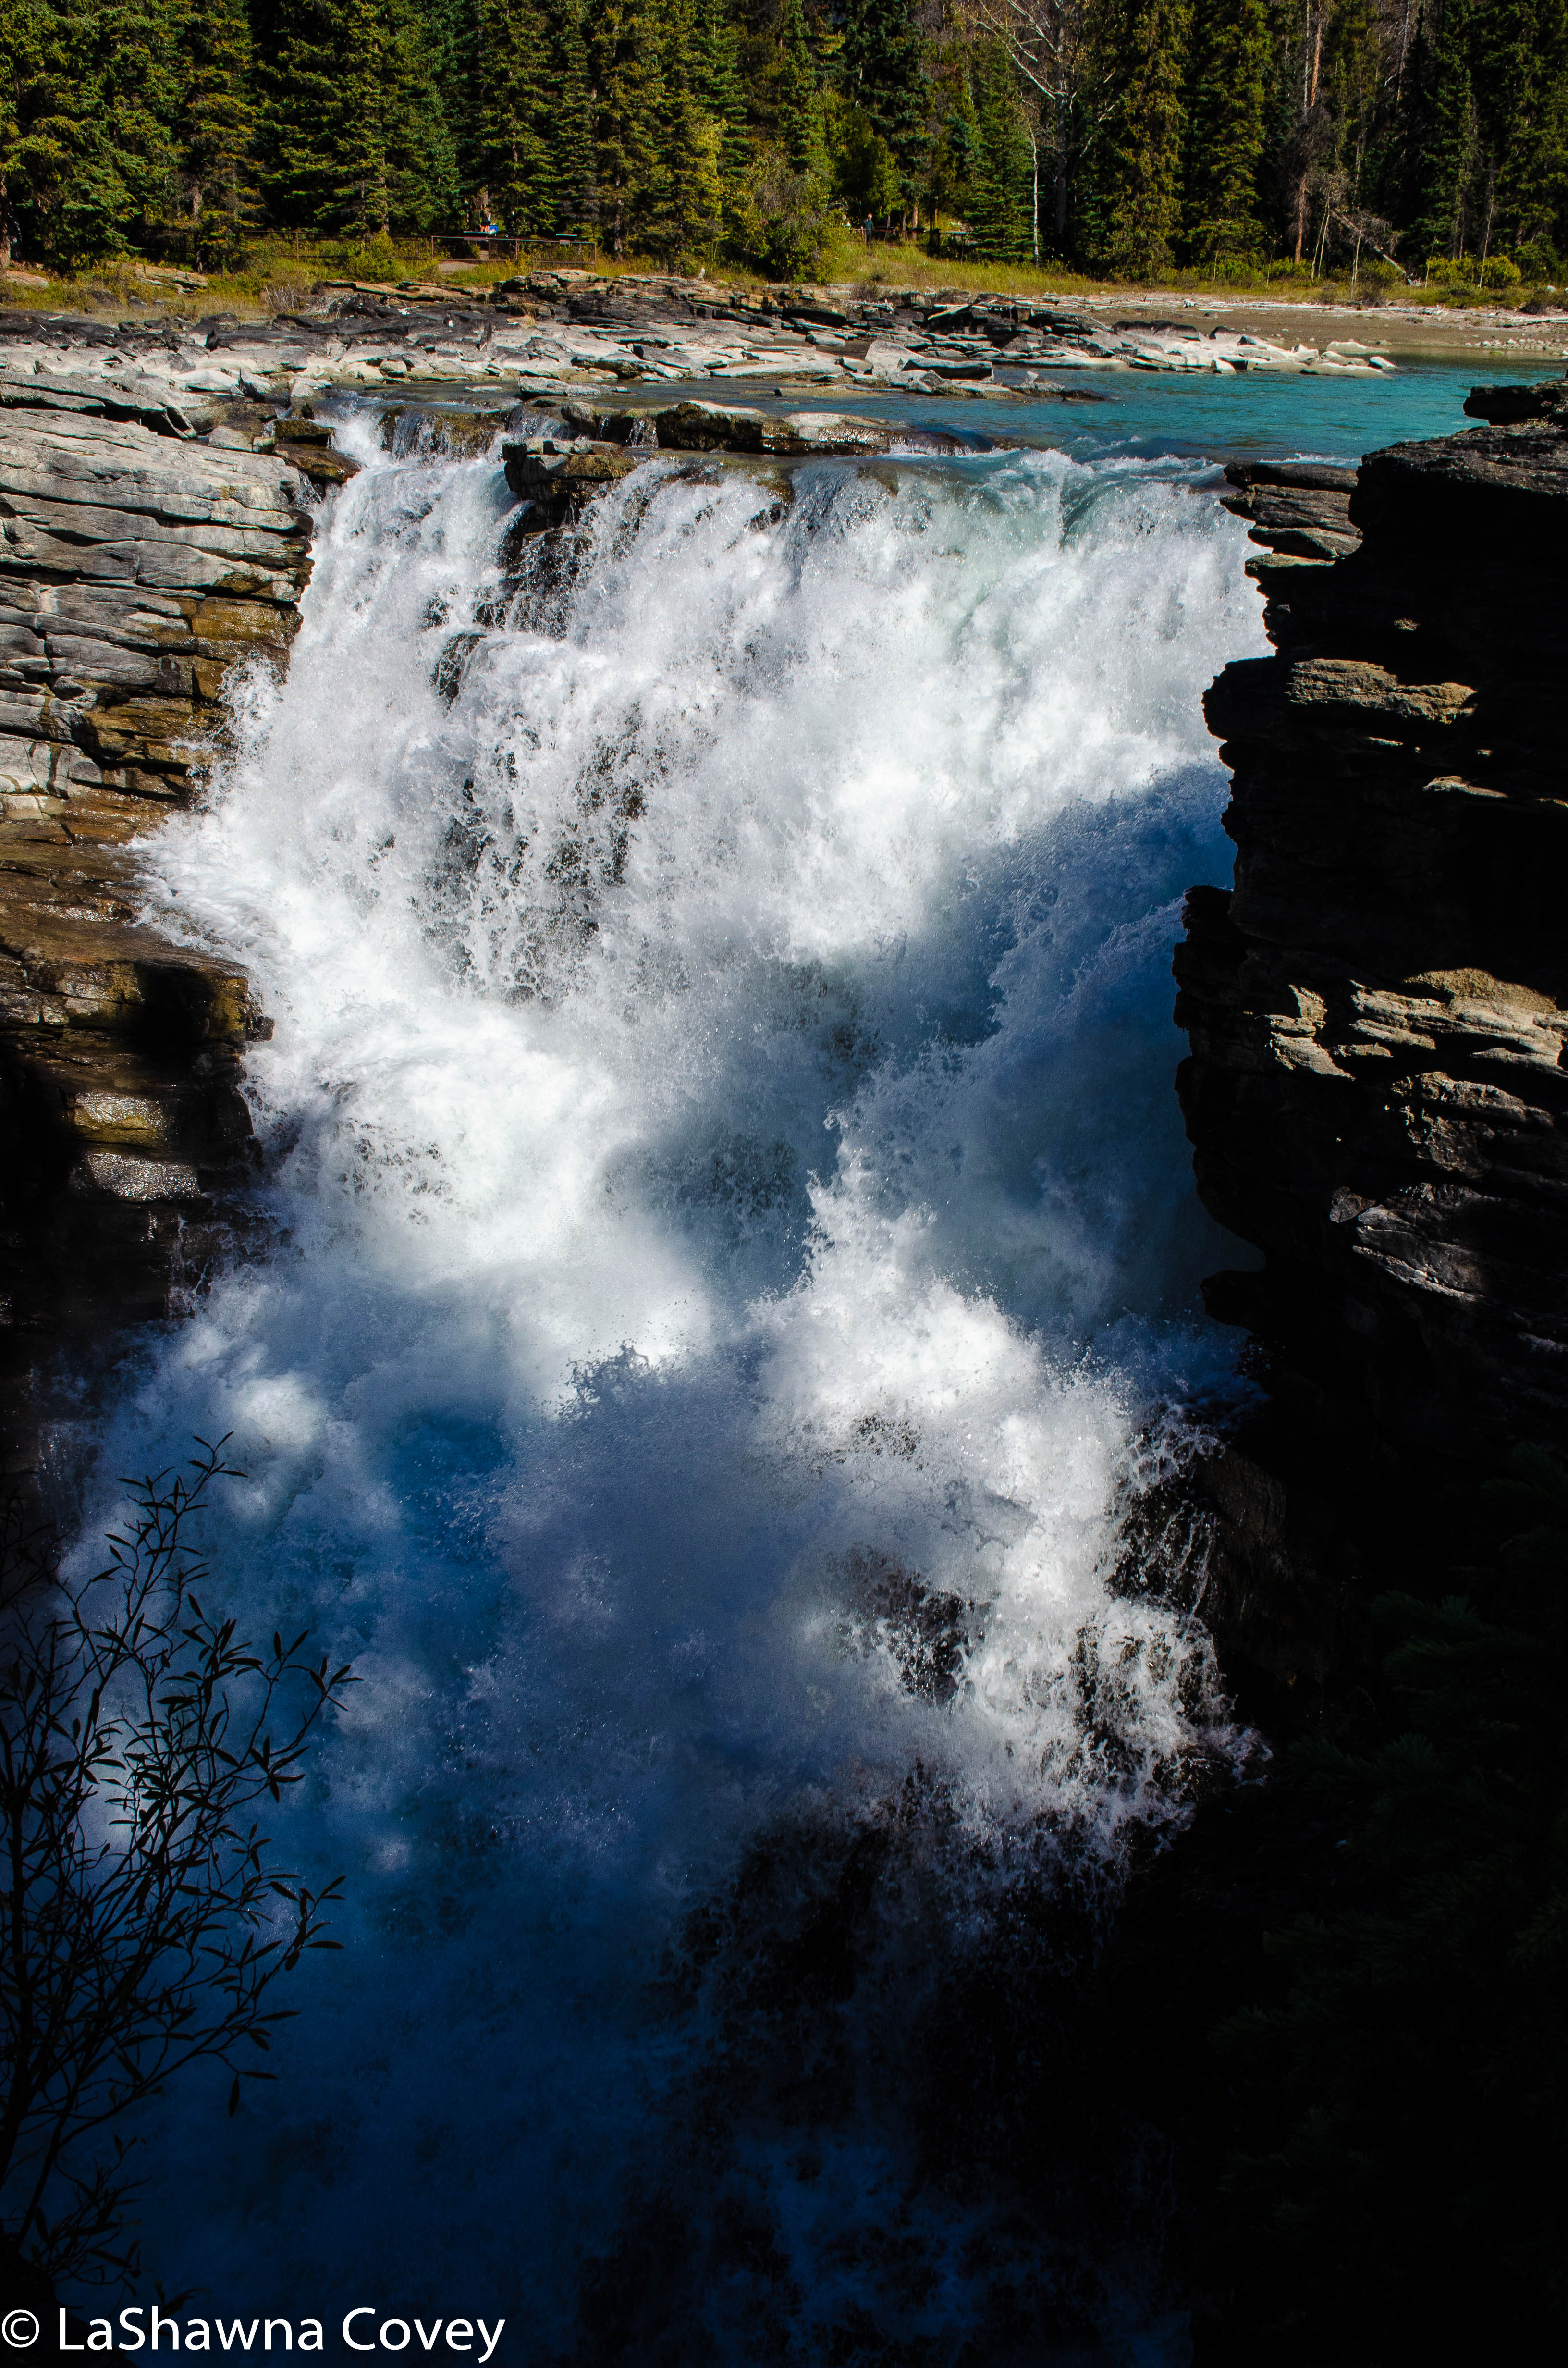
My next stop was at Takakkaw Falls. These falls are the second highest falls in Canada at 836 feet, and during the spring runoff, is basically gushing tons of water. But even in the more off season in the fall, the falls are still an impressive site. Reaching the falls involves driving along an eight mile road that is at times narrow with some interesting road switchbacks (I’m glad I was in a compact car, and not a large RV) to reach the trailhead. I could see the falls from a distance as I approached the trailhead, and there is ample parking, since it is such a popular spot to visit. 

Yoho National Park-4

The walk to get to the base of the falls is only half a mile and it’s on flat, paved surfaces, so it is easily accessible. The trail gets a bit more uneven as I approached the base of the falls and was looking all the up the cliff side to see the impressive water drop into the river and flow away. There are numerous beautiful viewpoints along the trail that provide nice photo opportunities of the waterfall. 

Yoho National Park-5

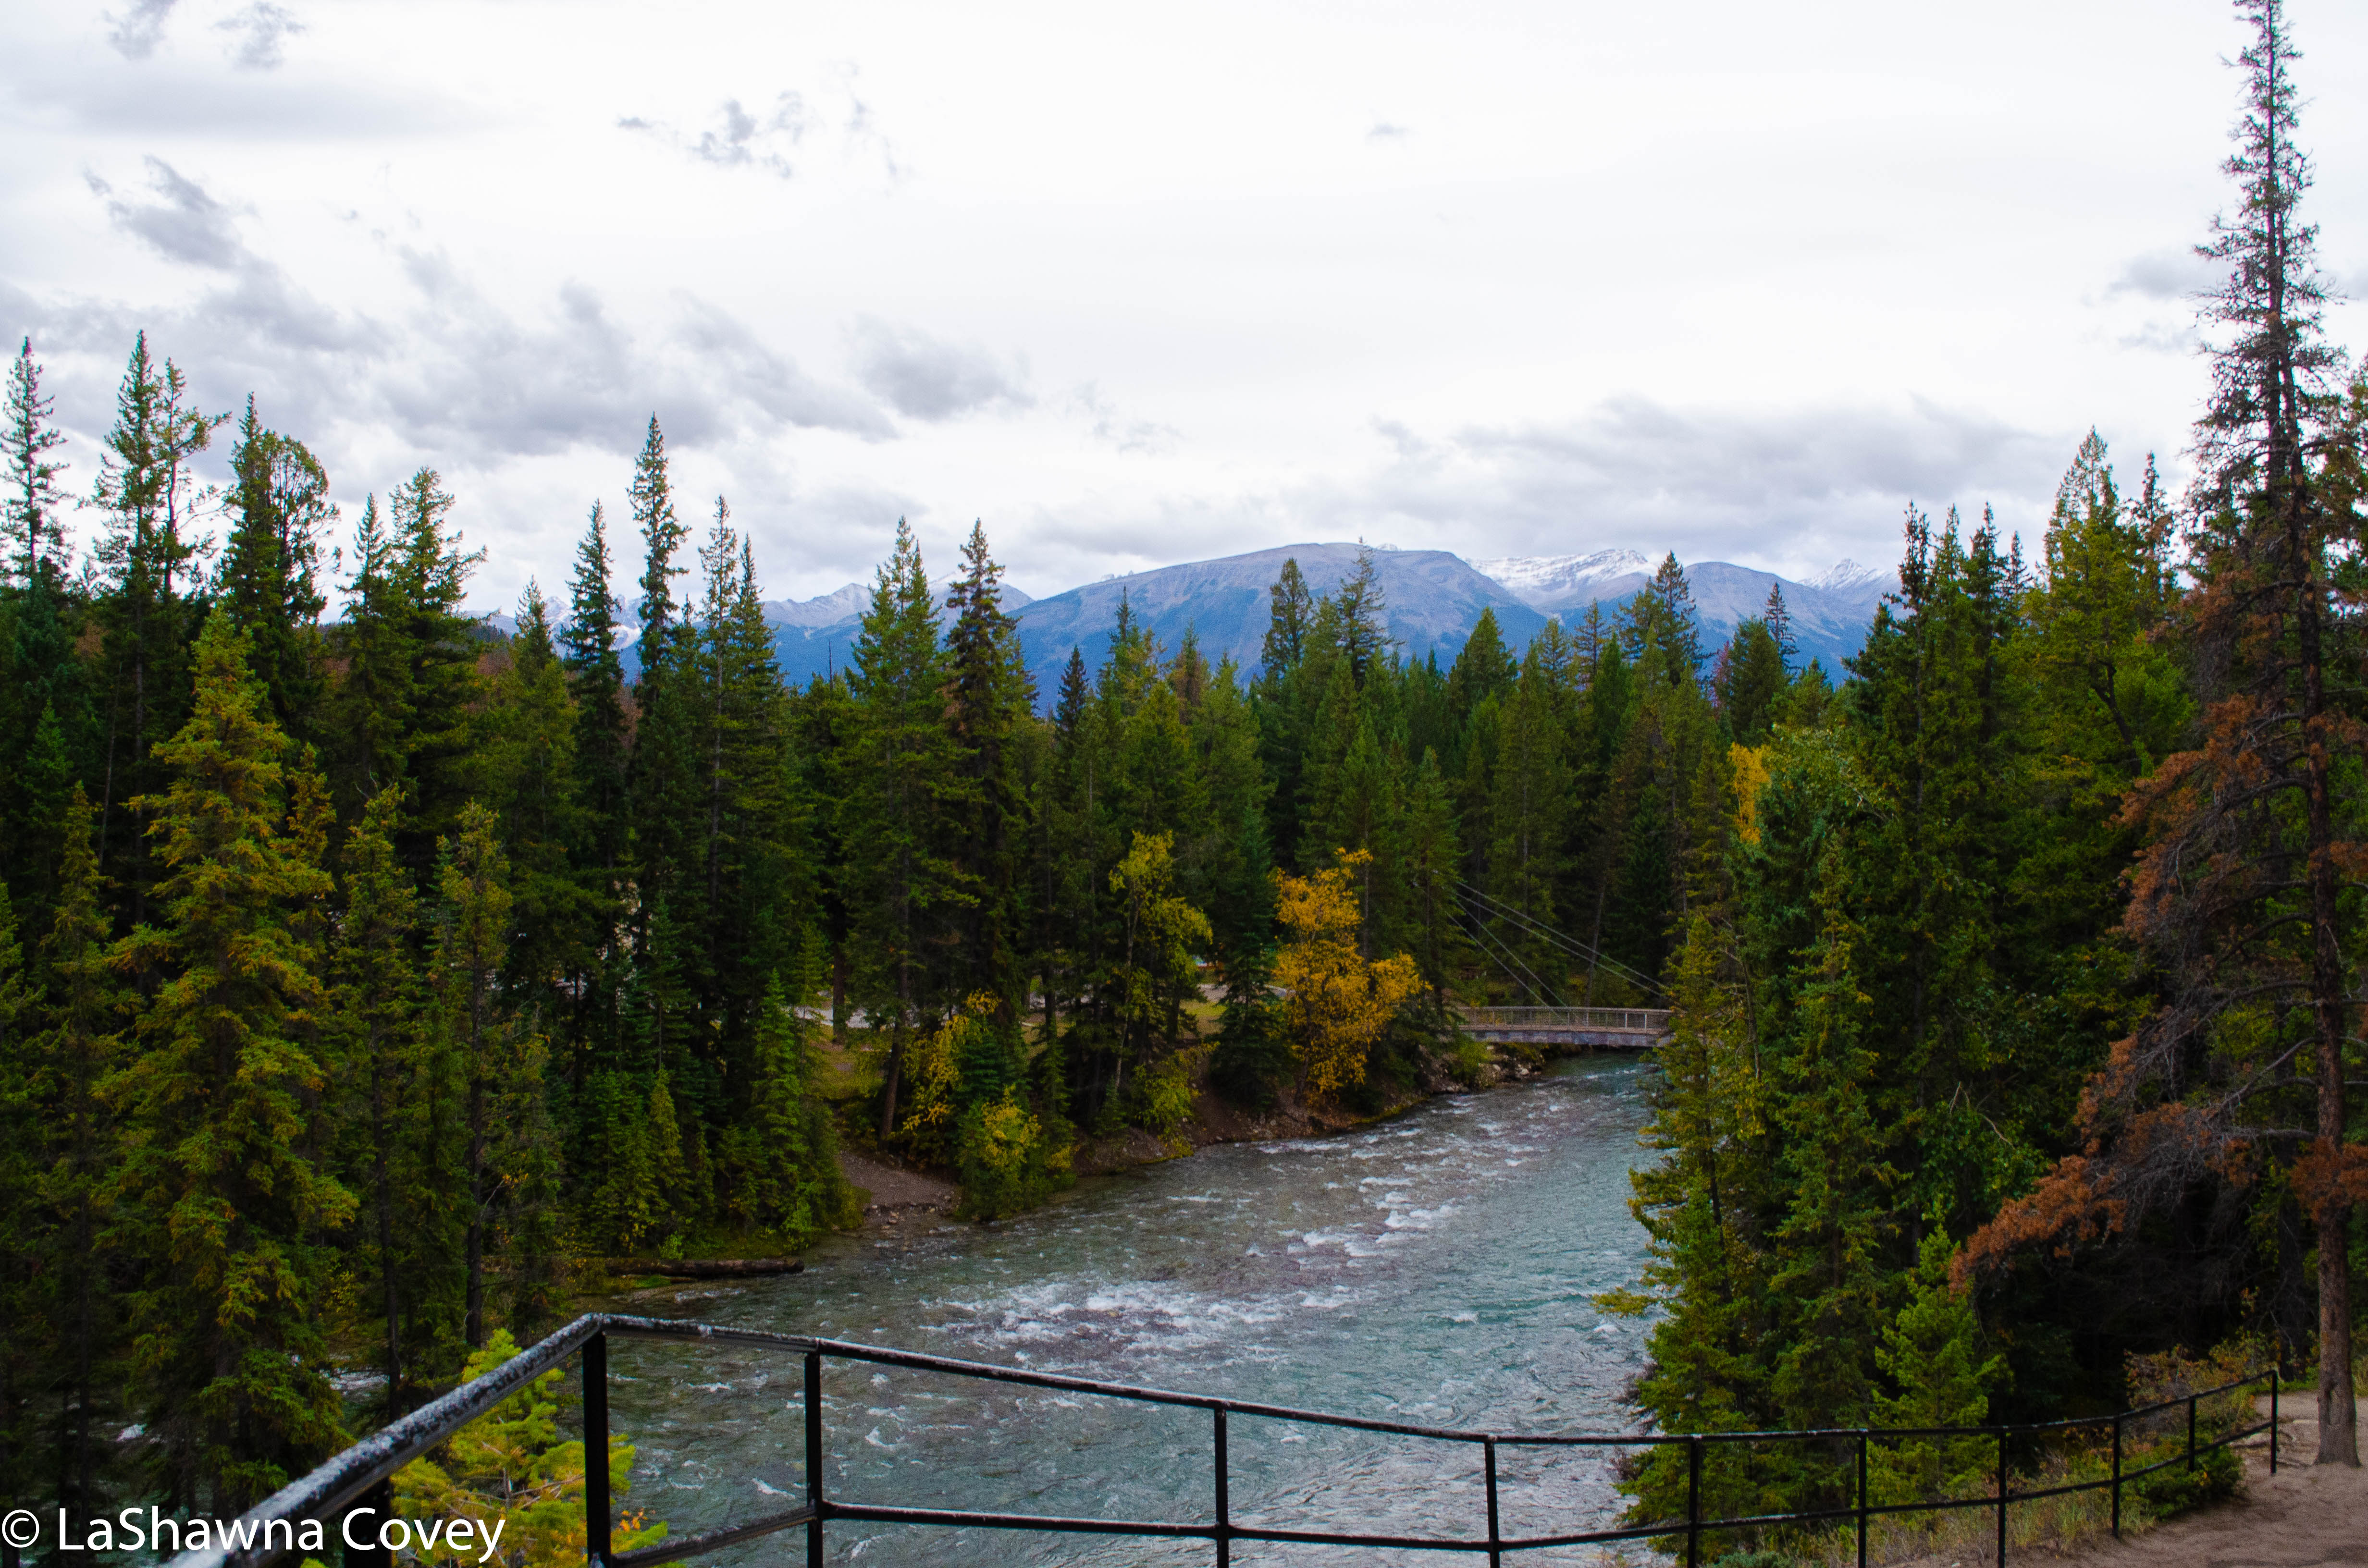
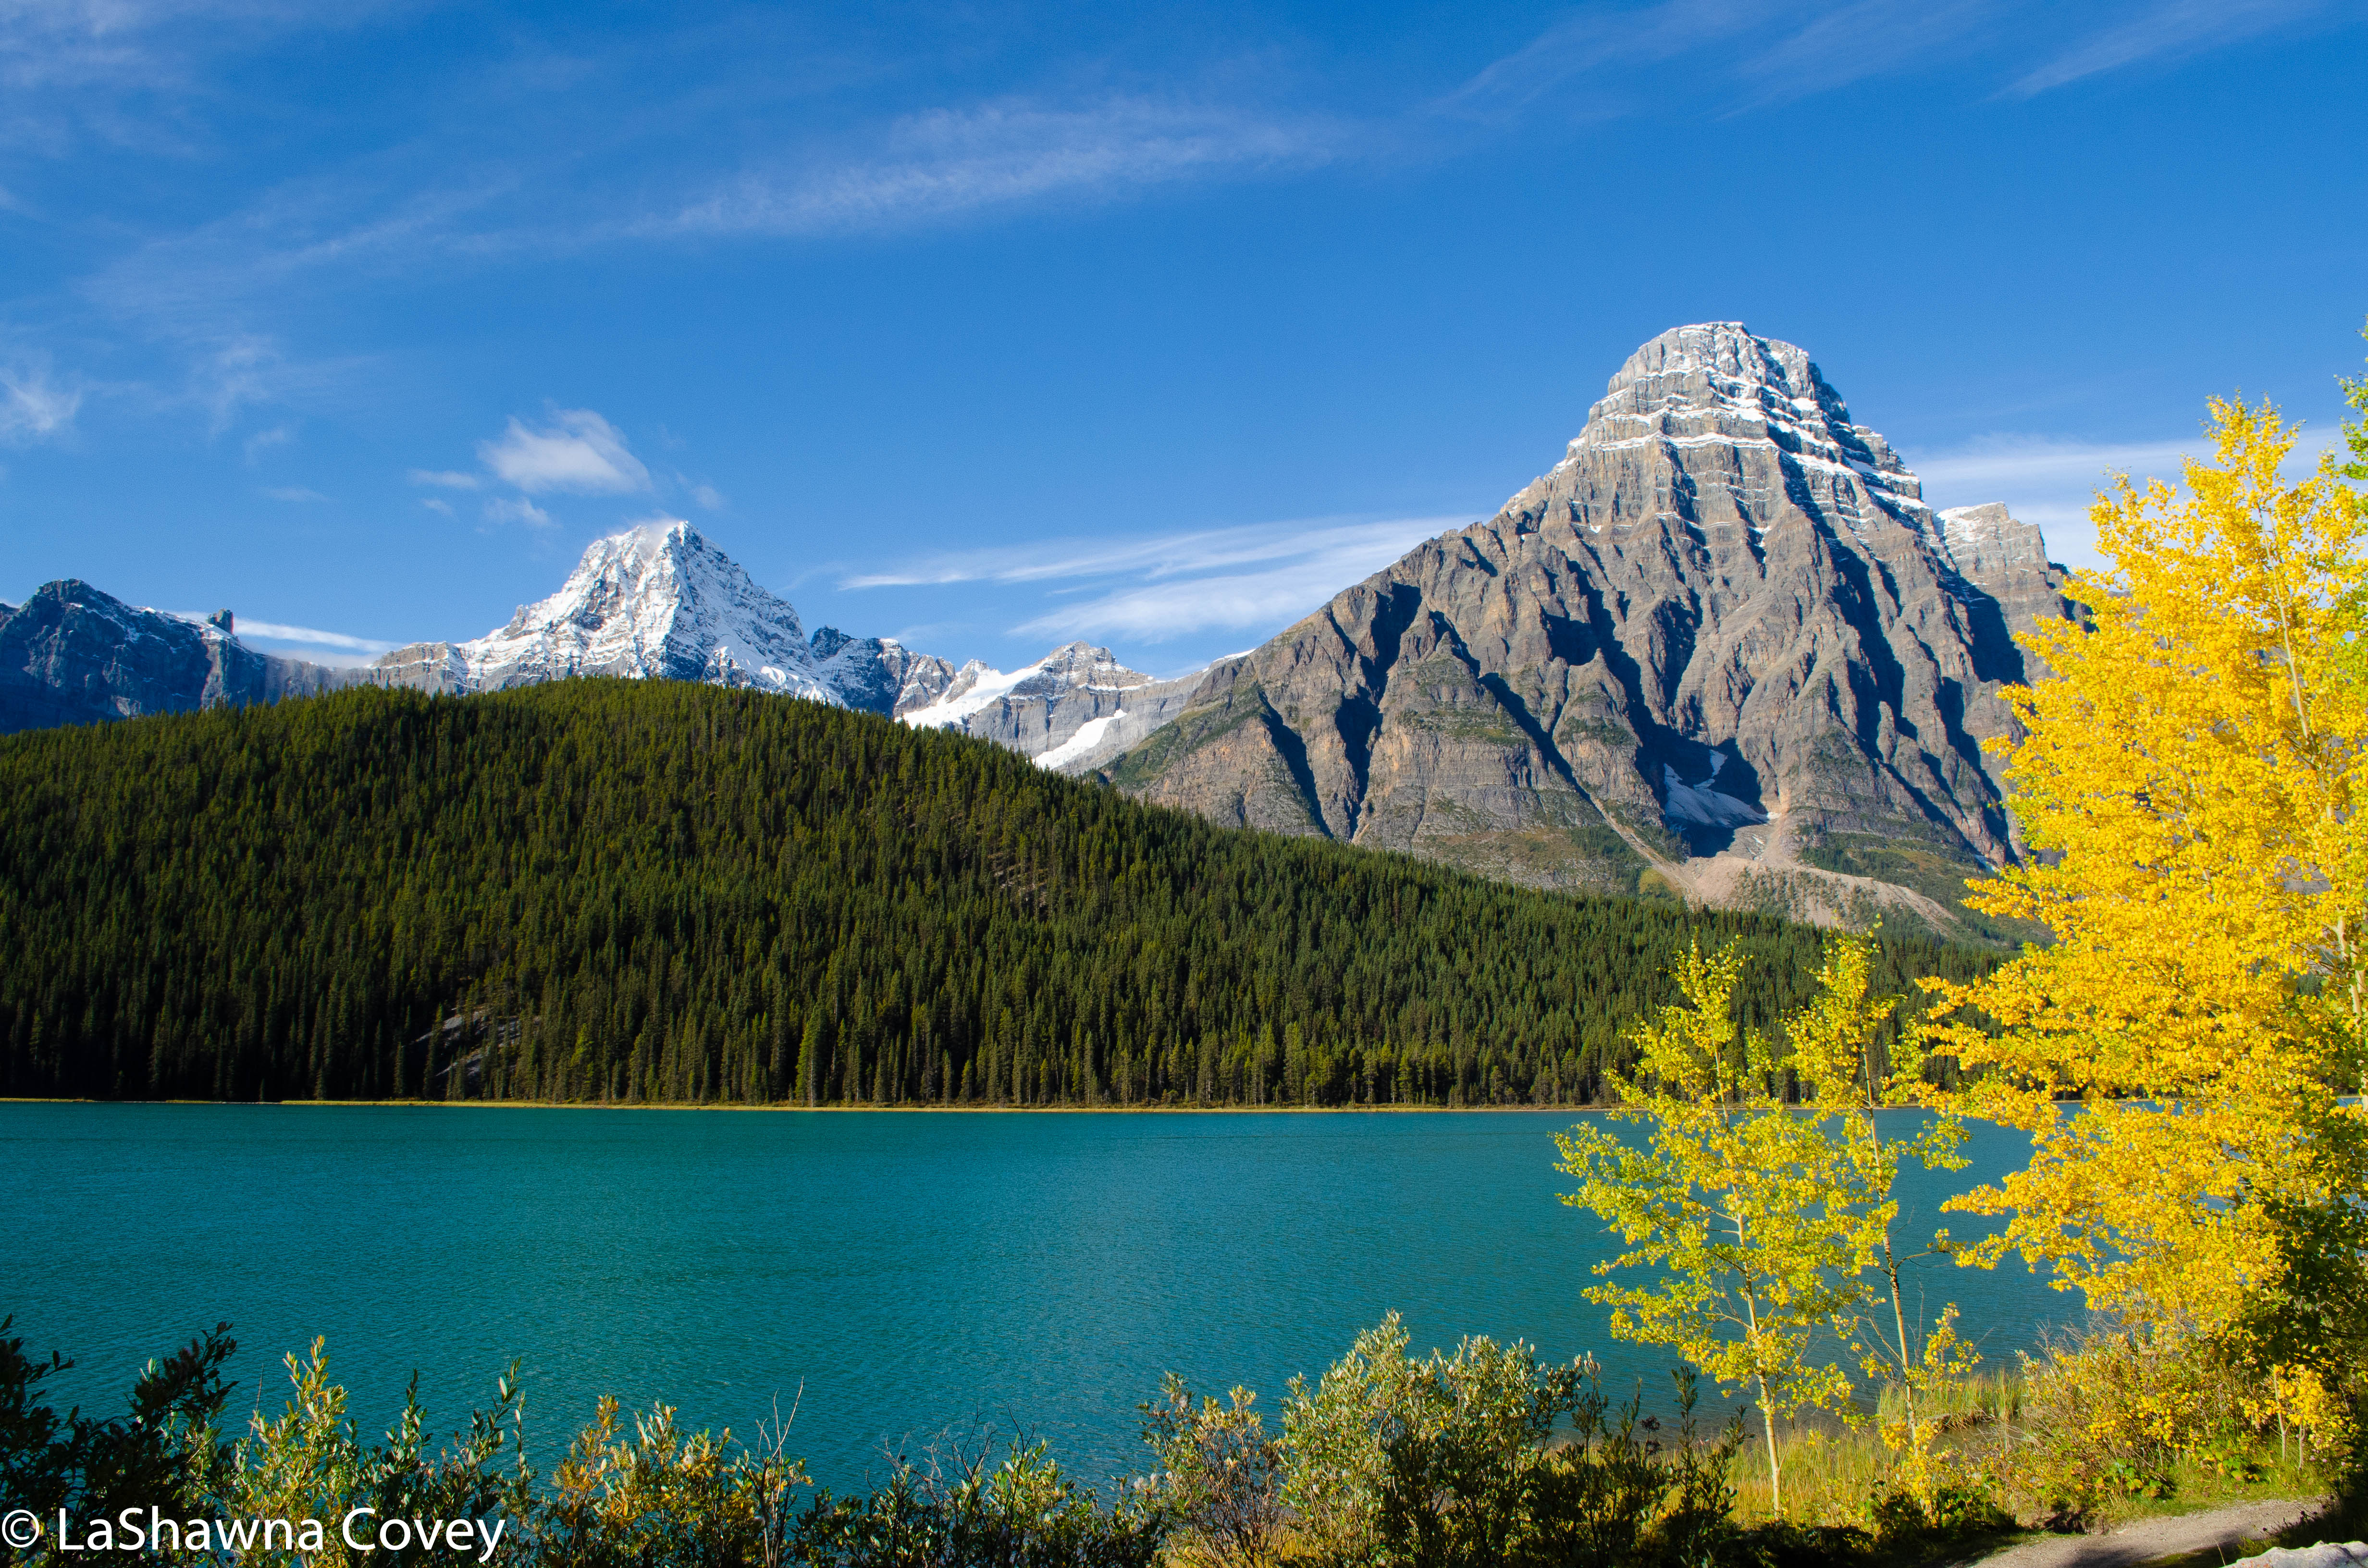
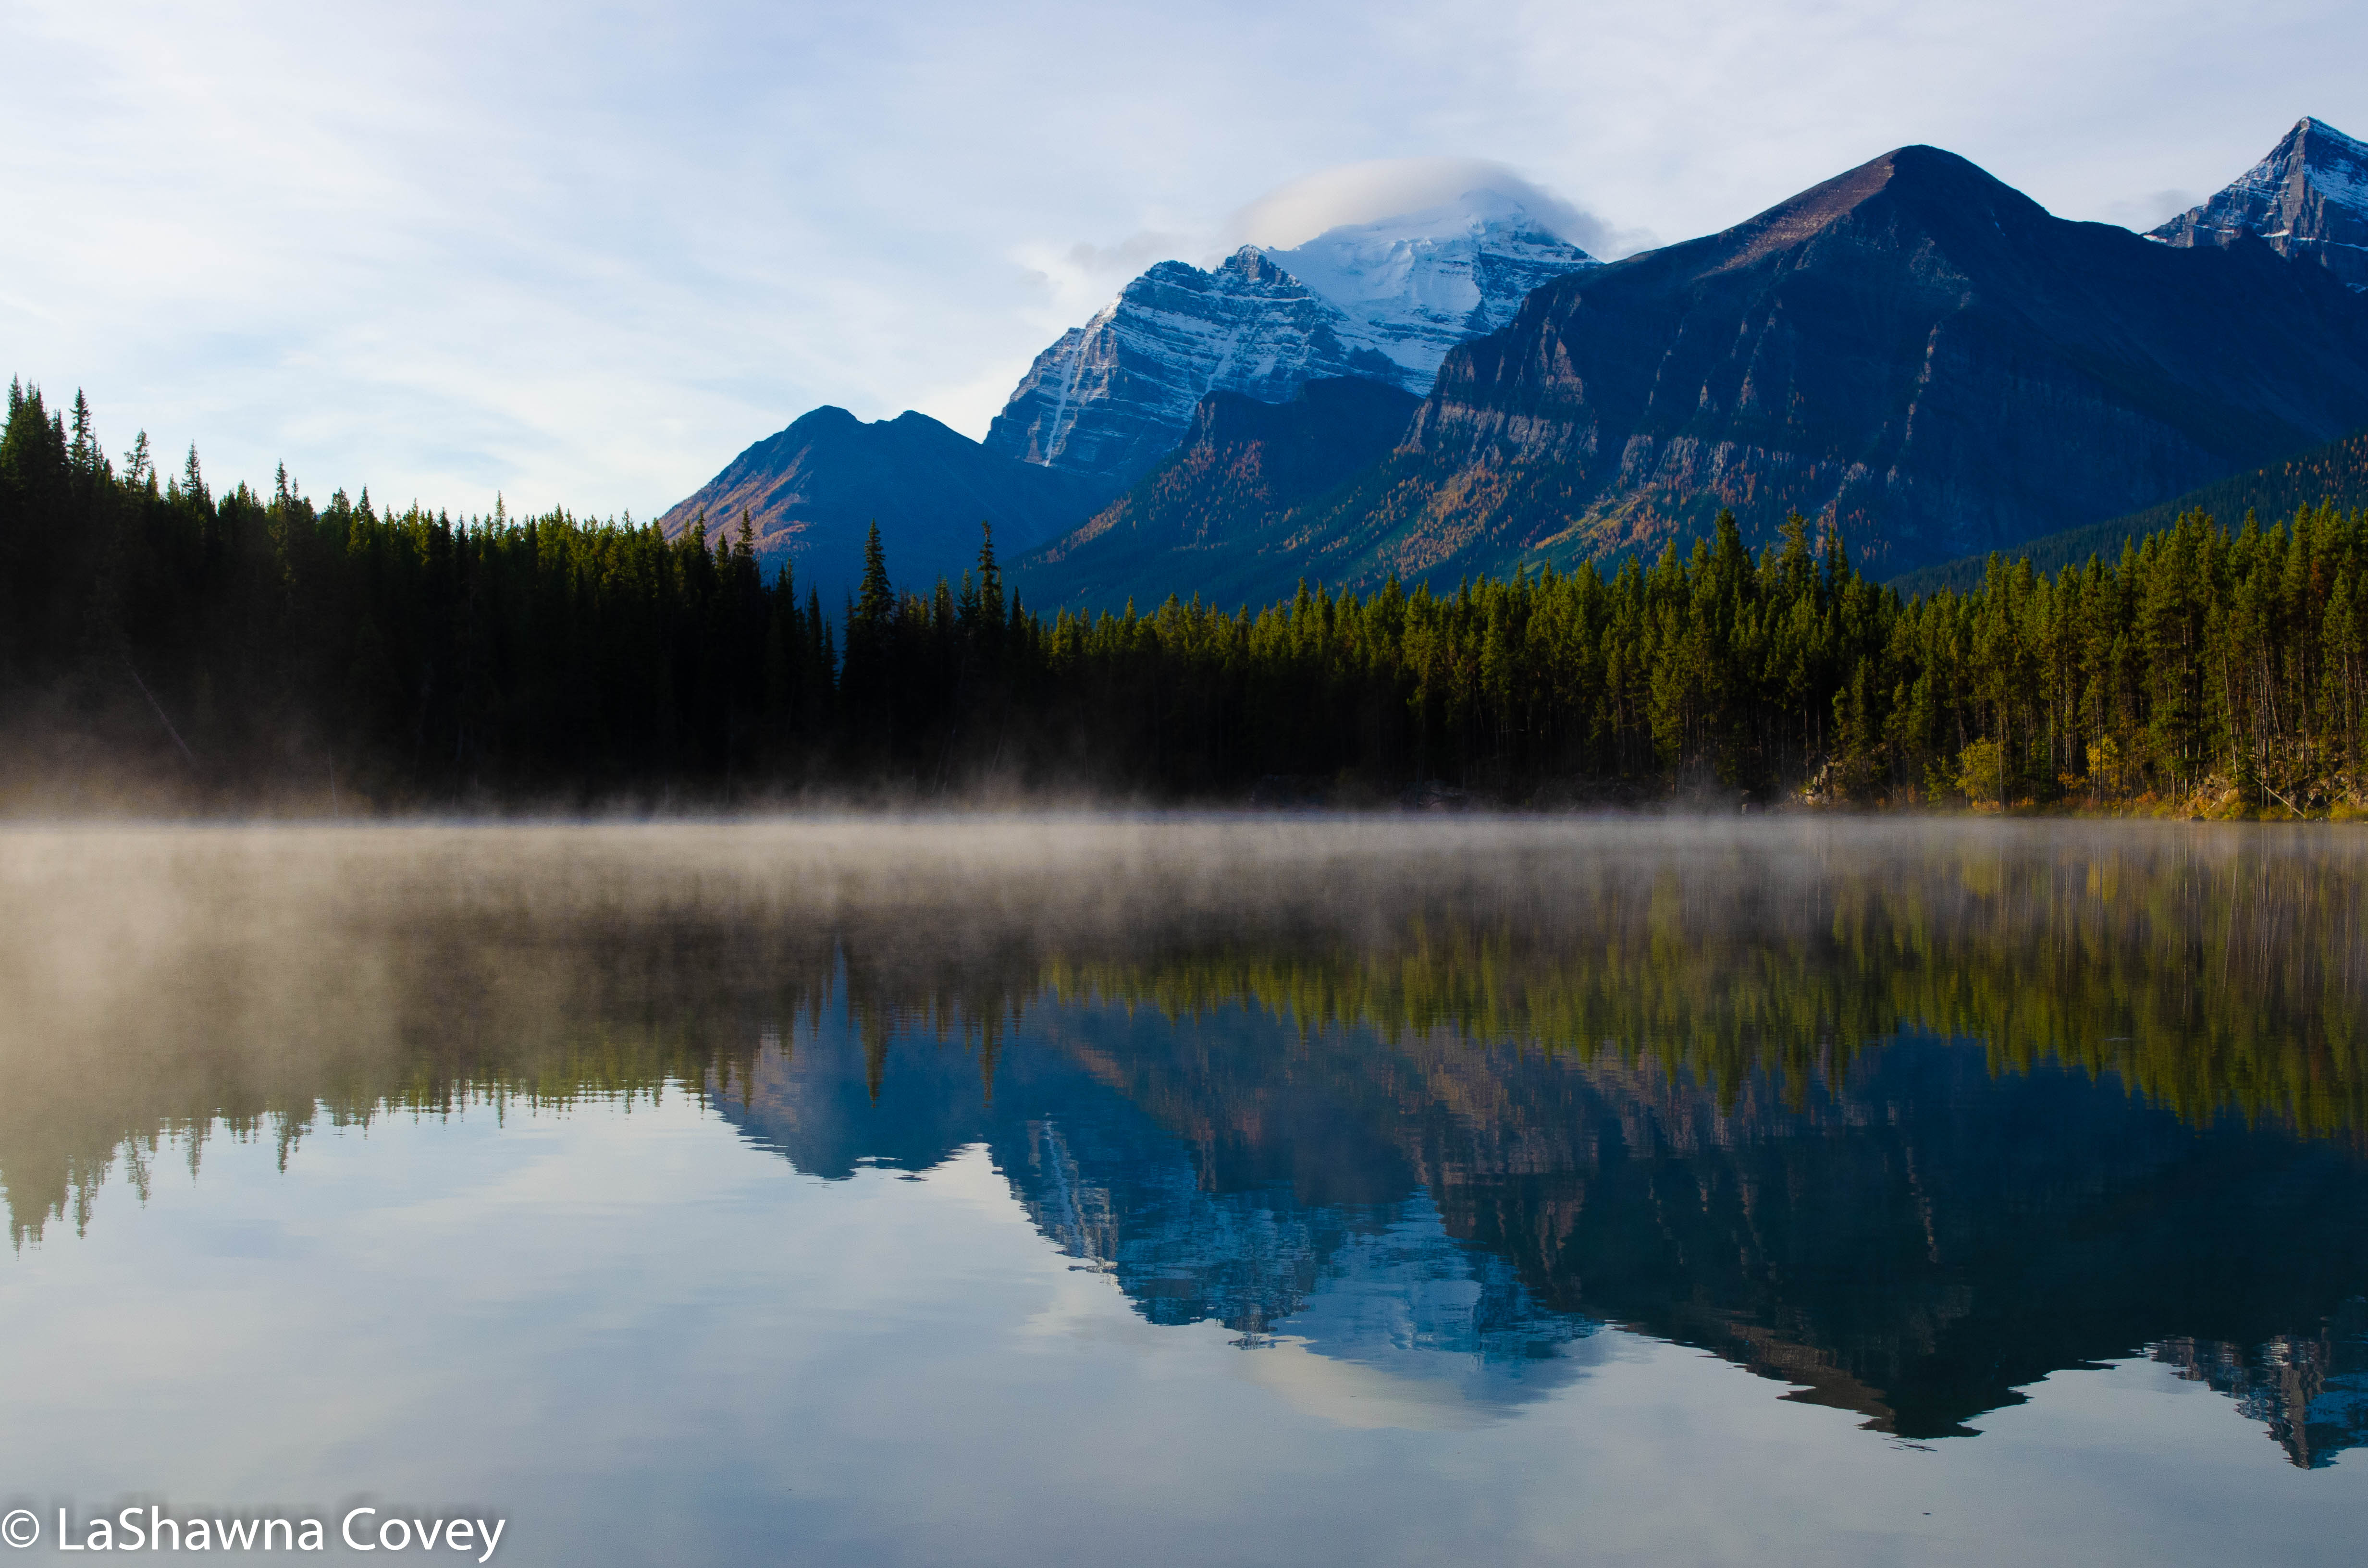
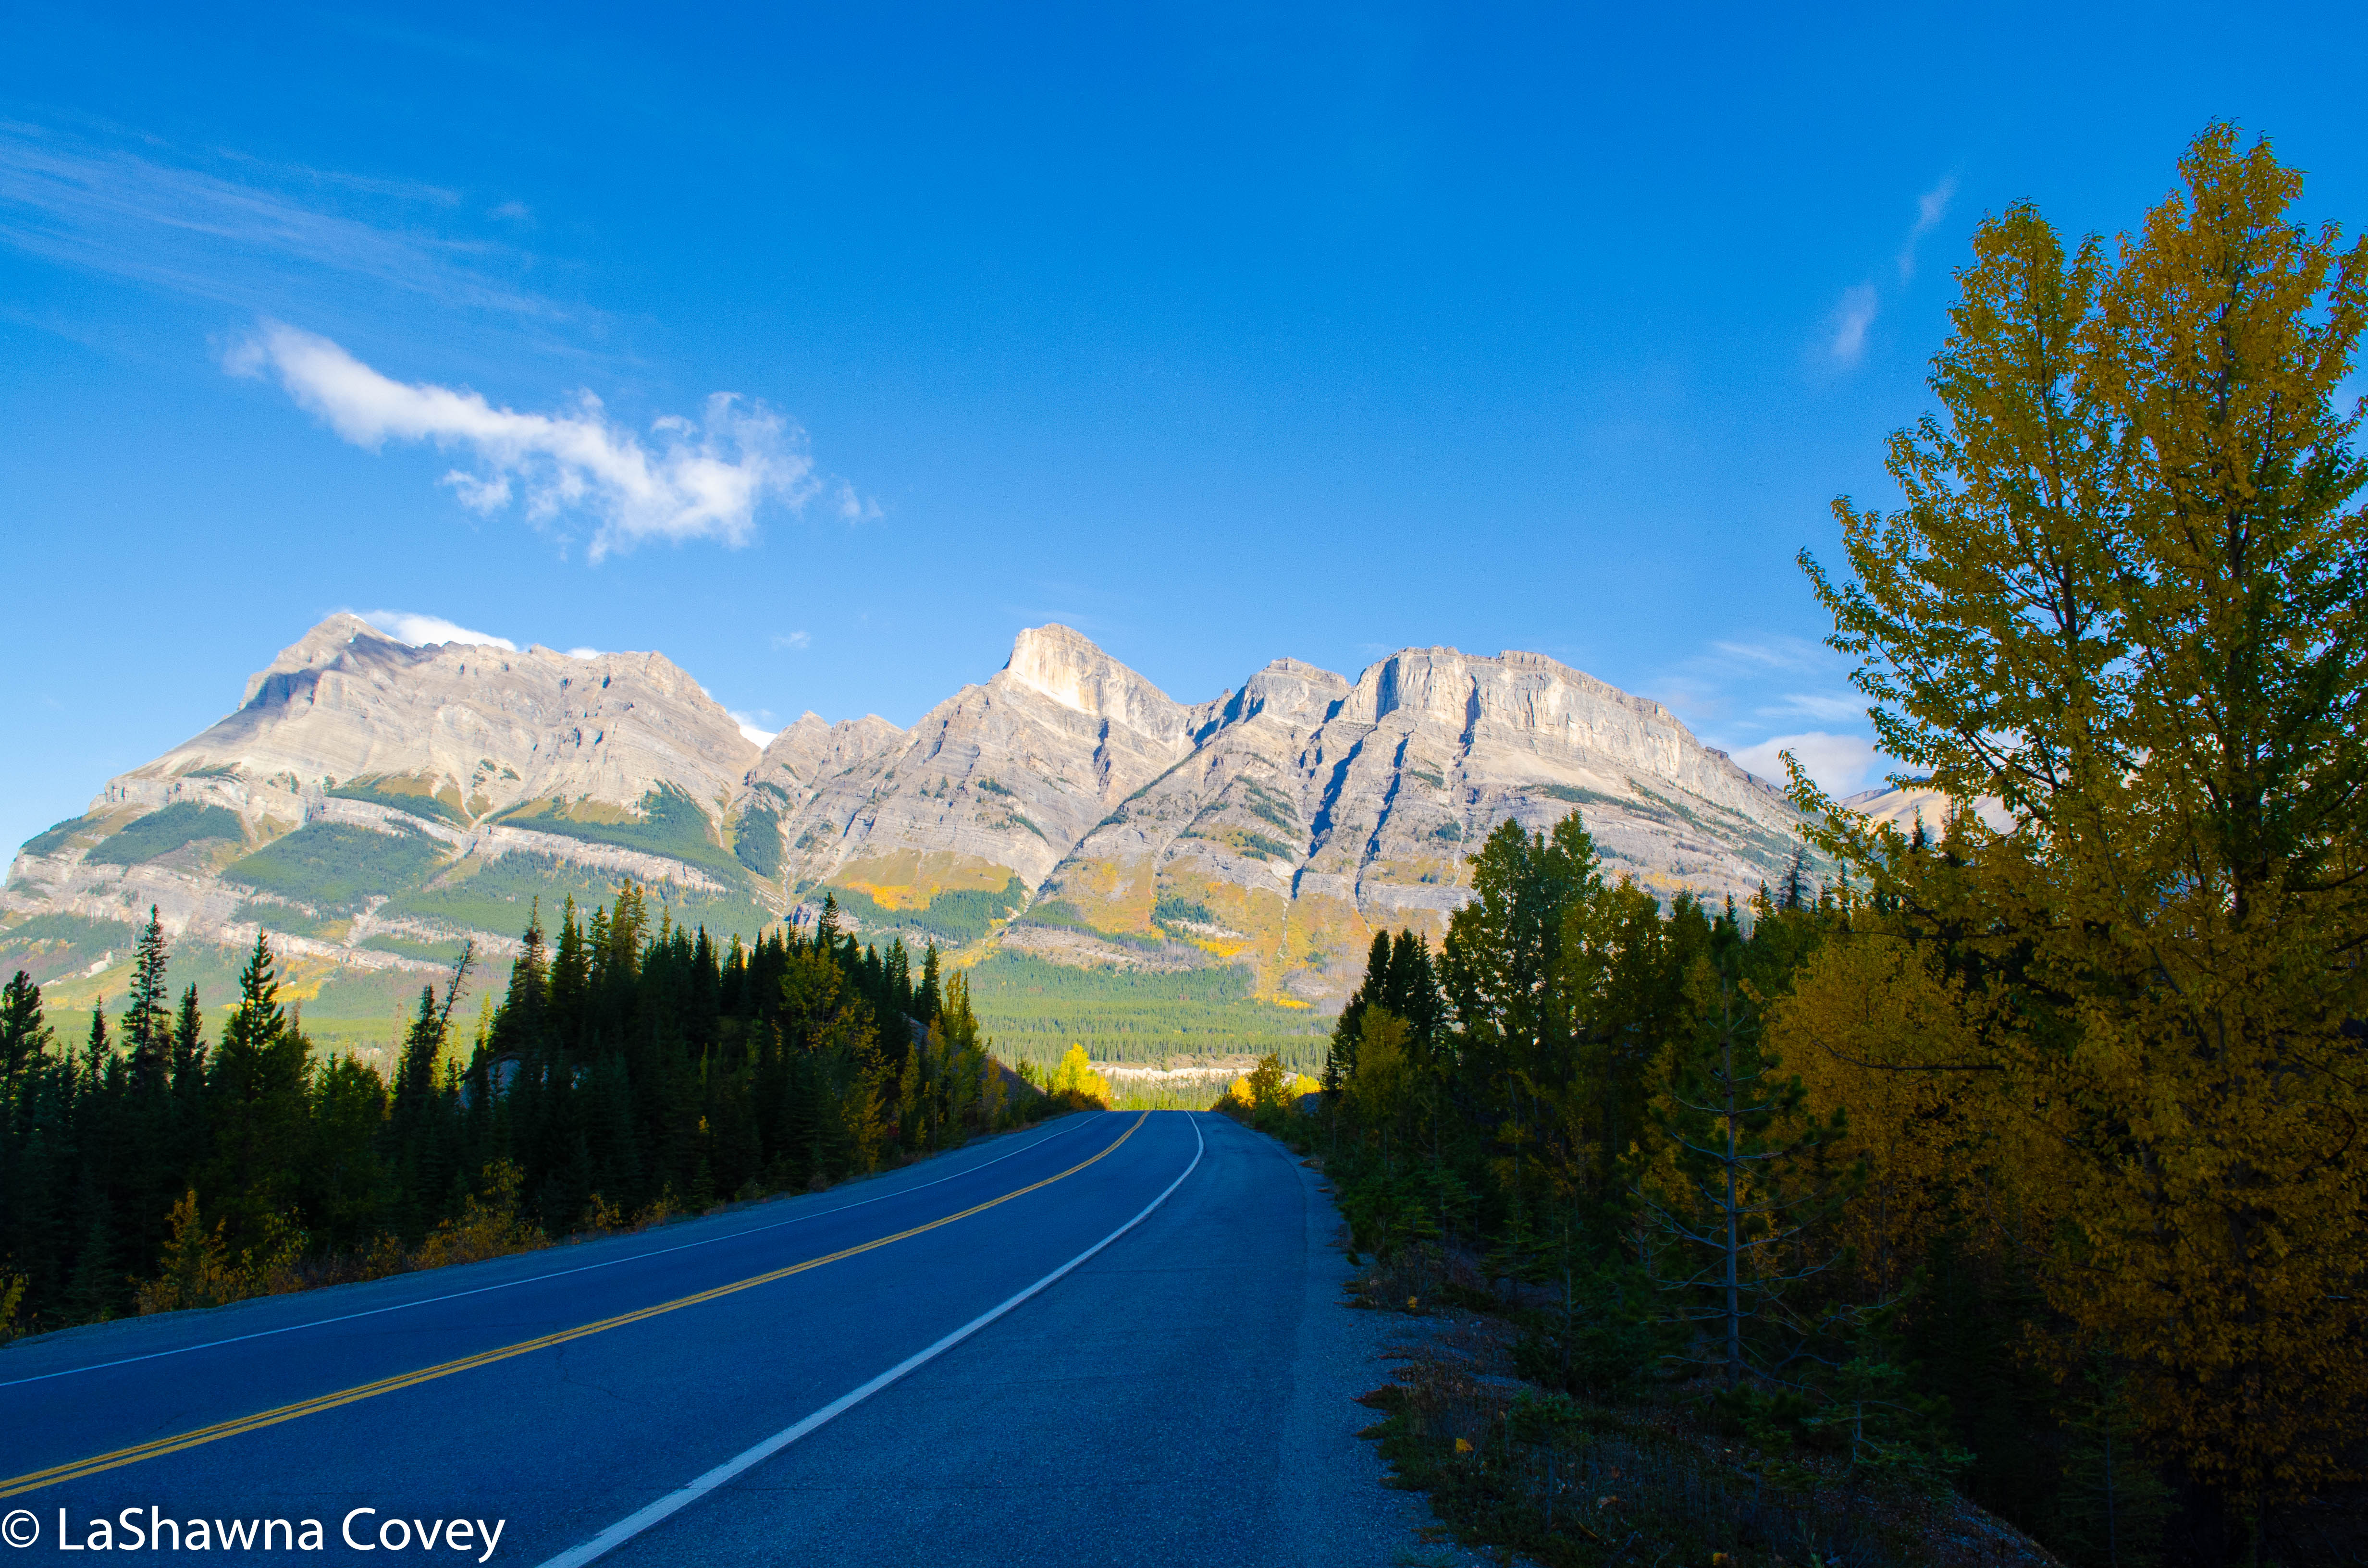
Once back in the car, I kept driving along Trans Canada Highway 1, stopping every so often at pullouts to take pictures of the astounding beauty of the river and the surrounding mountains. It is not noticeably different from Alberta province, but the natural beauty is still enough to give me pause. 

My next stop proved to be a bit harder to find. I was going to hike to the Wapta Falls, and had the basic directions. However, I never saw a sign for a turnoff to the waterfall, so I overshot my target and ended up at the nearby town of Golden. Even though I was farther than I wanted to be, I figured this was a good spot for some lunch, before heading back to Yoho National Park to try and find this waterfall.

Yoho National Park-6

It was a combination of rereading the directions in my guide book, and checking Google Maps to realize just where I needed to go. The road to the waterfall is easily accessible from the main highway. However, due to construction immediately around the turnoff, I didn’t see a sign to turn left as I was traveling west on the highway. But there was a sign (plus I was on the close lookout for the road sign) that told me to turn right off the highway as I was heading east back towards Alberta. 

The road to the trailhead was rather bumpy and muddy, but still negotiable with a compact car. When I got to the parking place, I was a bit surprised to see how full it was. Sure, the parking lot isn’t HUGE, but it shows how this hike is pretty popular. 

Yoho National Park-7

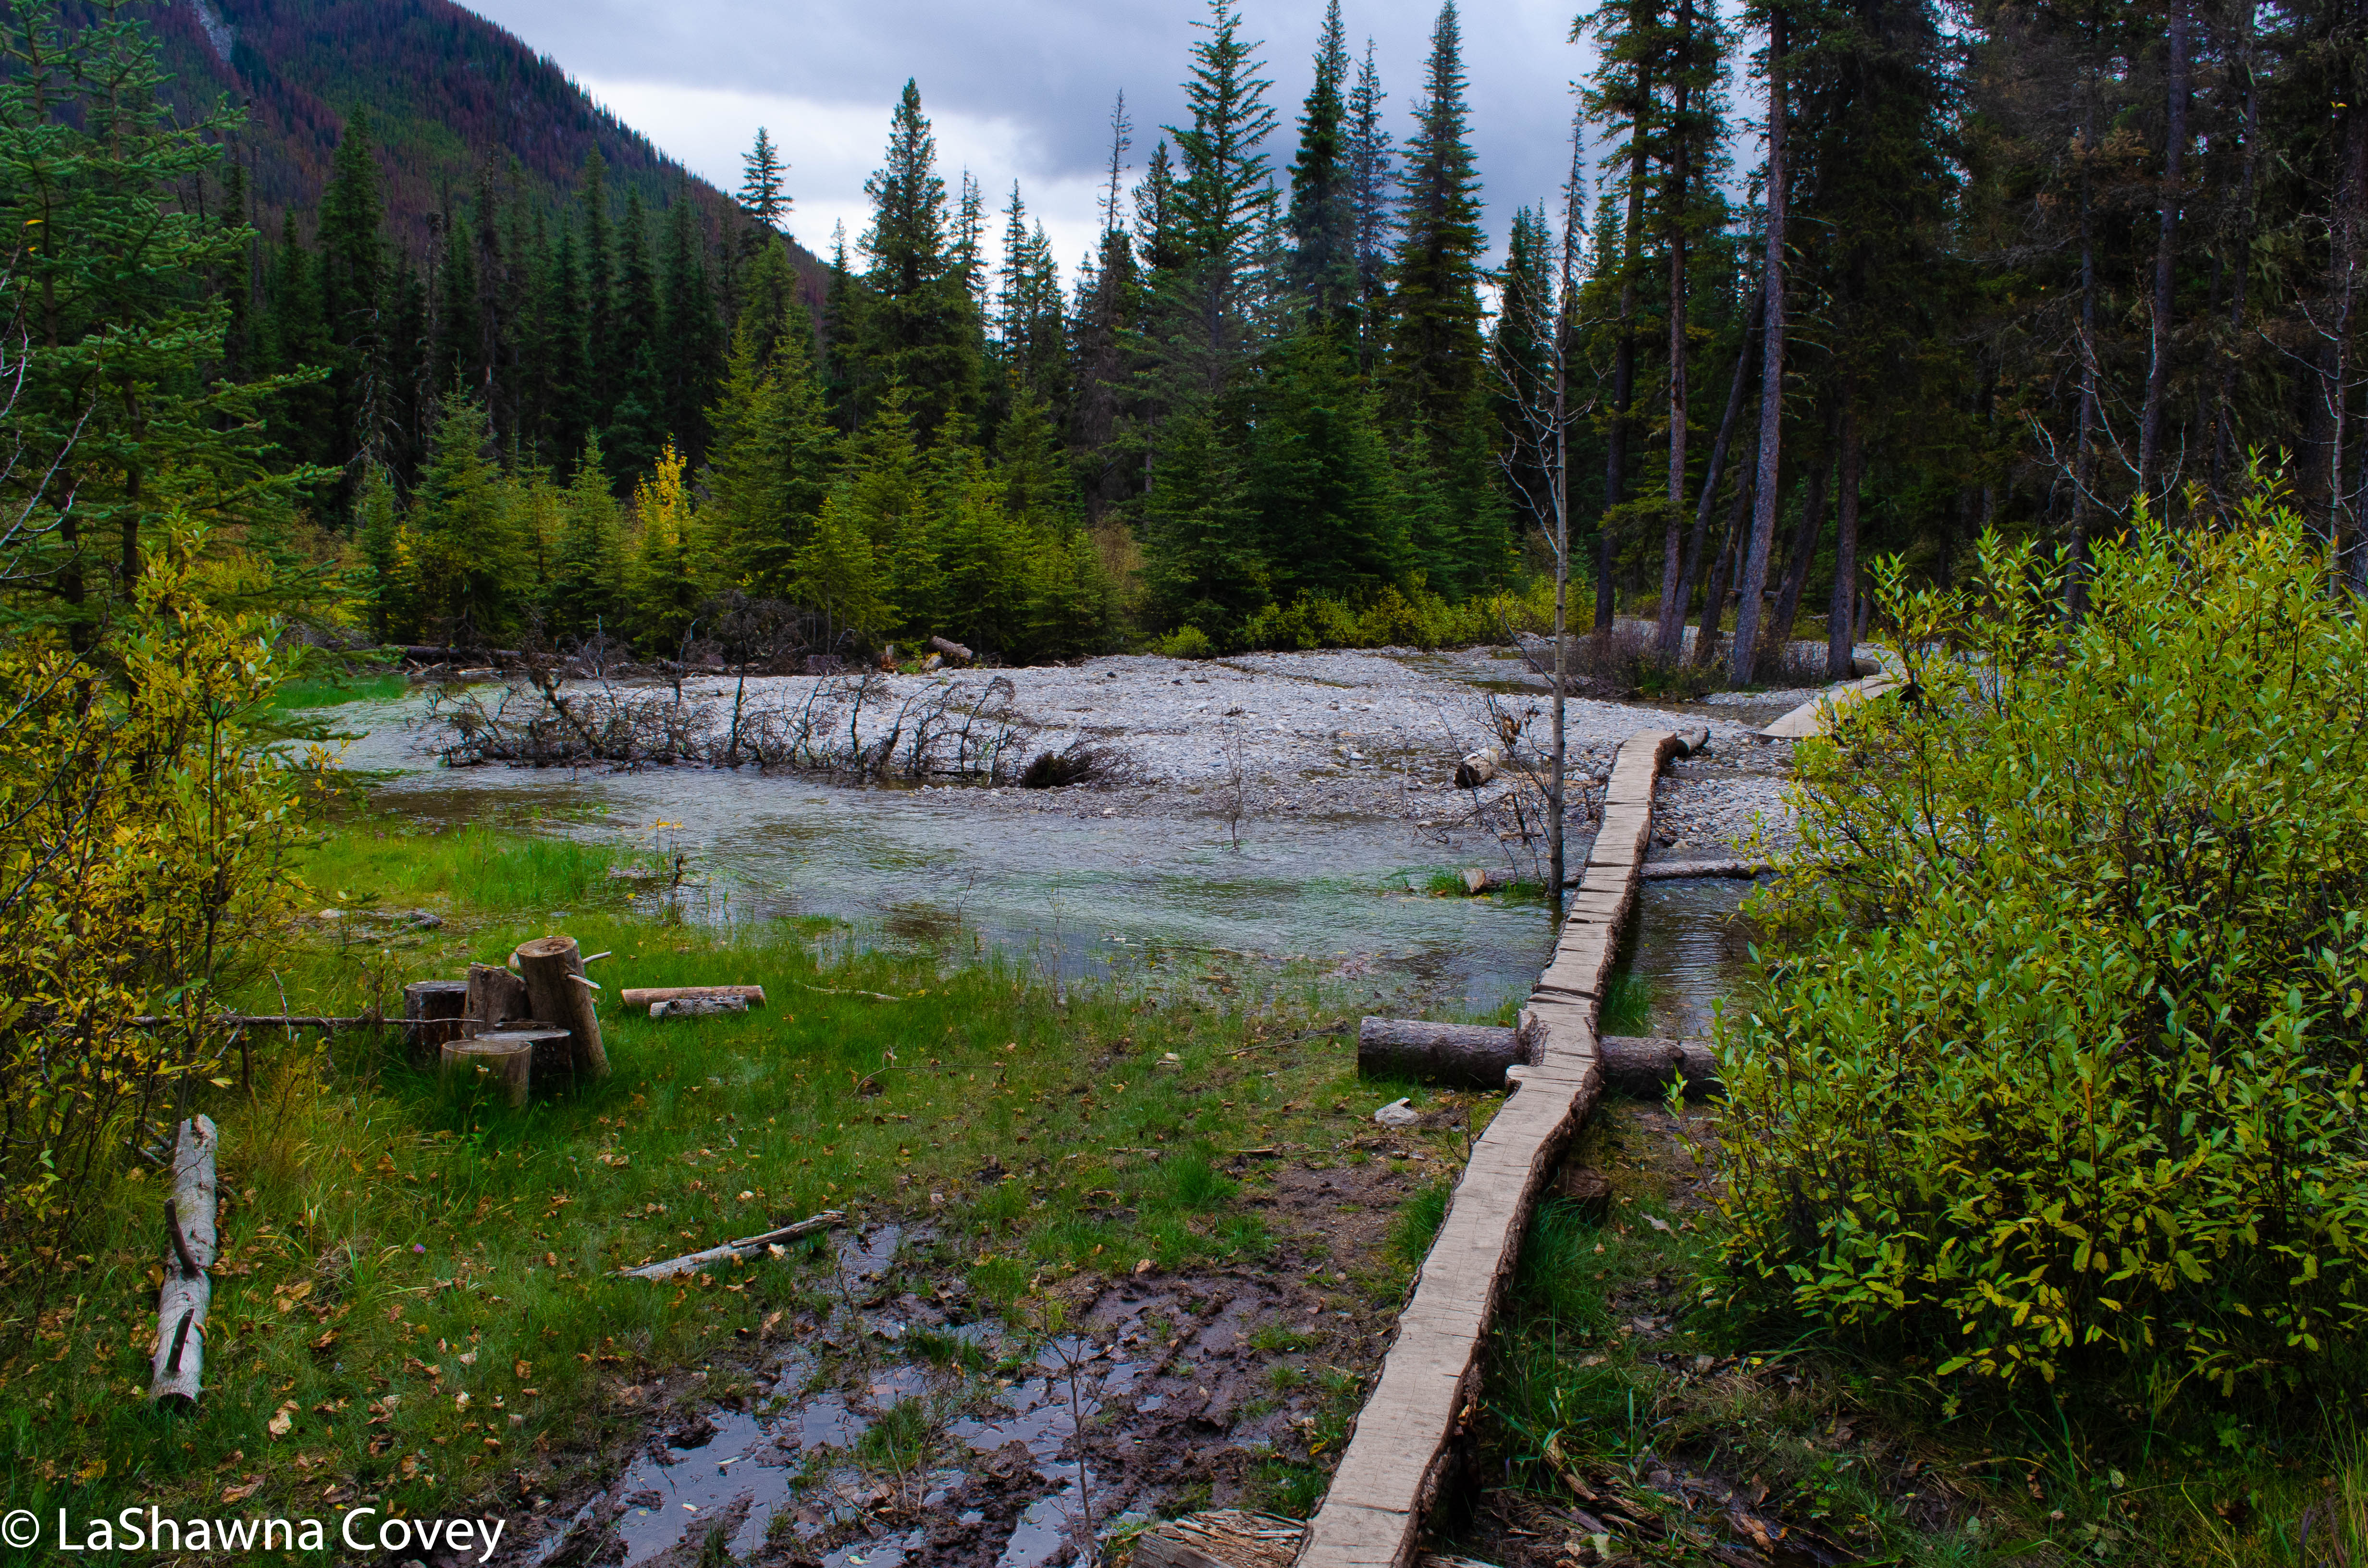
The initial part of the hike is flat and easy, though it definitely got muddy in spots. I can never figure out how there could be this huge puddle in the middle of the trail, but I see it all the time. There were boards put down in some places, and large rocks to navigate in others, but there were times, when I just had to brave it and pick the least muddy path and hope that I didn’t slip and fall into the mud, or get my boots gunked up with too much mud.

The trail is only listed as a 30 minute walk to the waterfall, which isn’t that far. However, my body was still a bit tired from my previous days’ hikes, so I wasn’t walking as fast, and I was starting to wonder just where this waterfall actually was.

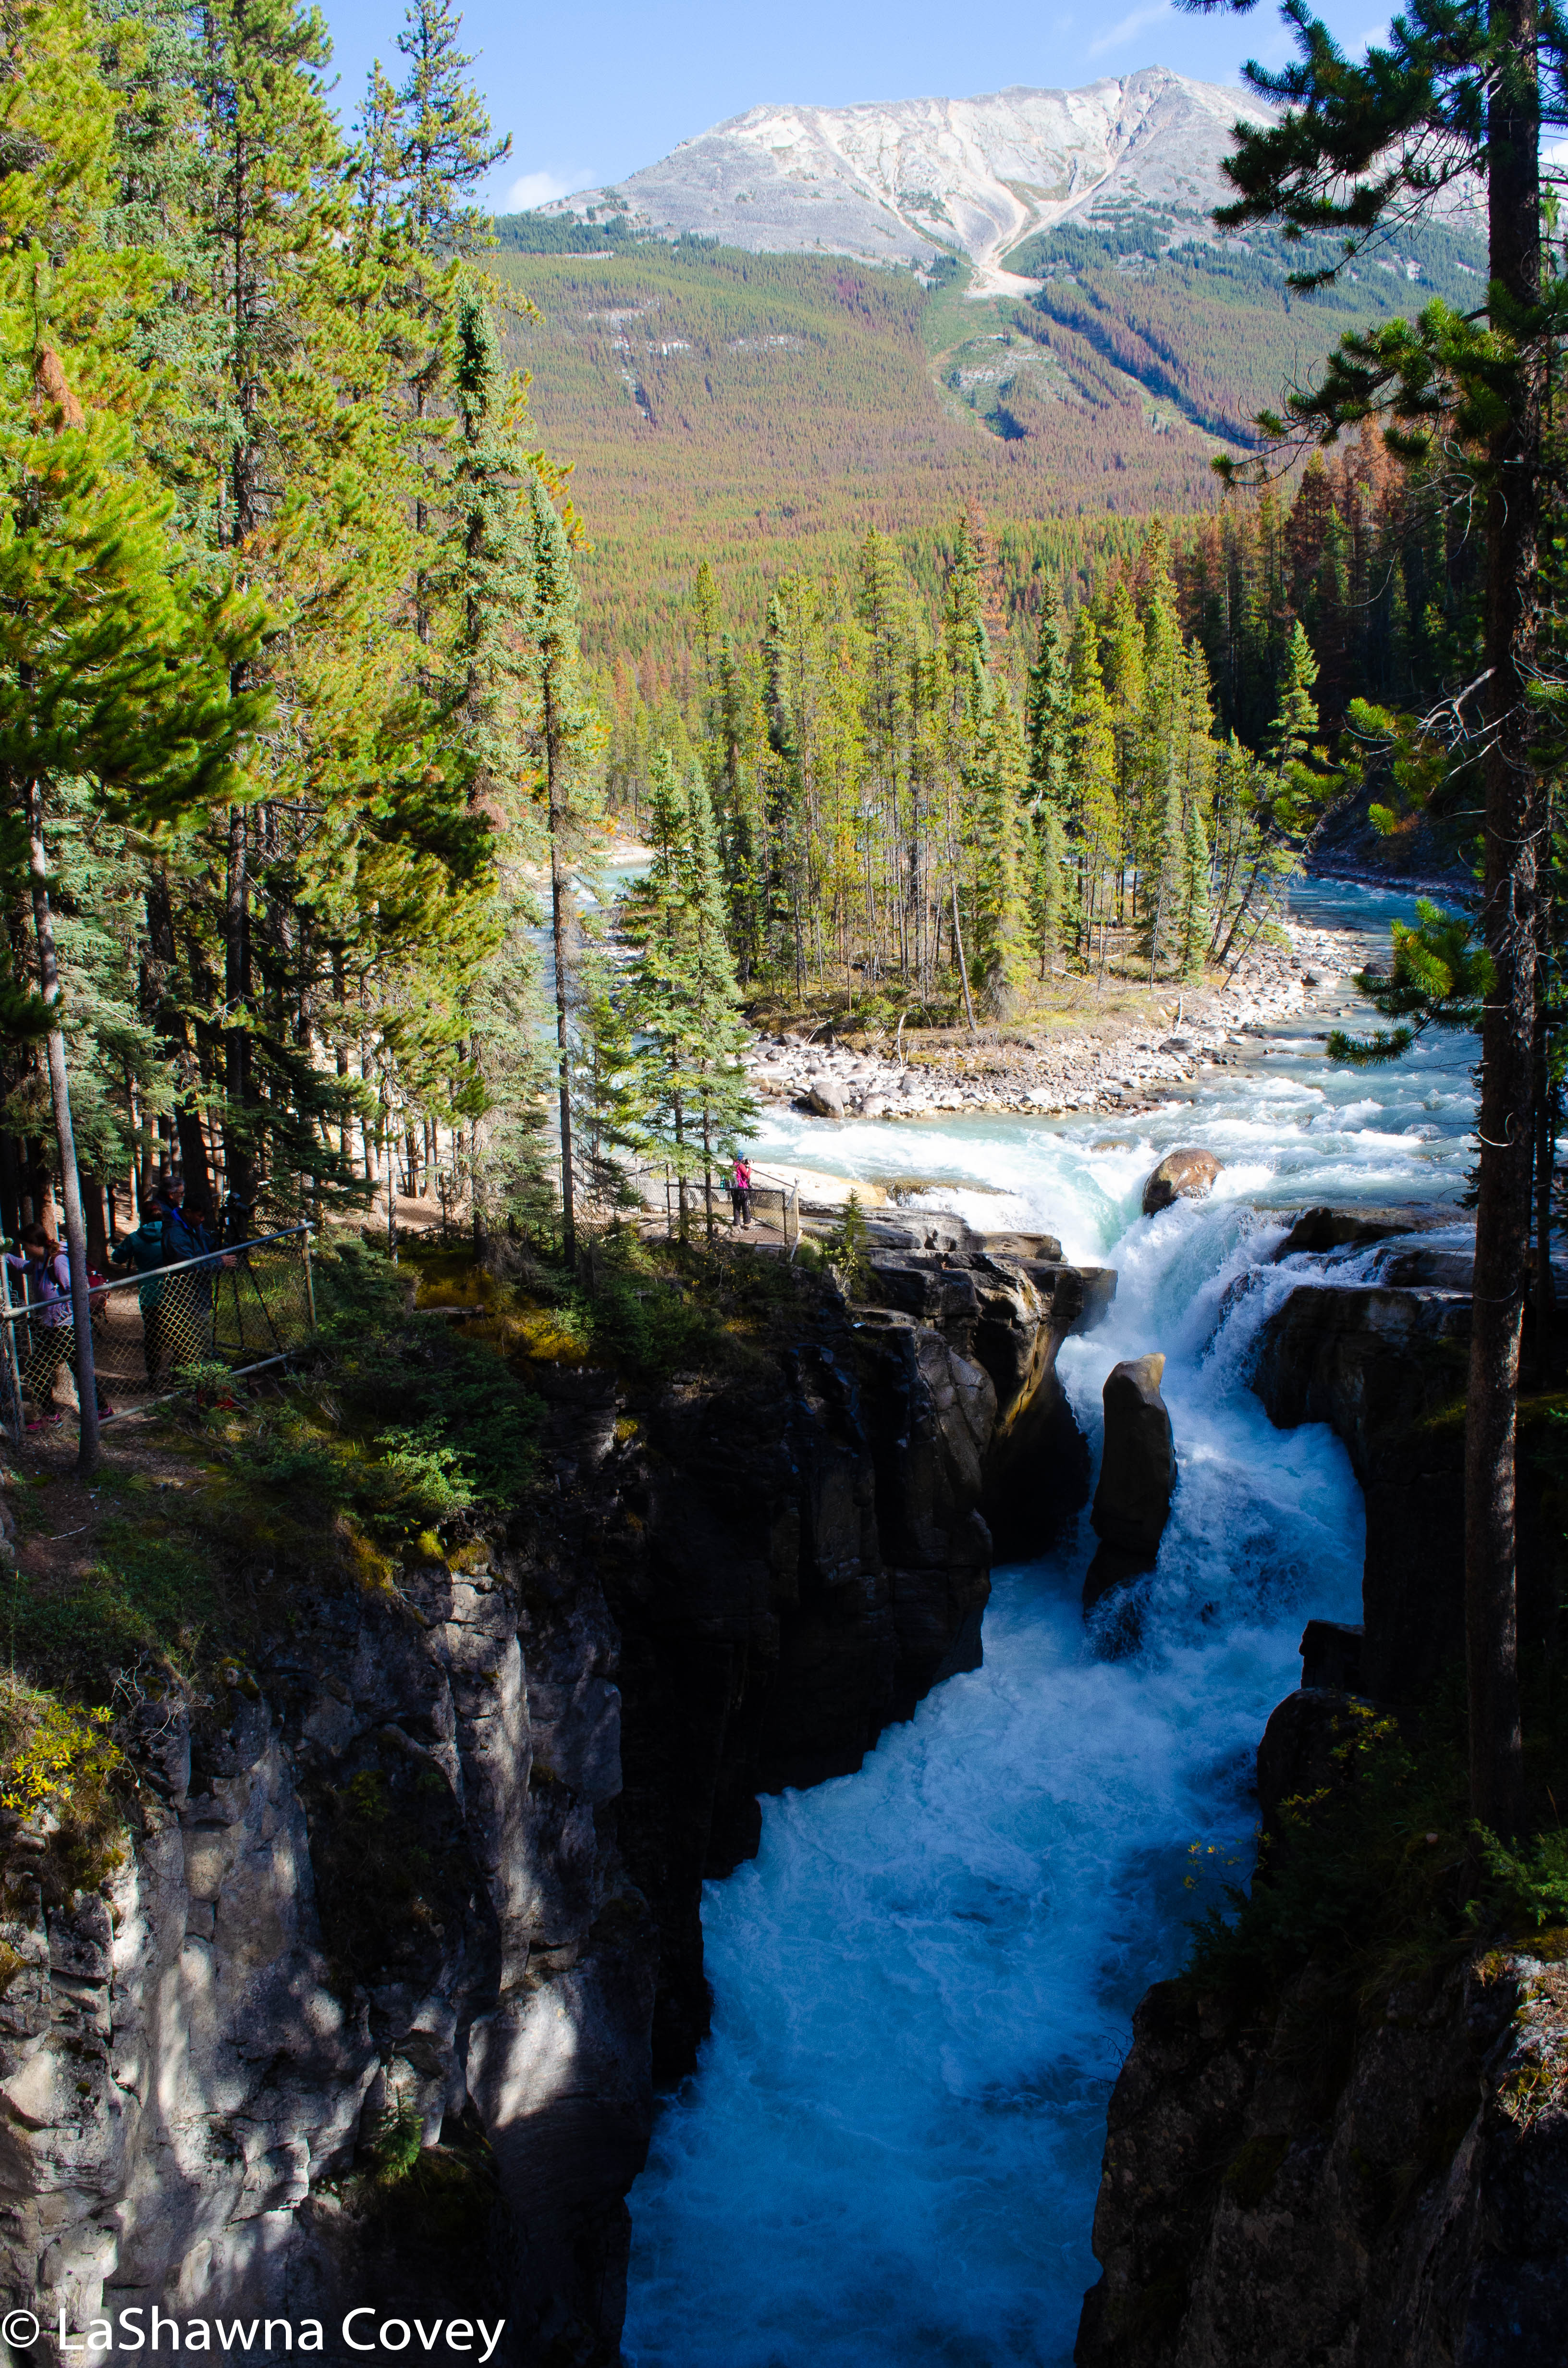
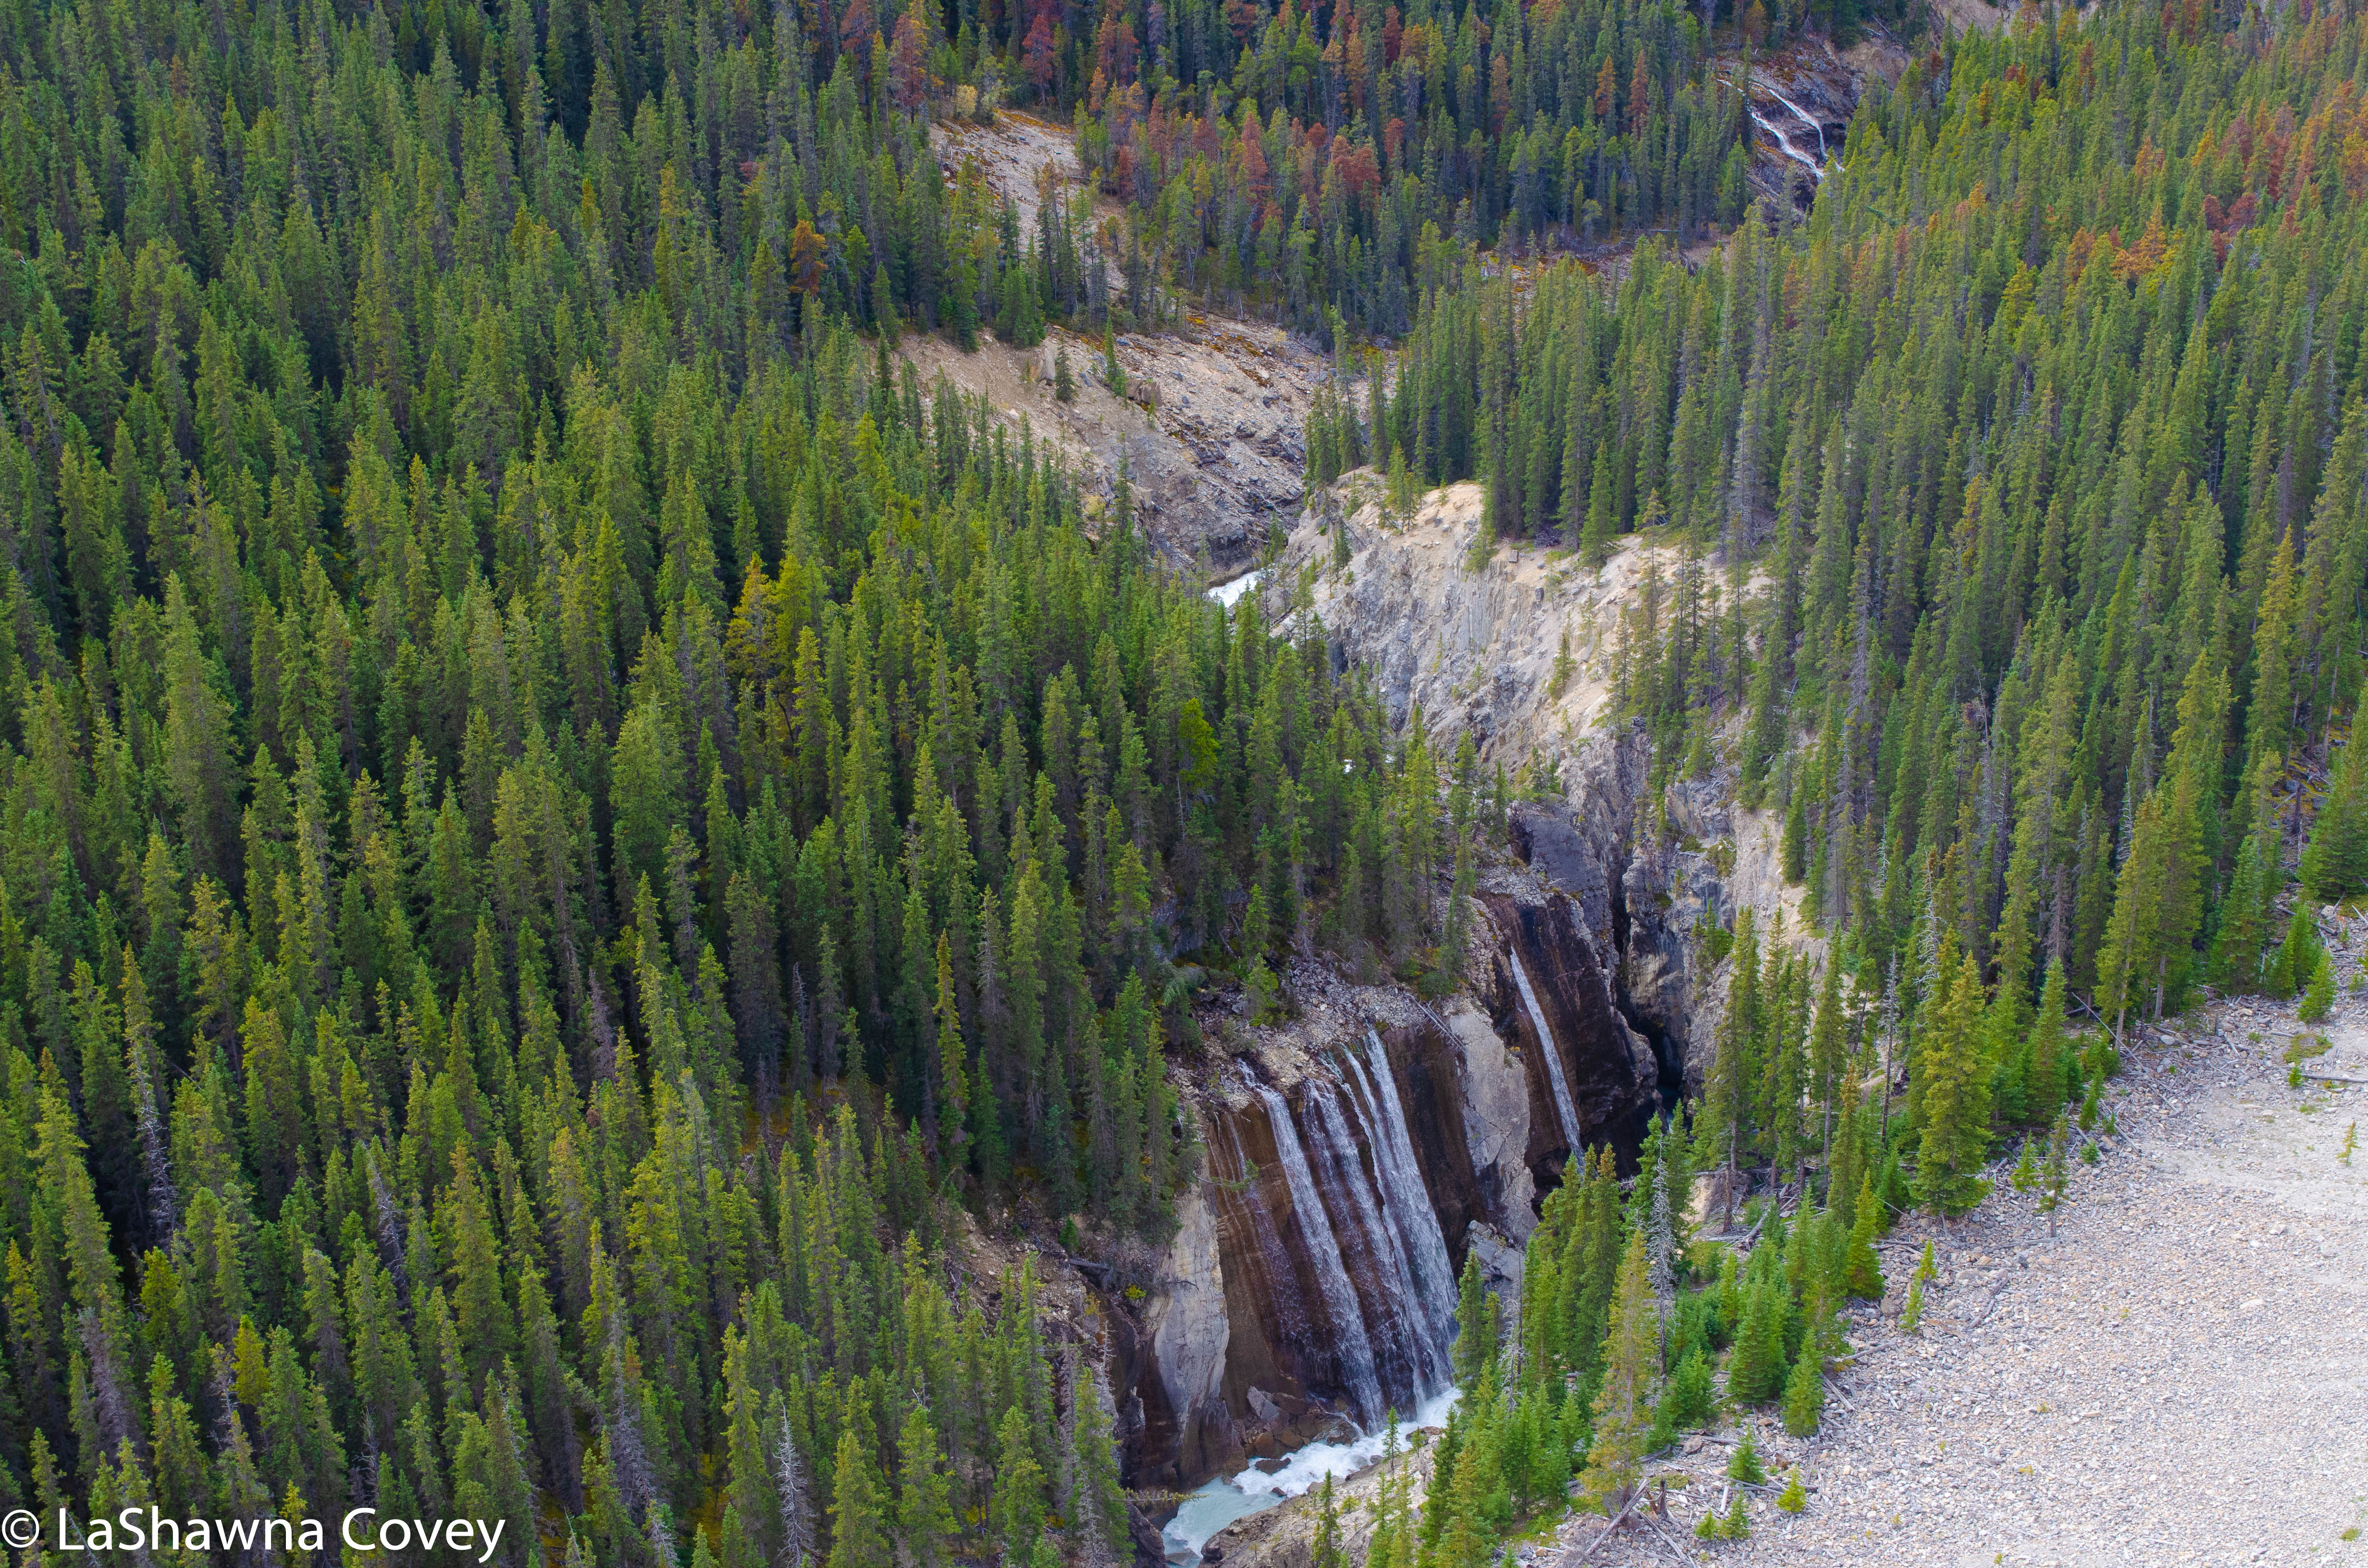
It was right about then when I came up to the overlook, high over the waterfall. It’s really more of a fence that borders the trail down, where I could look down and see the rushing waterfall. Wapta Falls isn’t as tall as Takkakaw Falls (98 feet), but it is much wider (490 feet), and more picturesque. Part of my body was super tired and wanted to stay up top, but the other part of me wanted to get closer, so I descended the trail. It’s a pretty steep downhill in parts (which I knew was going to be a huffer to ascend back later), but it wasn’t that long before I was at the midpoint of the waterfall views.

Yoho National Park-9

This view is much closer and is an extraordinarily beautiful place to just take in and admire the beauty and feel the spray from the waterfall. From here the trail gets  faint, but I could see that it was possible to descend, because I saw some people right on the river’s edge. I toyed with the idea of going down to the bottom, but I didn’t really want to get wet (the wind was blowing the spray pretty hard toward the shore), and I wasn’t motivated for the steep climb back up the trail, so I decided to stay where I was and just enjoy the waterfall views from a bit of a distance.

Yoho National Park-8

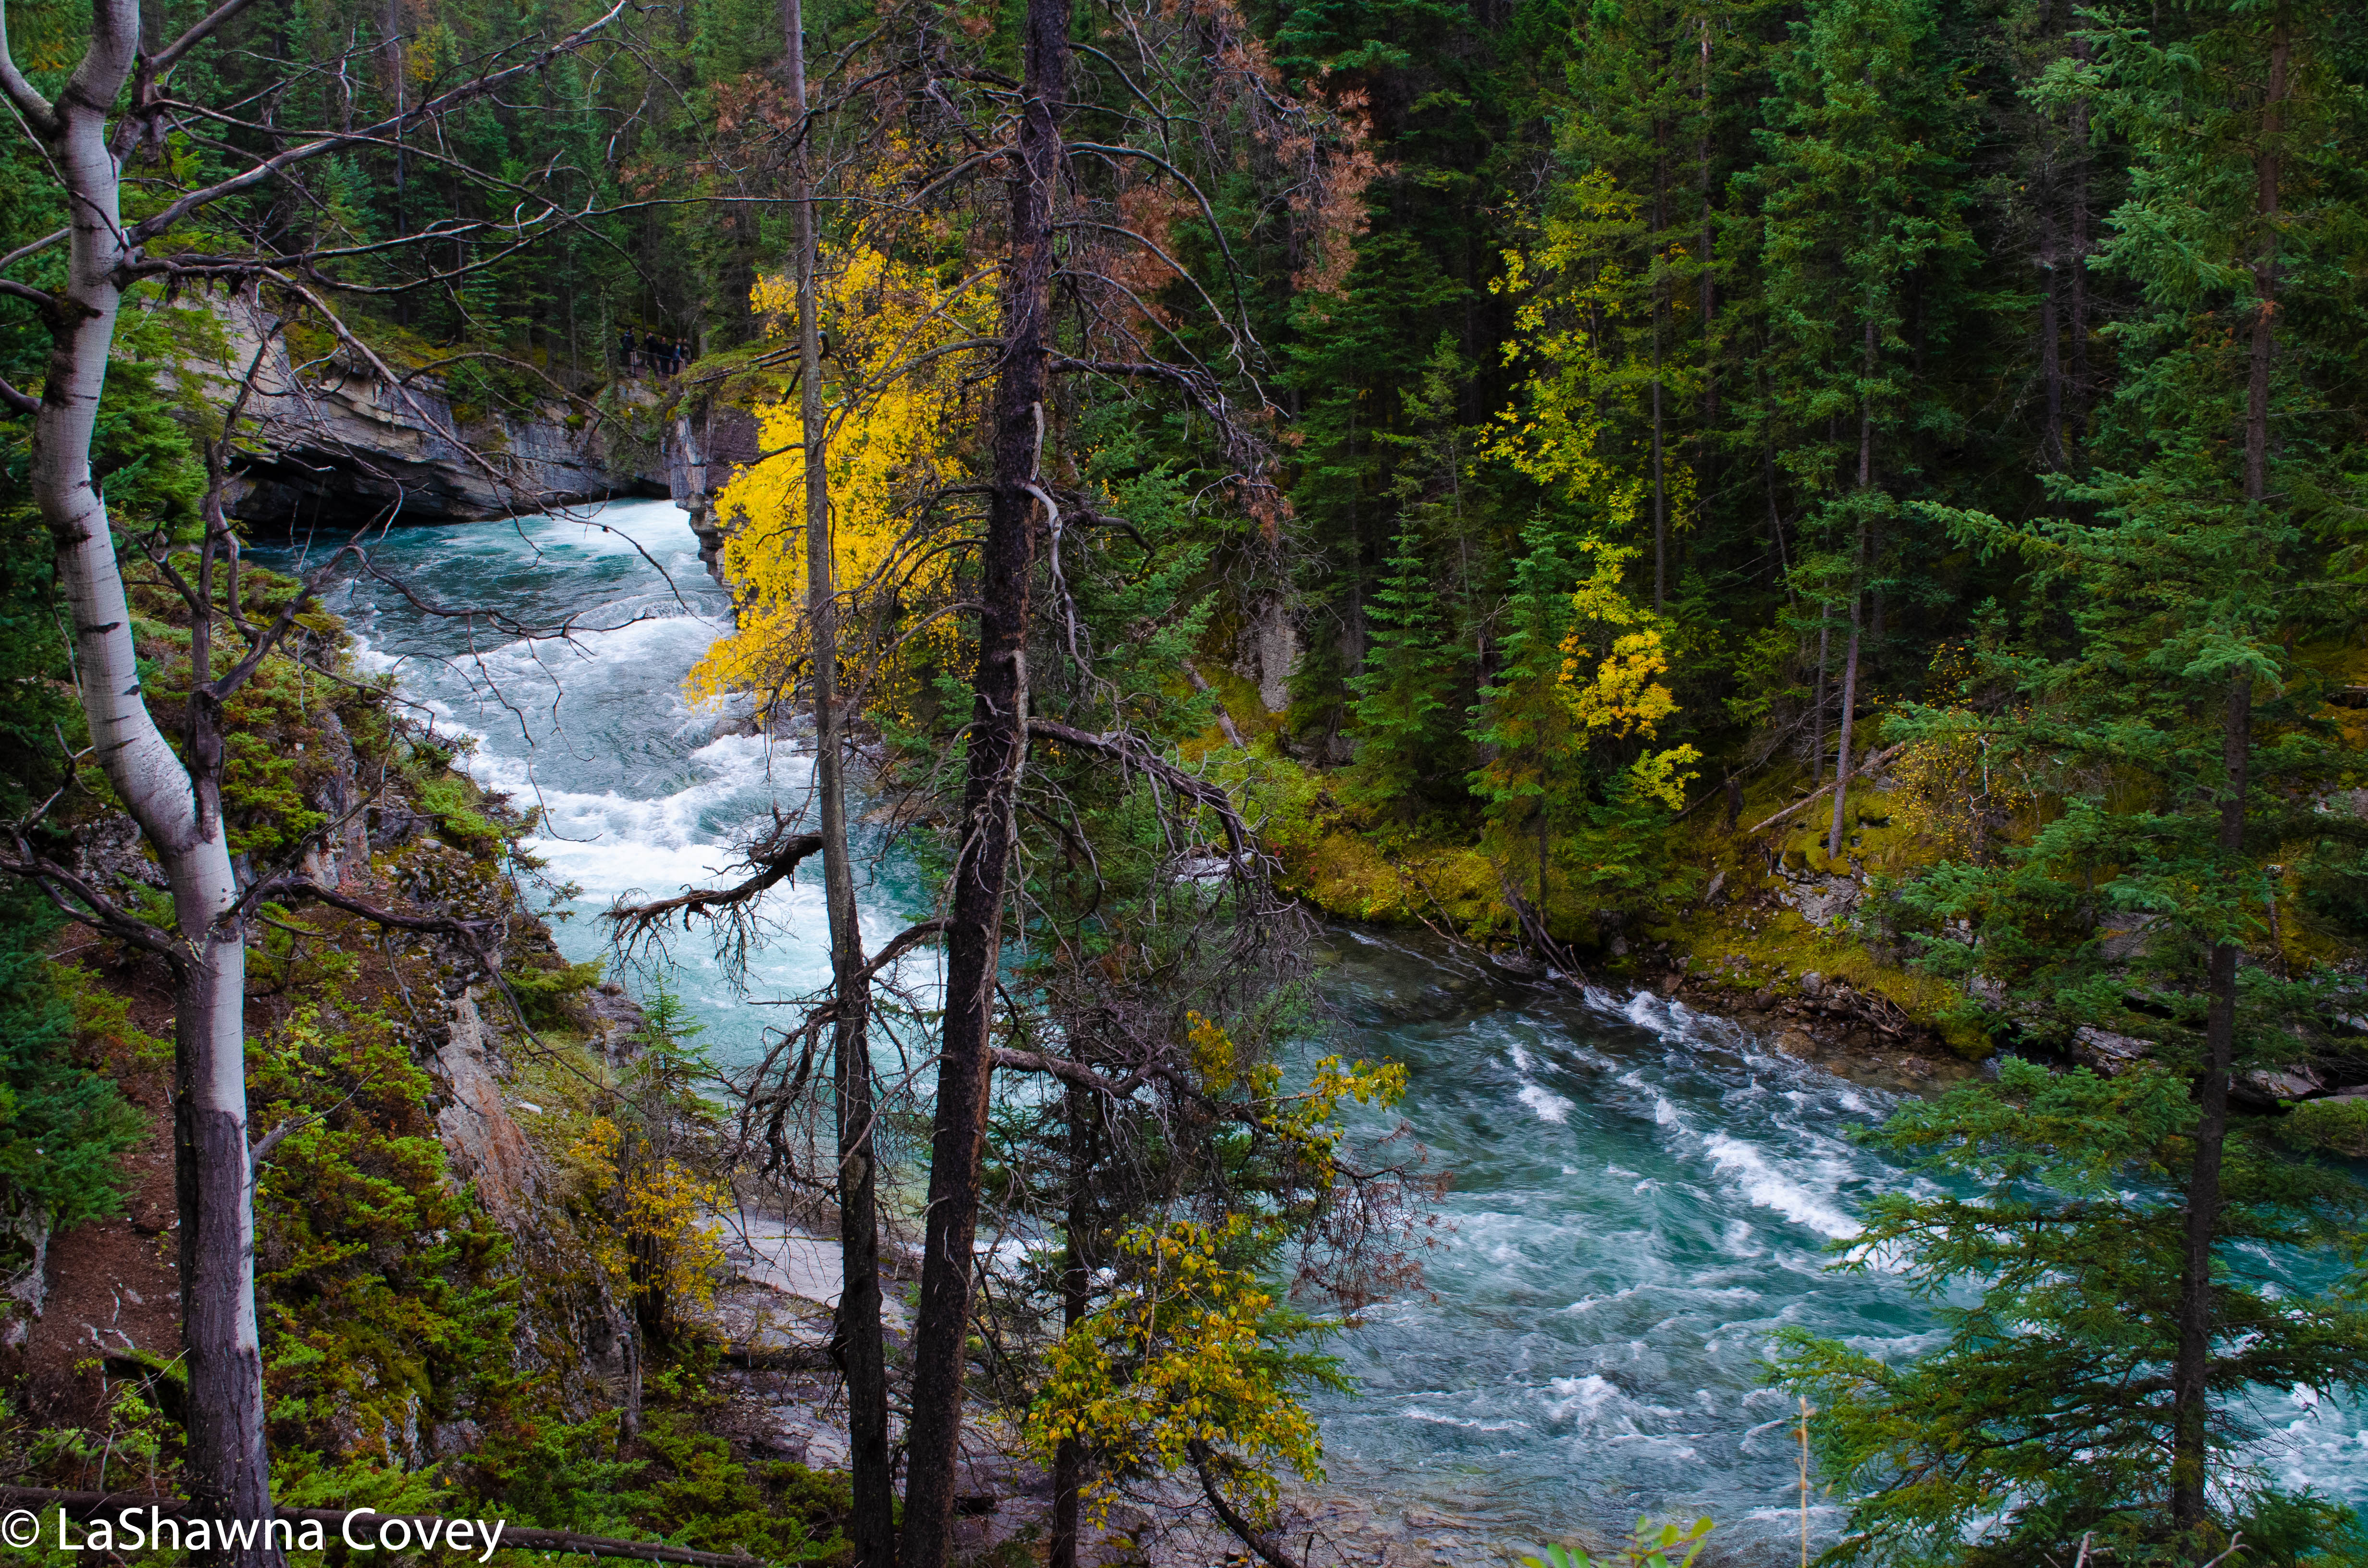
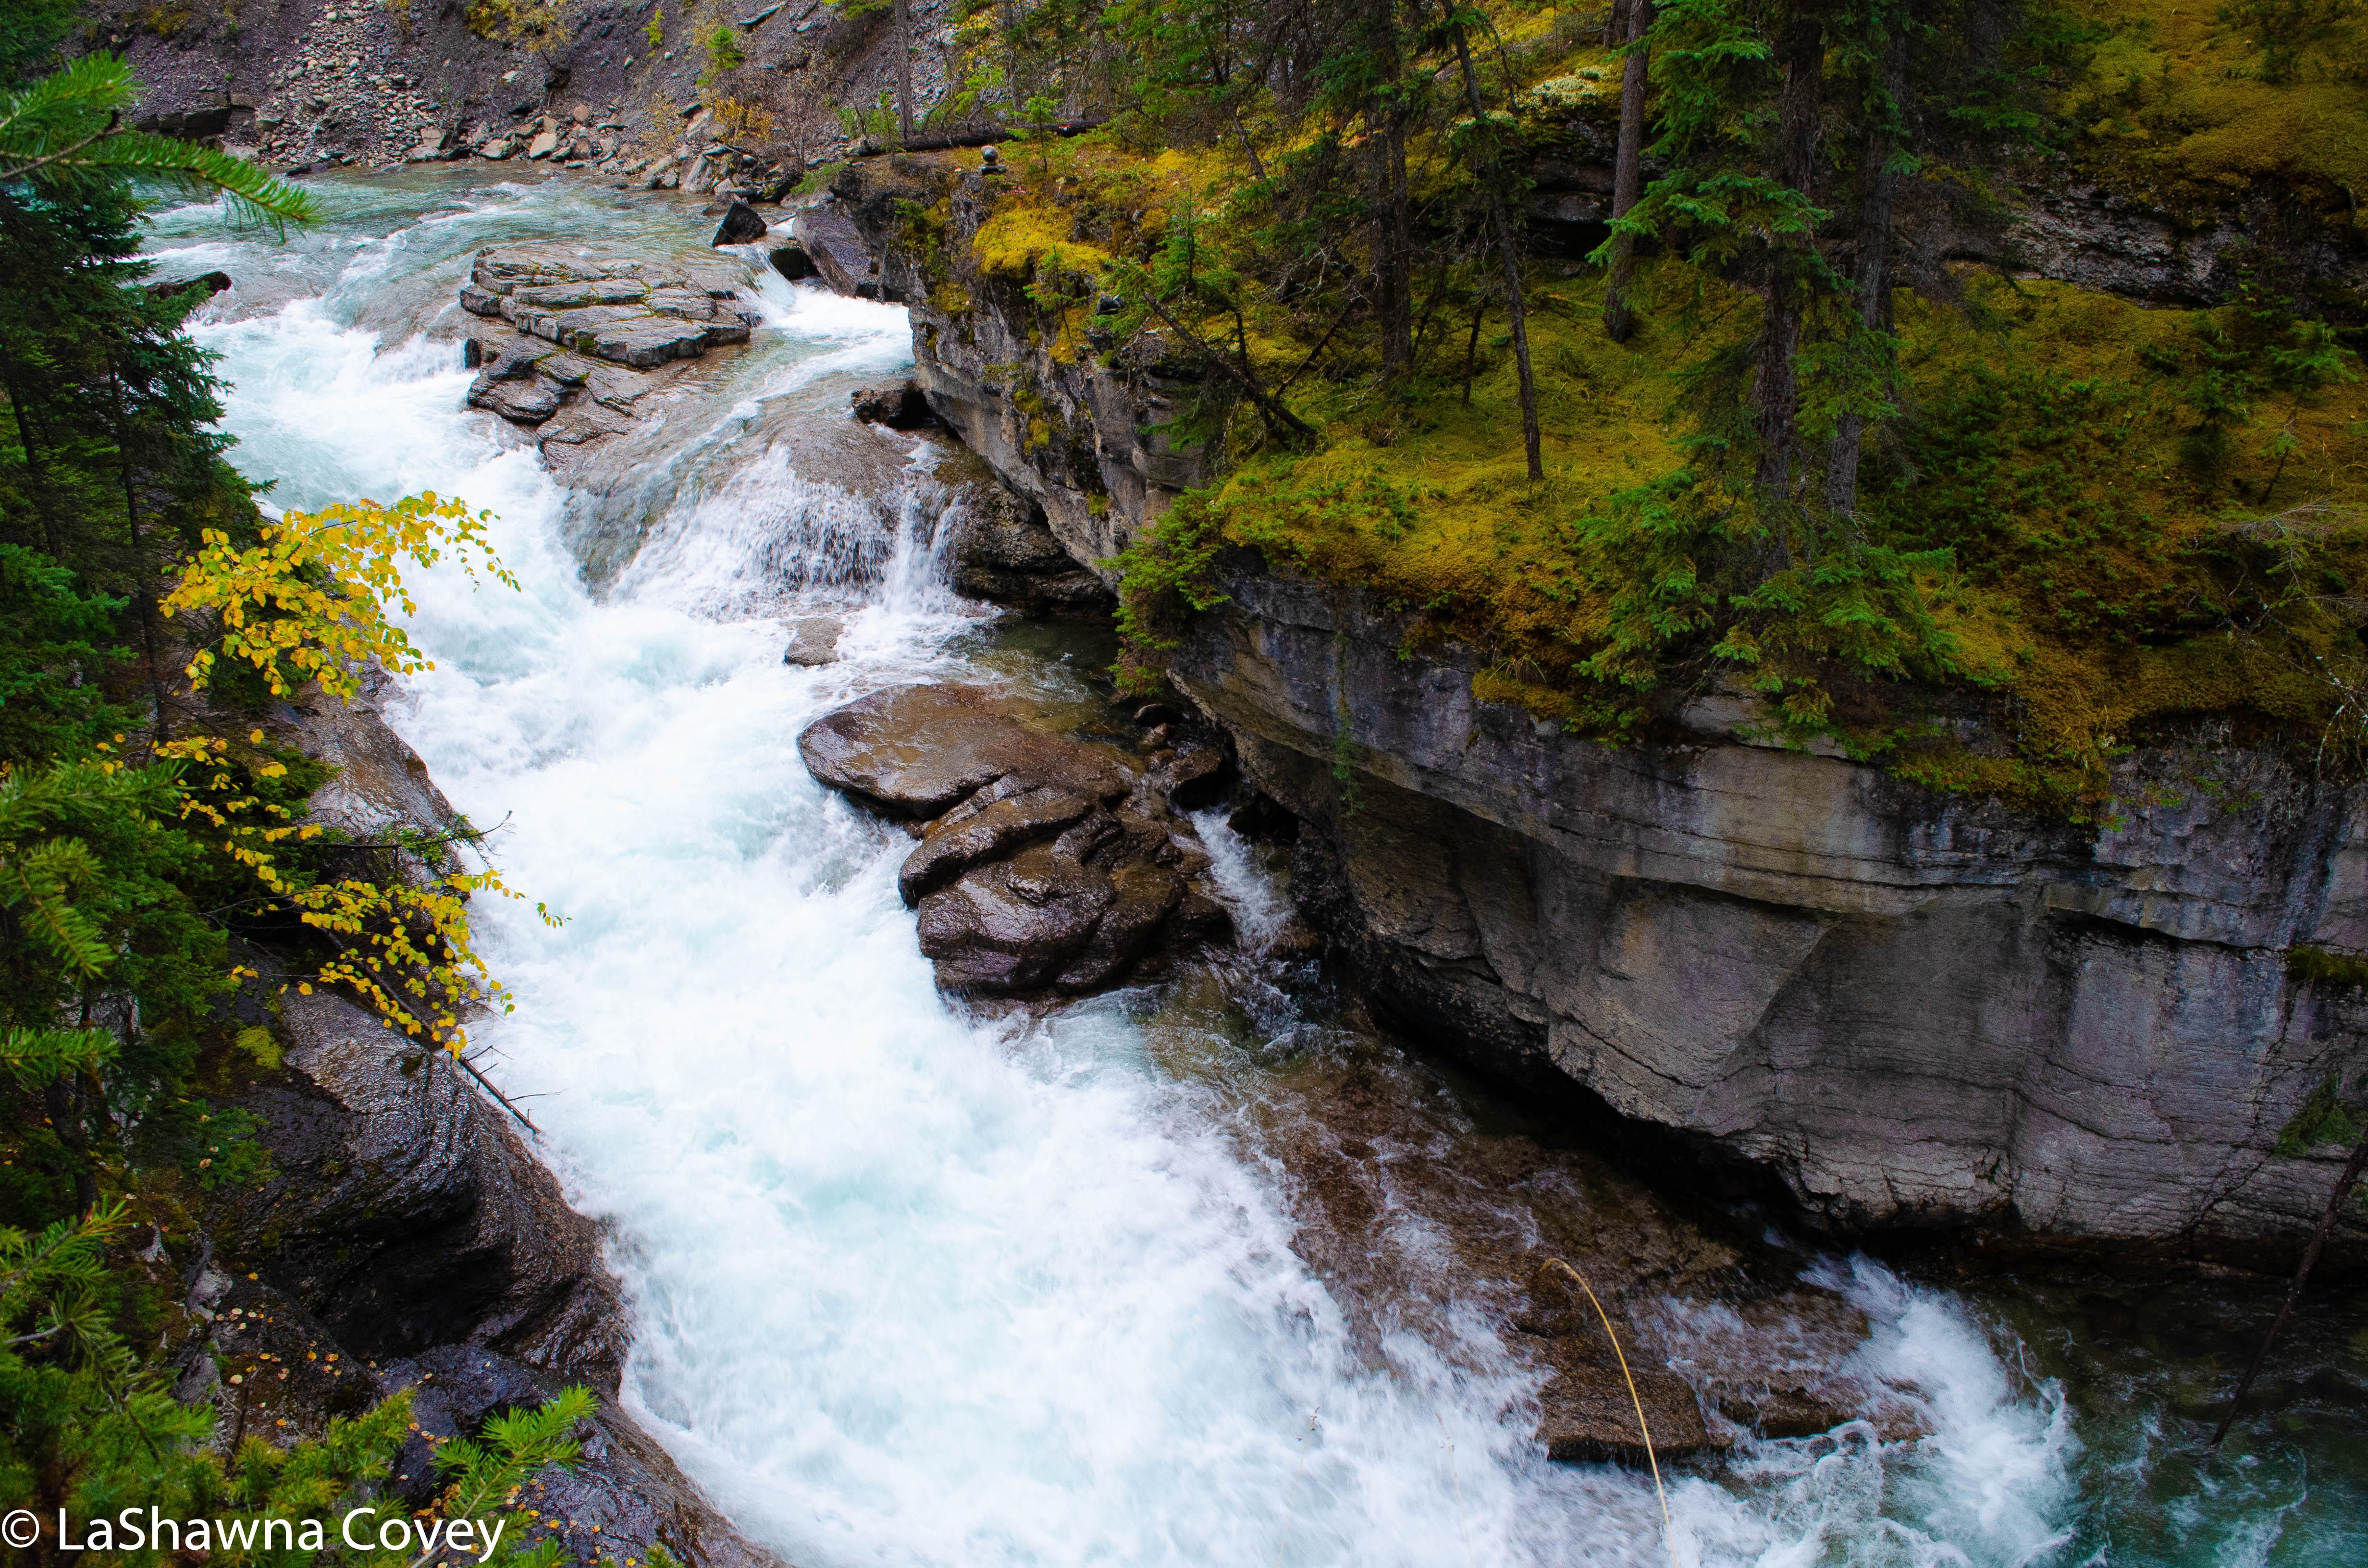
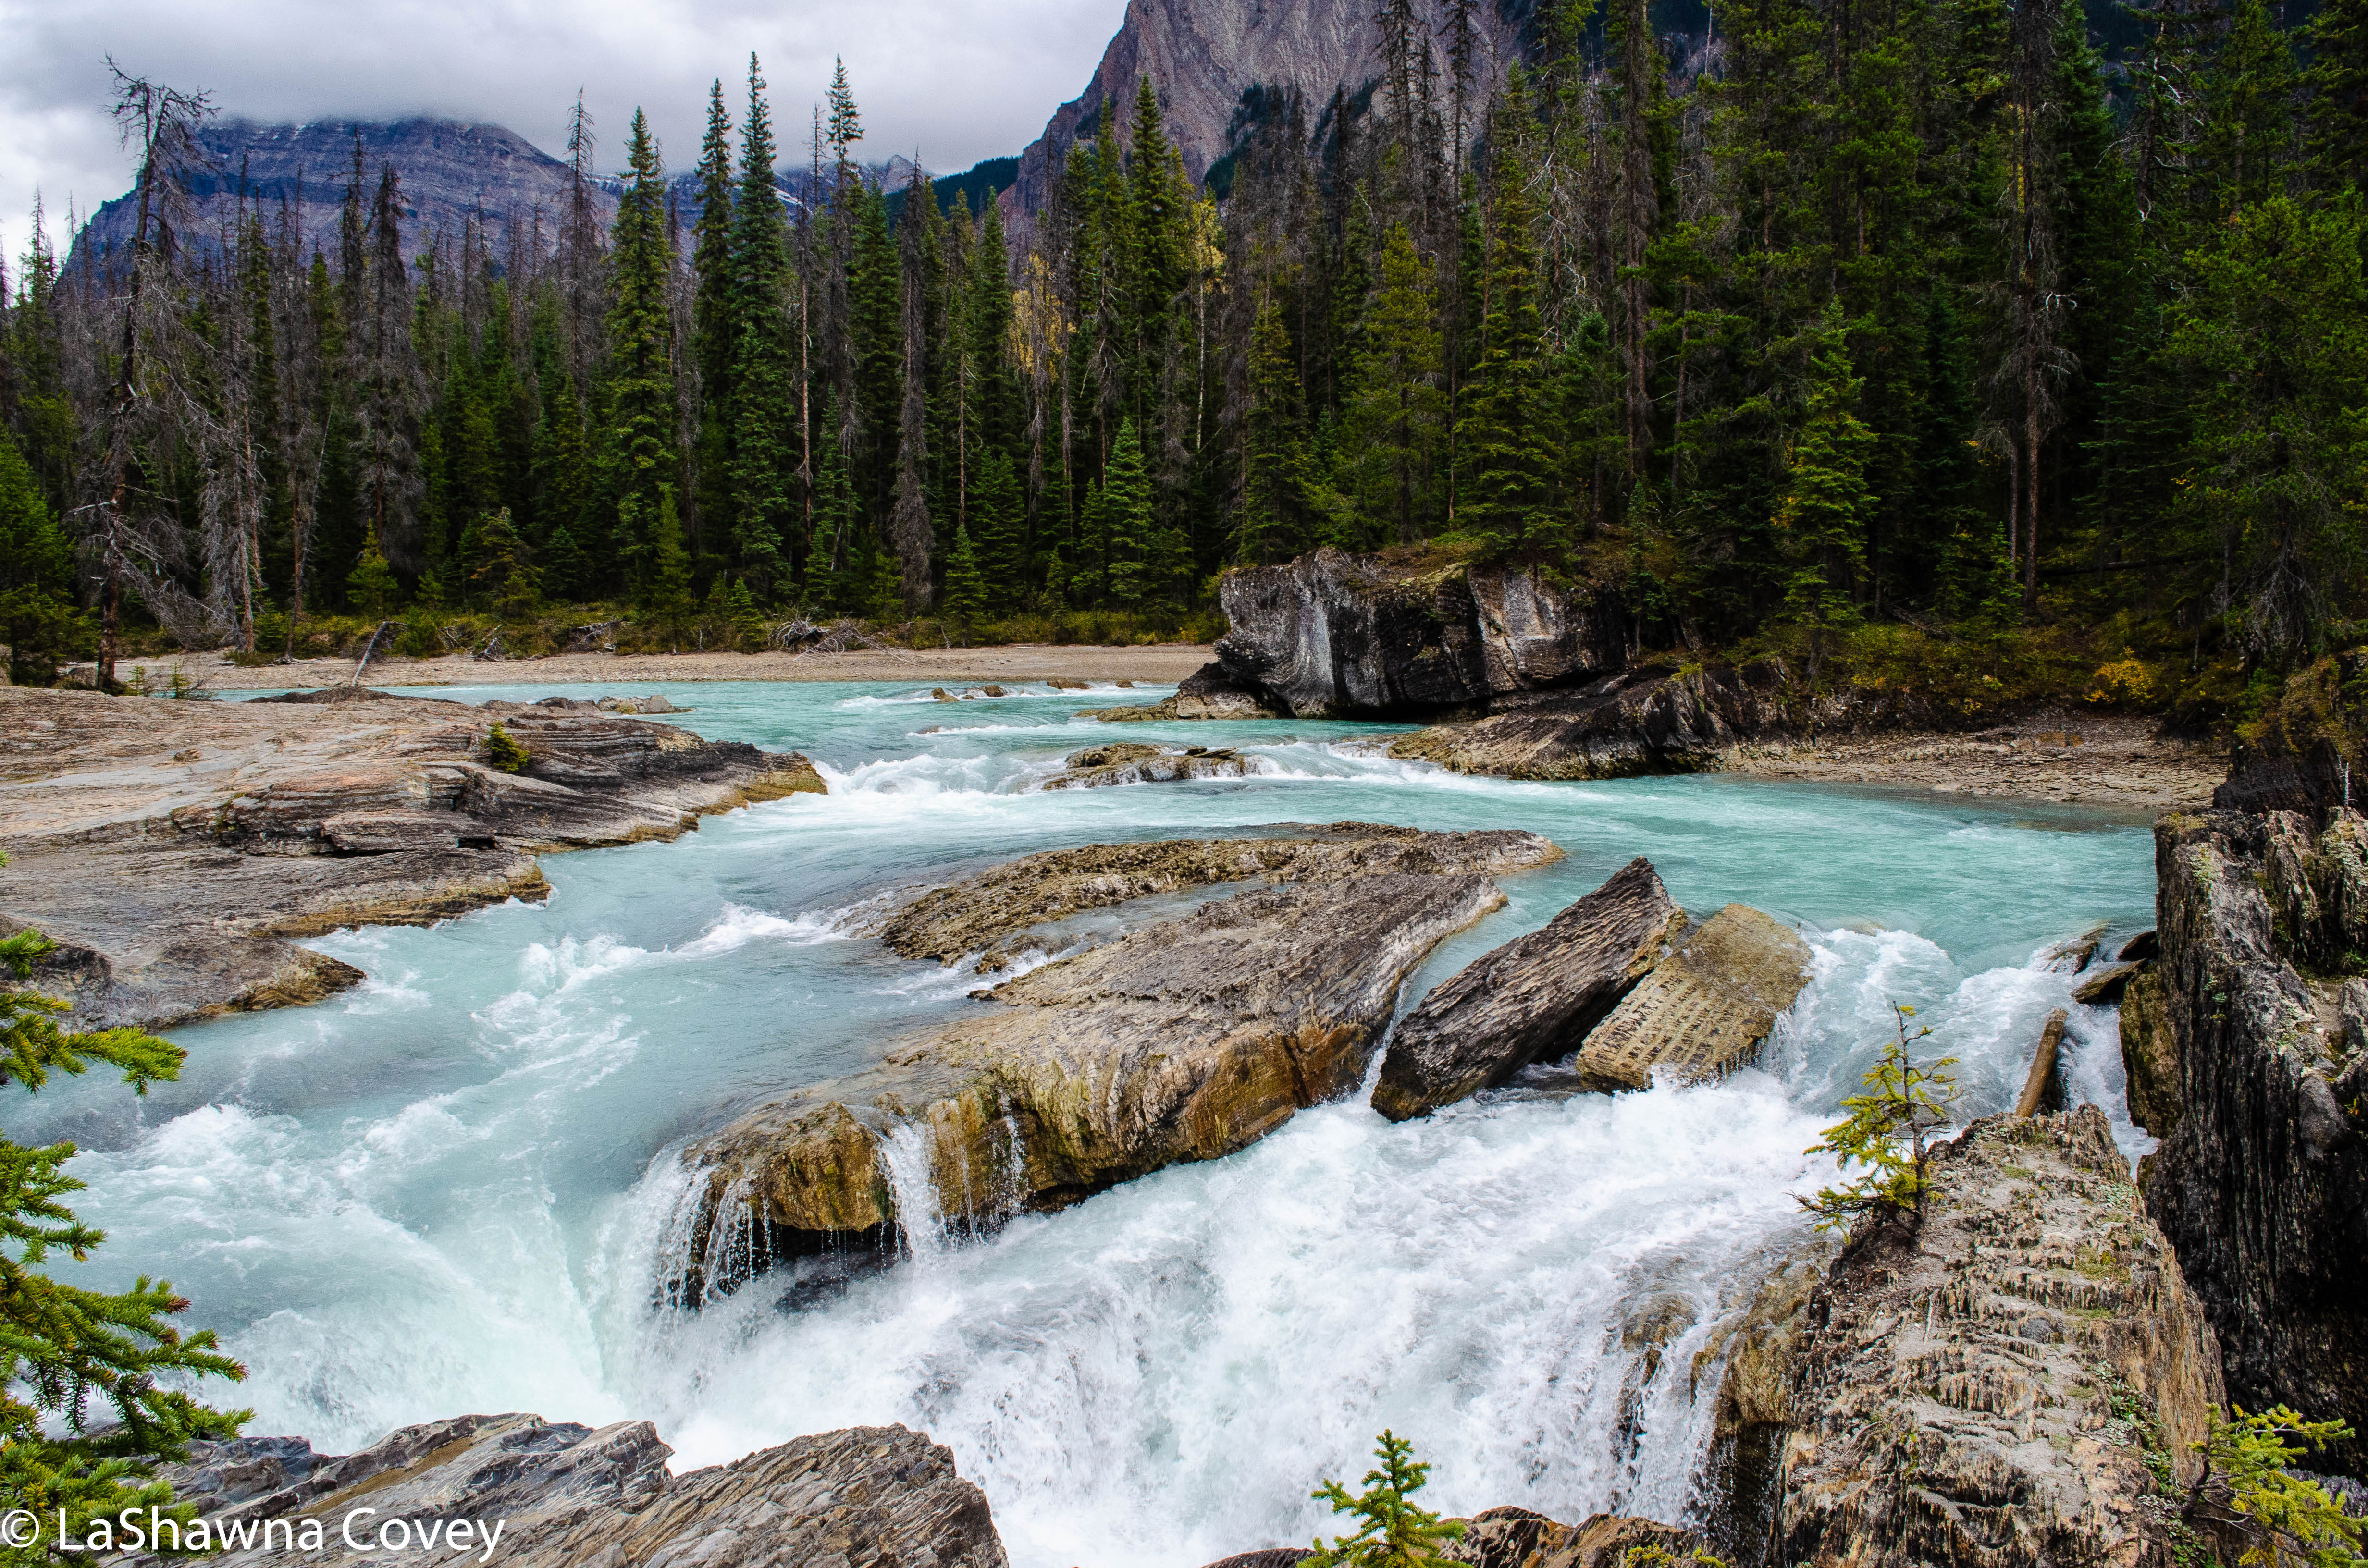
My last stop of the day was the Emerald Lake area, which really was two stops. The first one is the Natural Bridge, which is pretty much what it sounds like. Due to the amazing power of water to erode anything, holes were cut into the rock, and over the years, a natural rock bridge has formed over the rushing Kicking Horse River. I keep using the word beautiful to describe the sites, but it is true. There is just so much natural beauty in these Canadian national parks, that I just wanted to stay there forever.

Yoho National Park-10

This was mid afternoon, and my visit had come up on a tour bus packed with camera wielding tourists,but thankfully they dispersed soon enough, so it wasn’t quite so noisy. There are many places around the Natural Bridge to admire the rock formations and the rushing water, and it makes for some pretty photo angles. I could even approach the edge of the river yourself, though of course I wanted to be careful so I didn’t slip and fall in.

Yoho National Park-11Yoho National Park-12

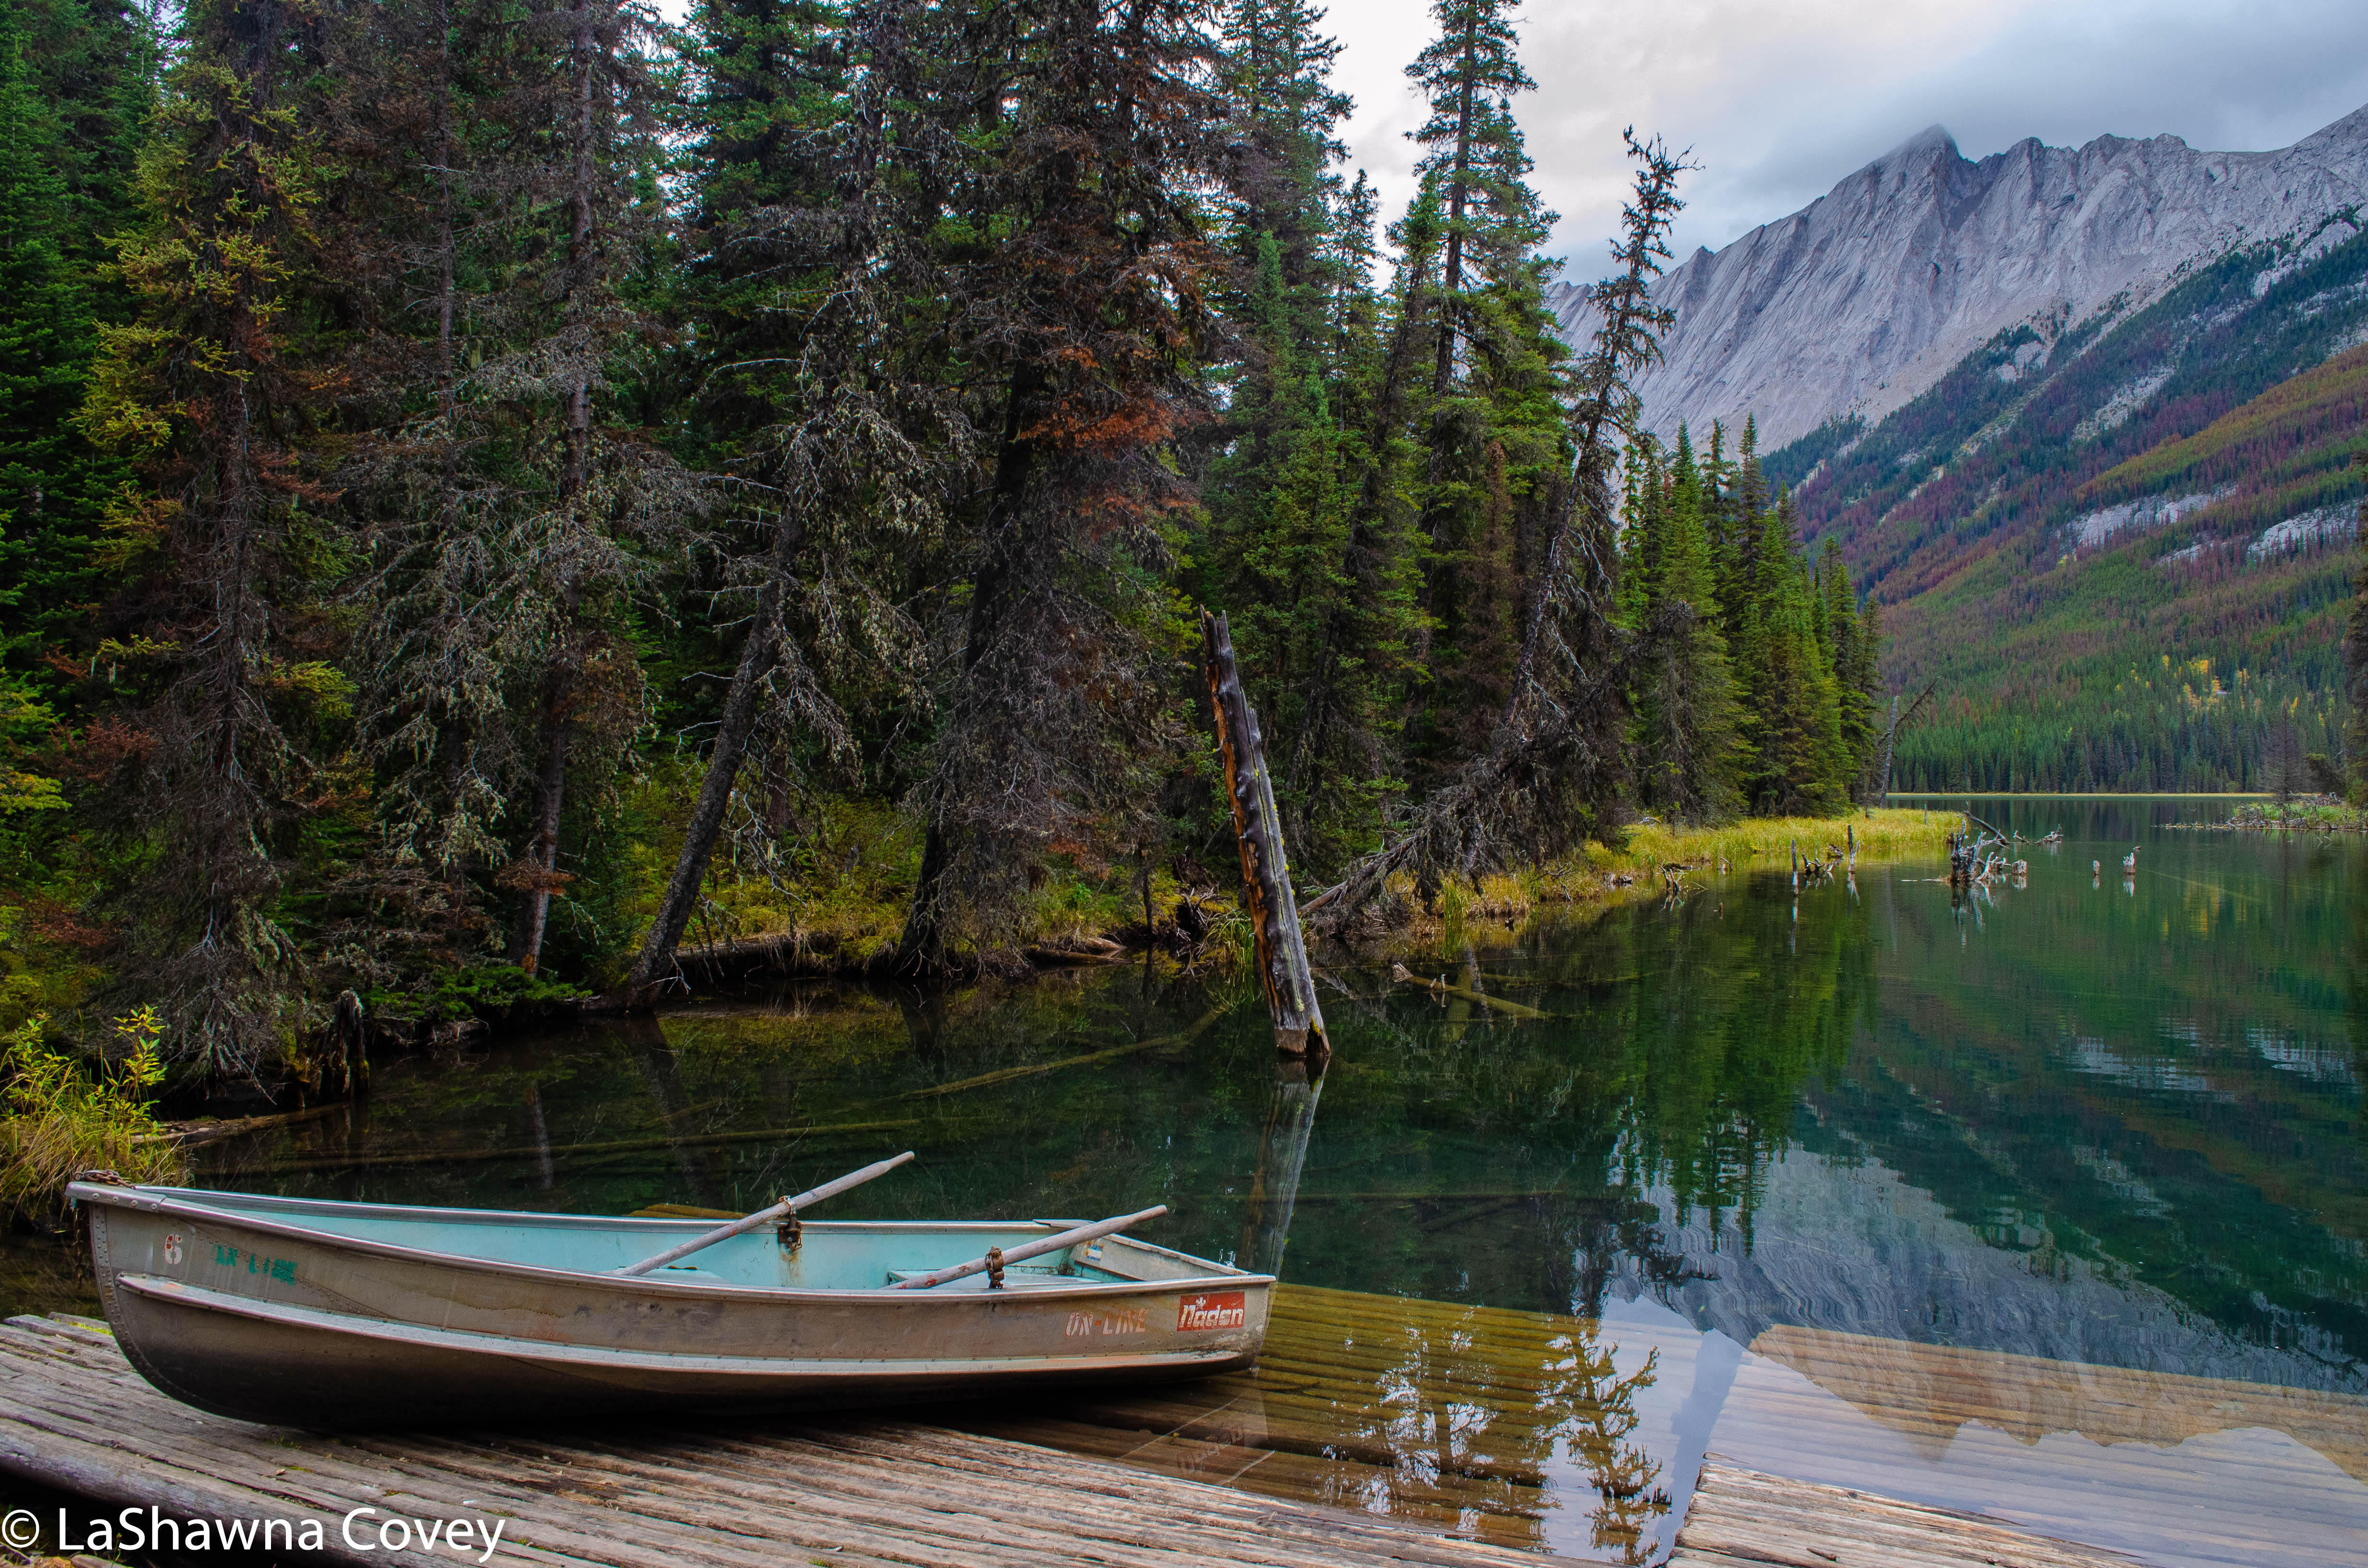
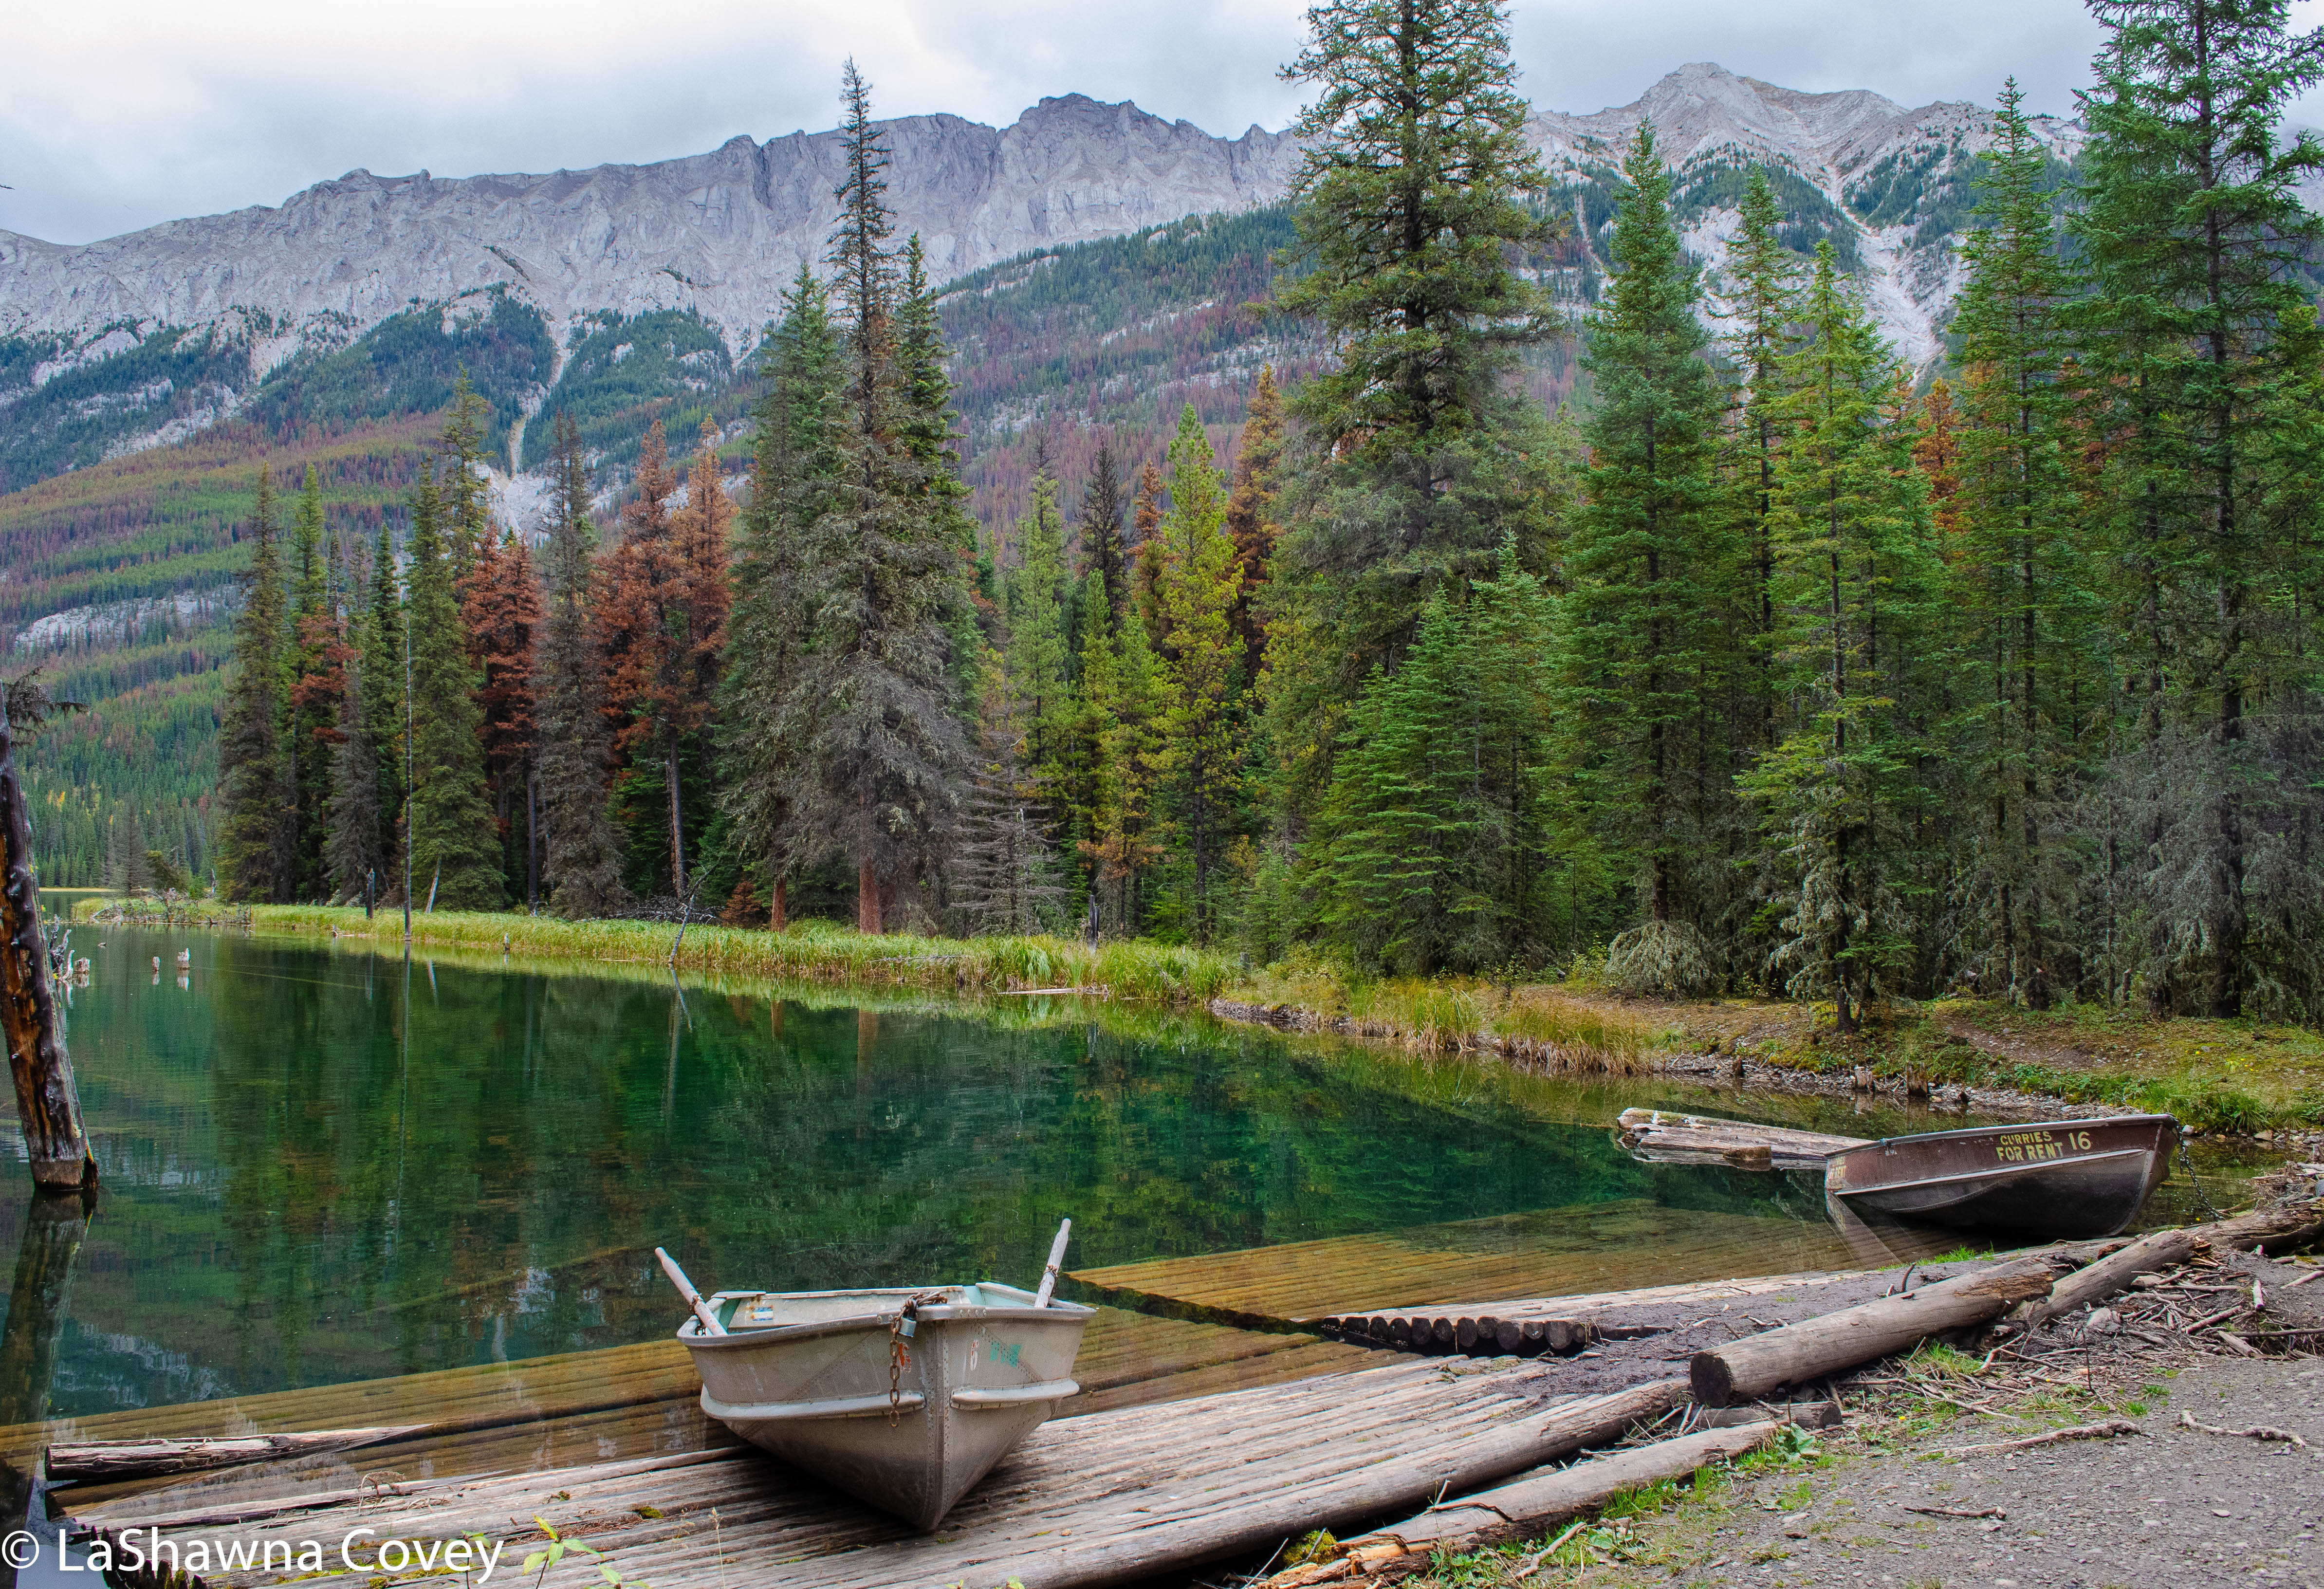
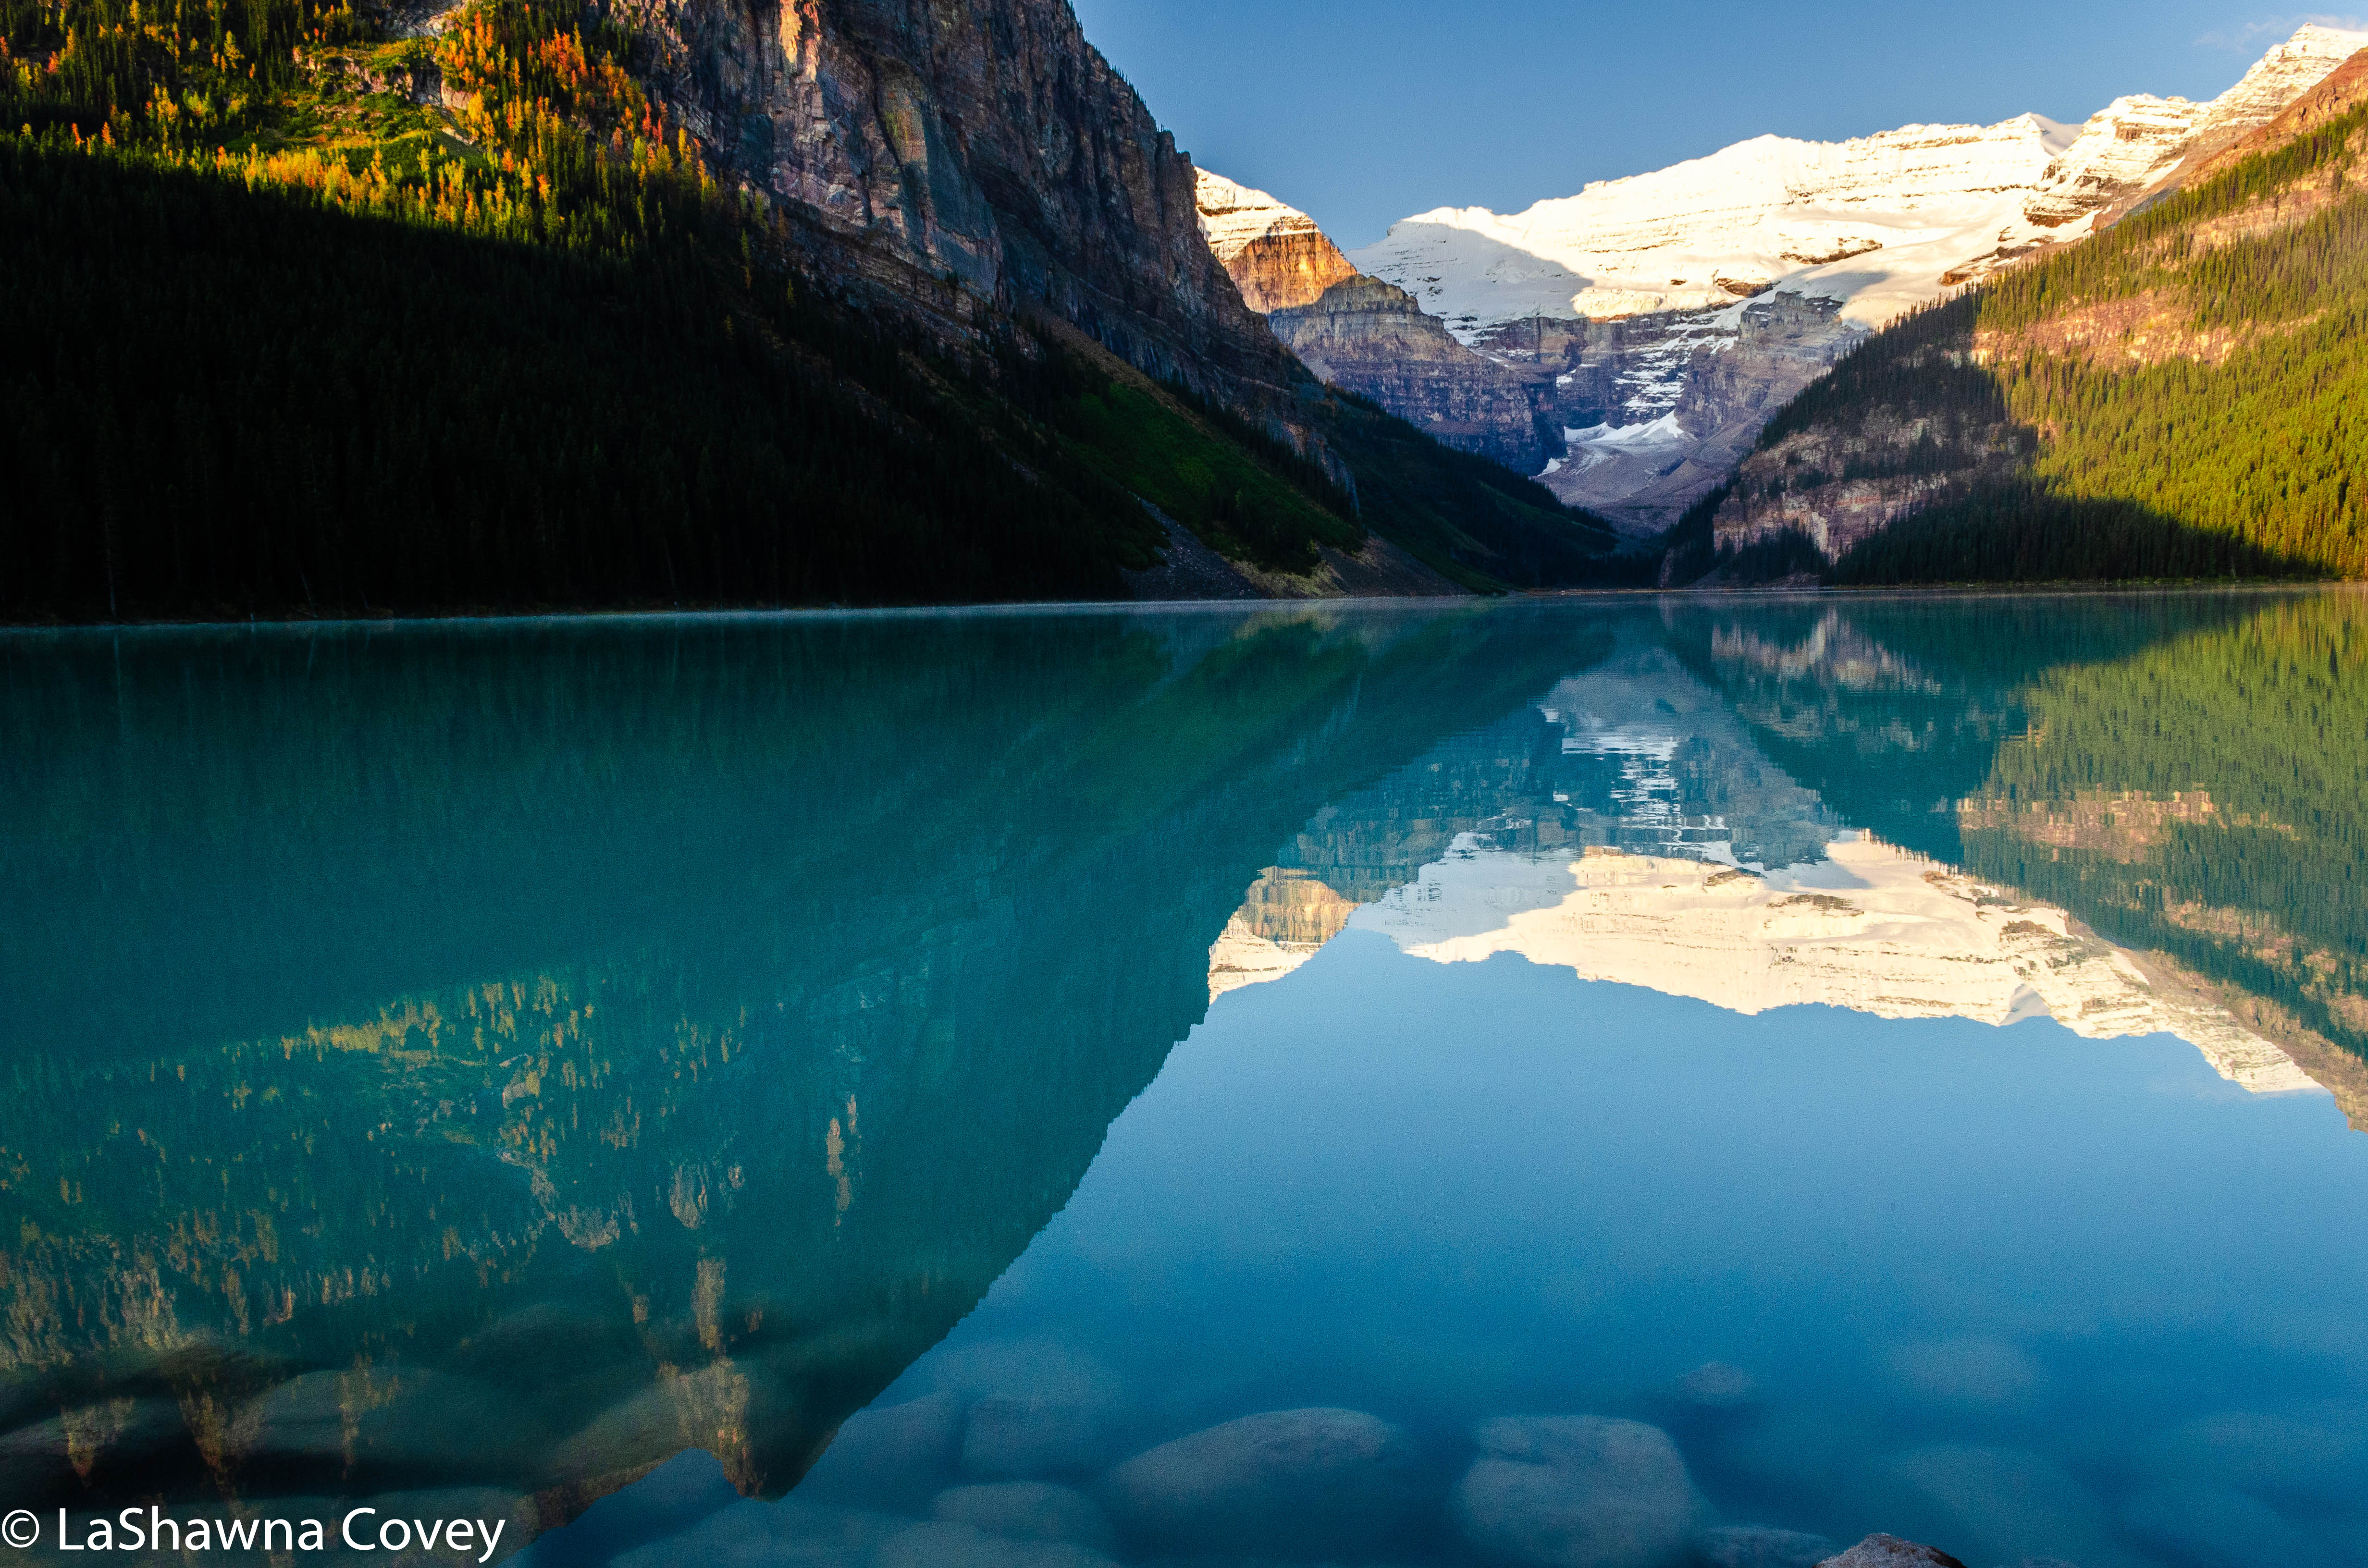
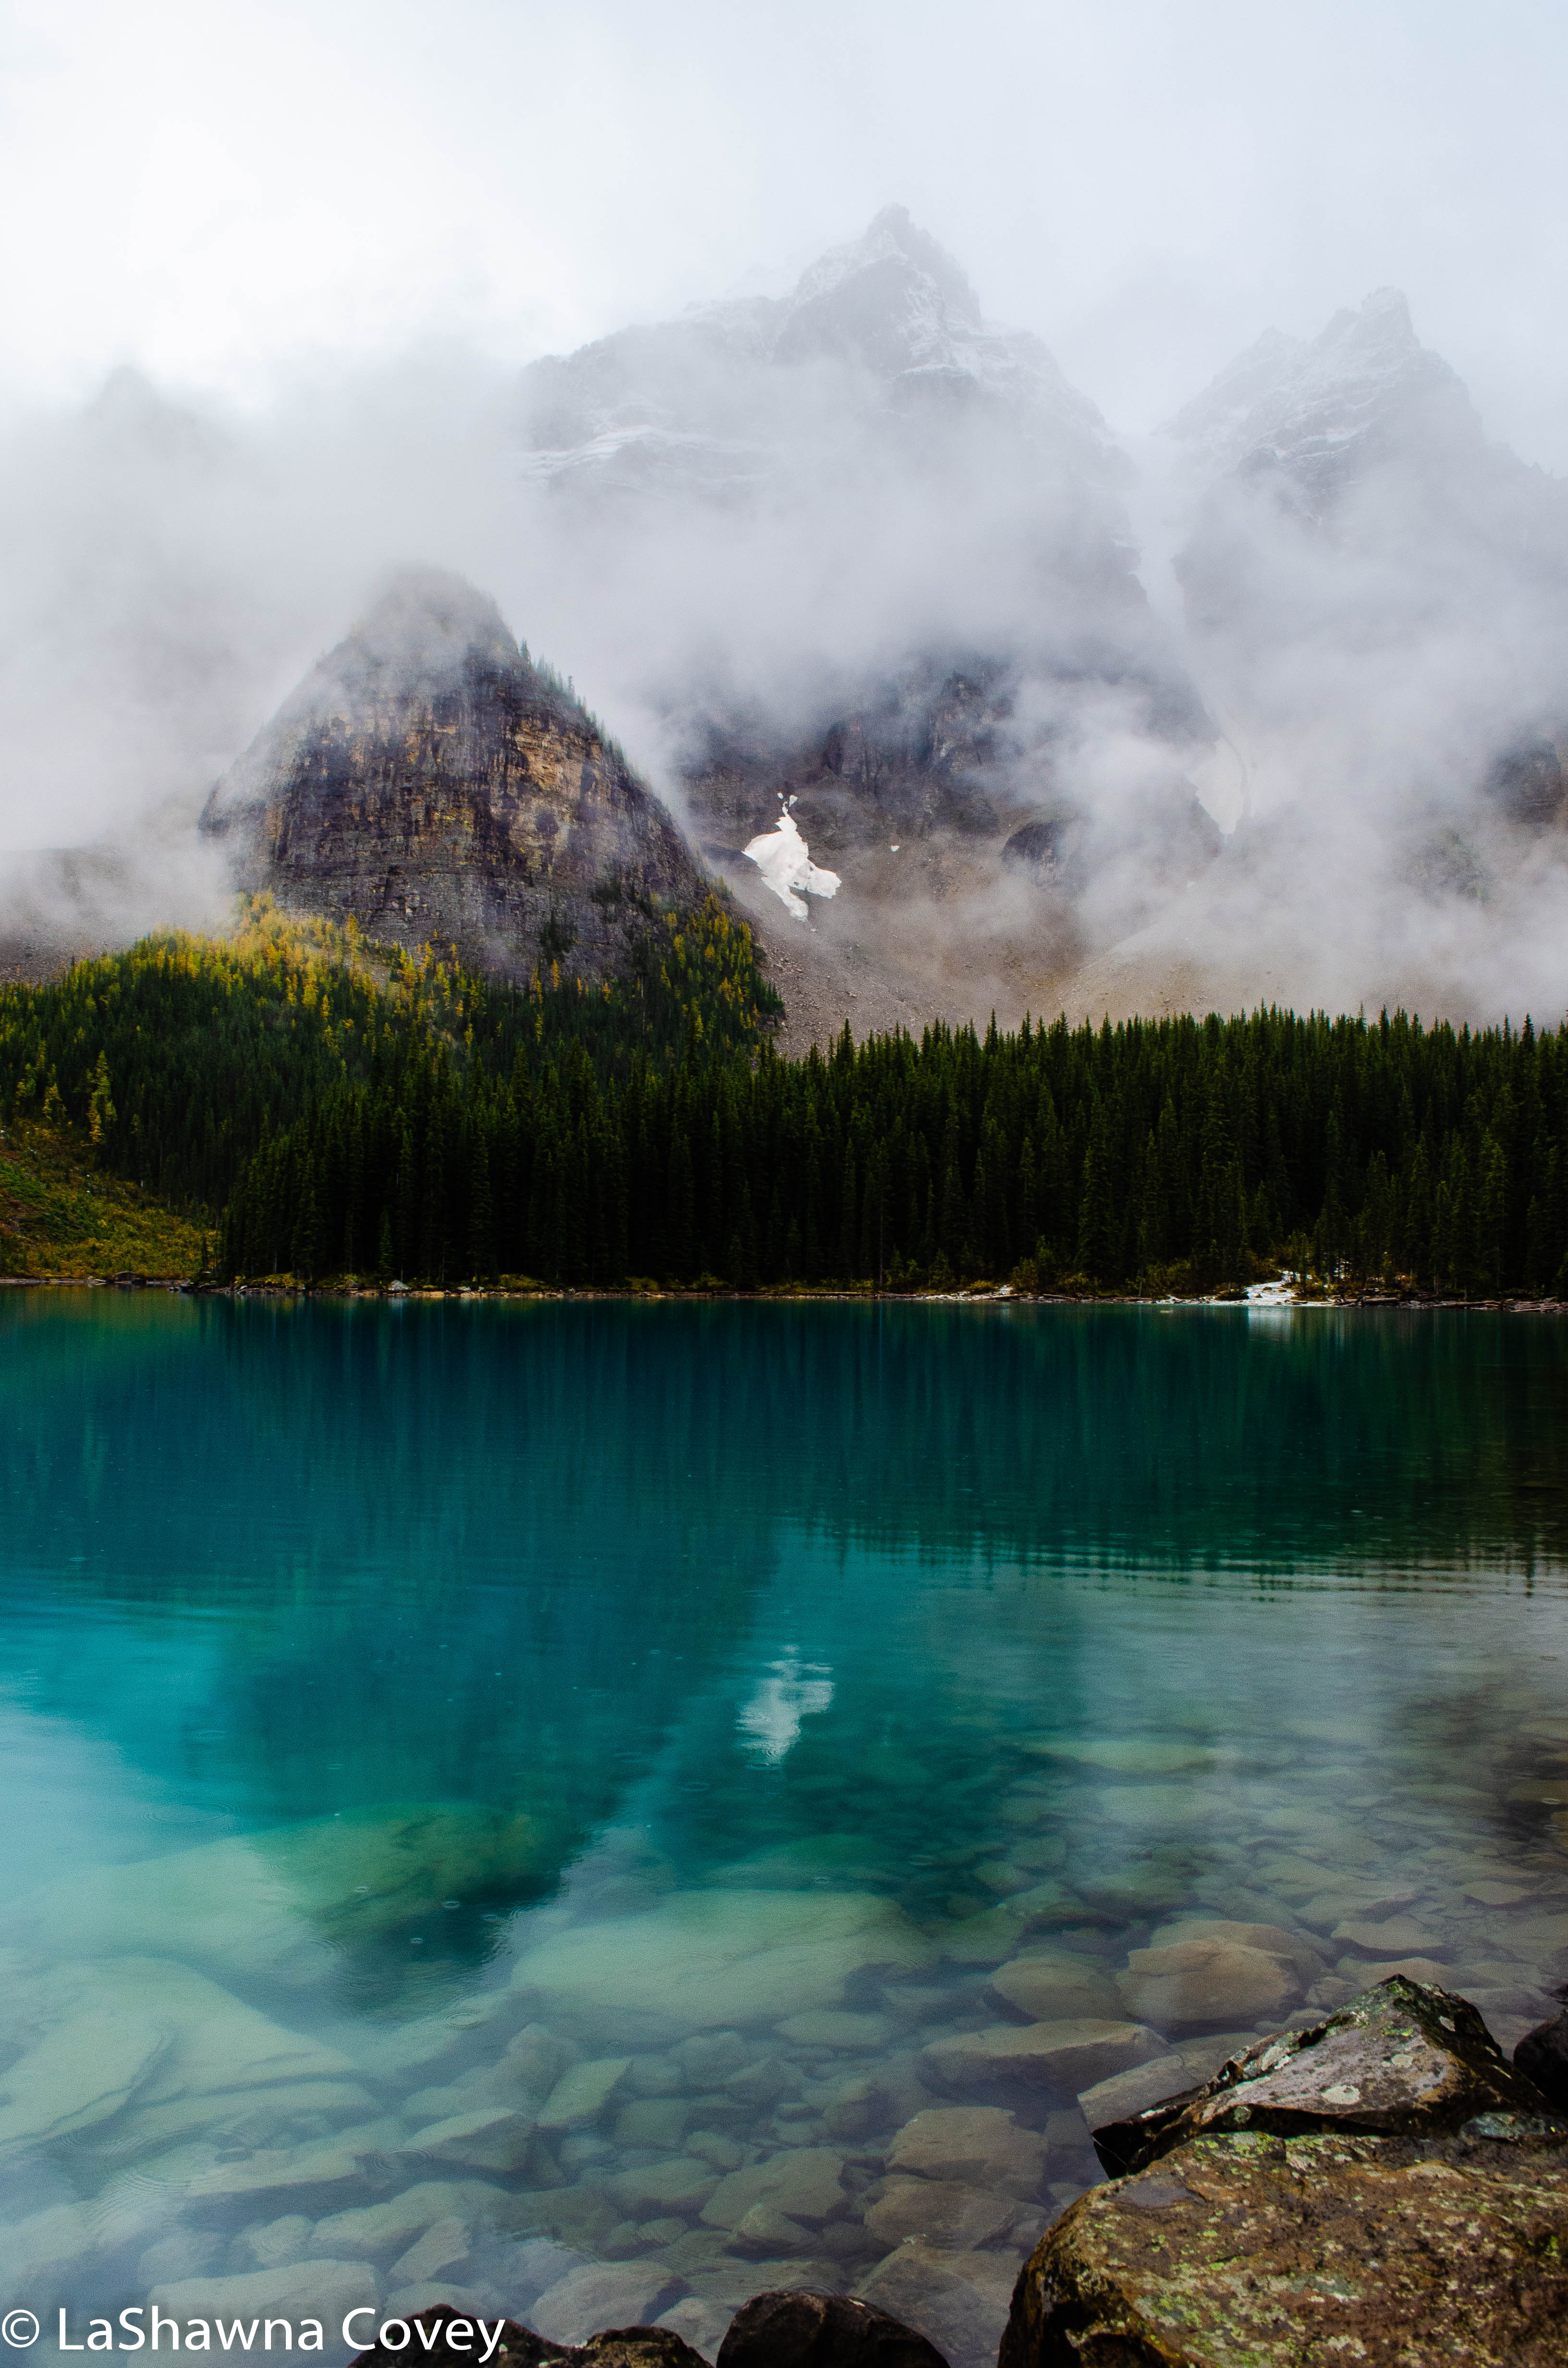
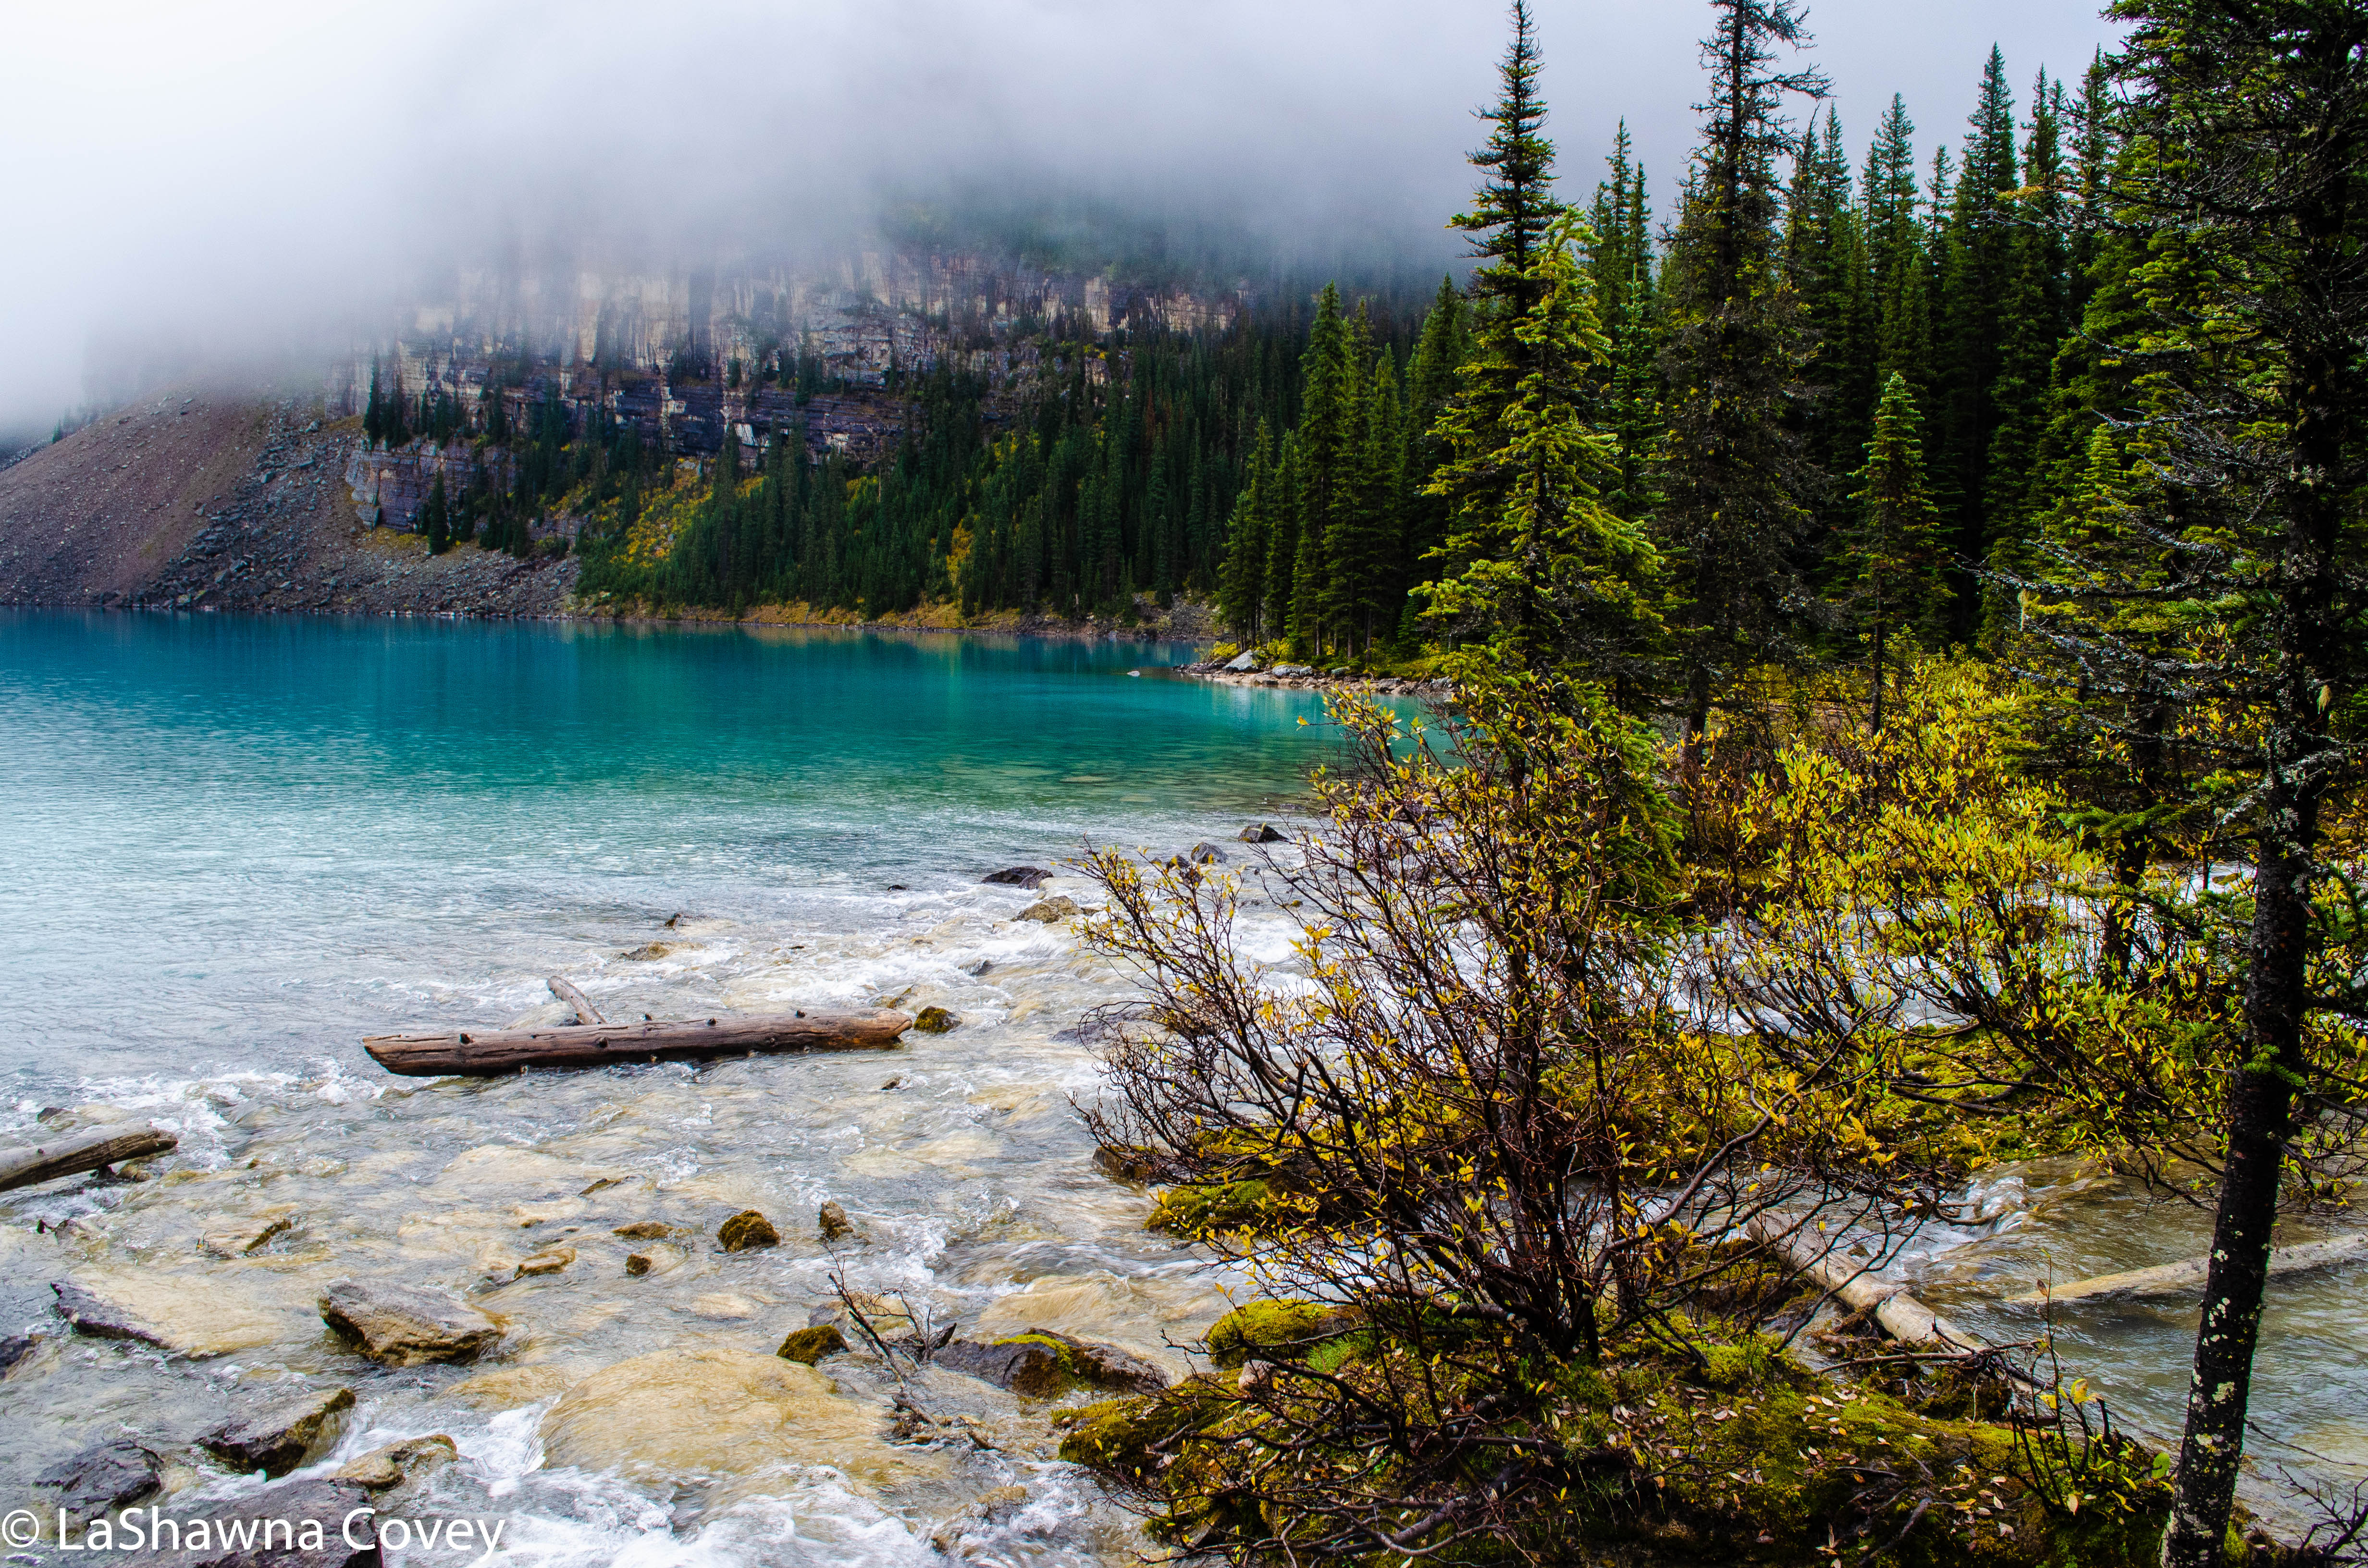
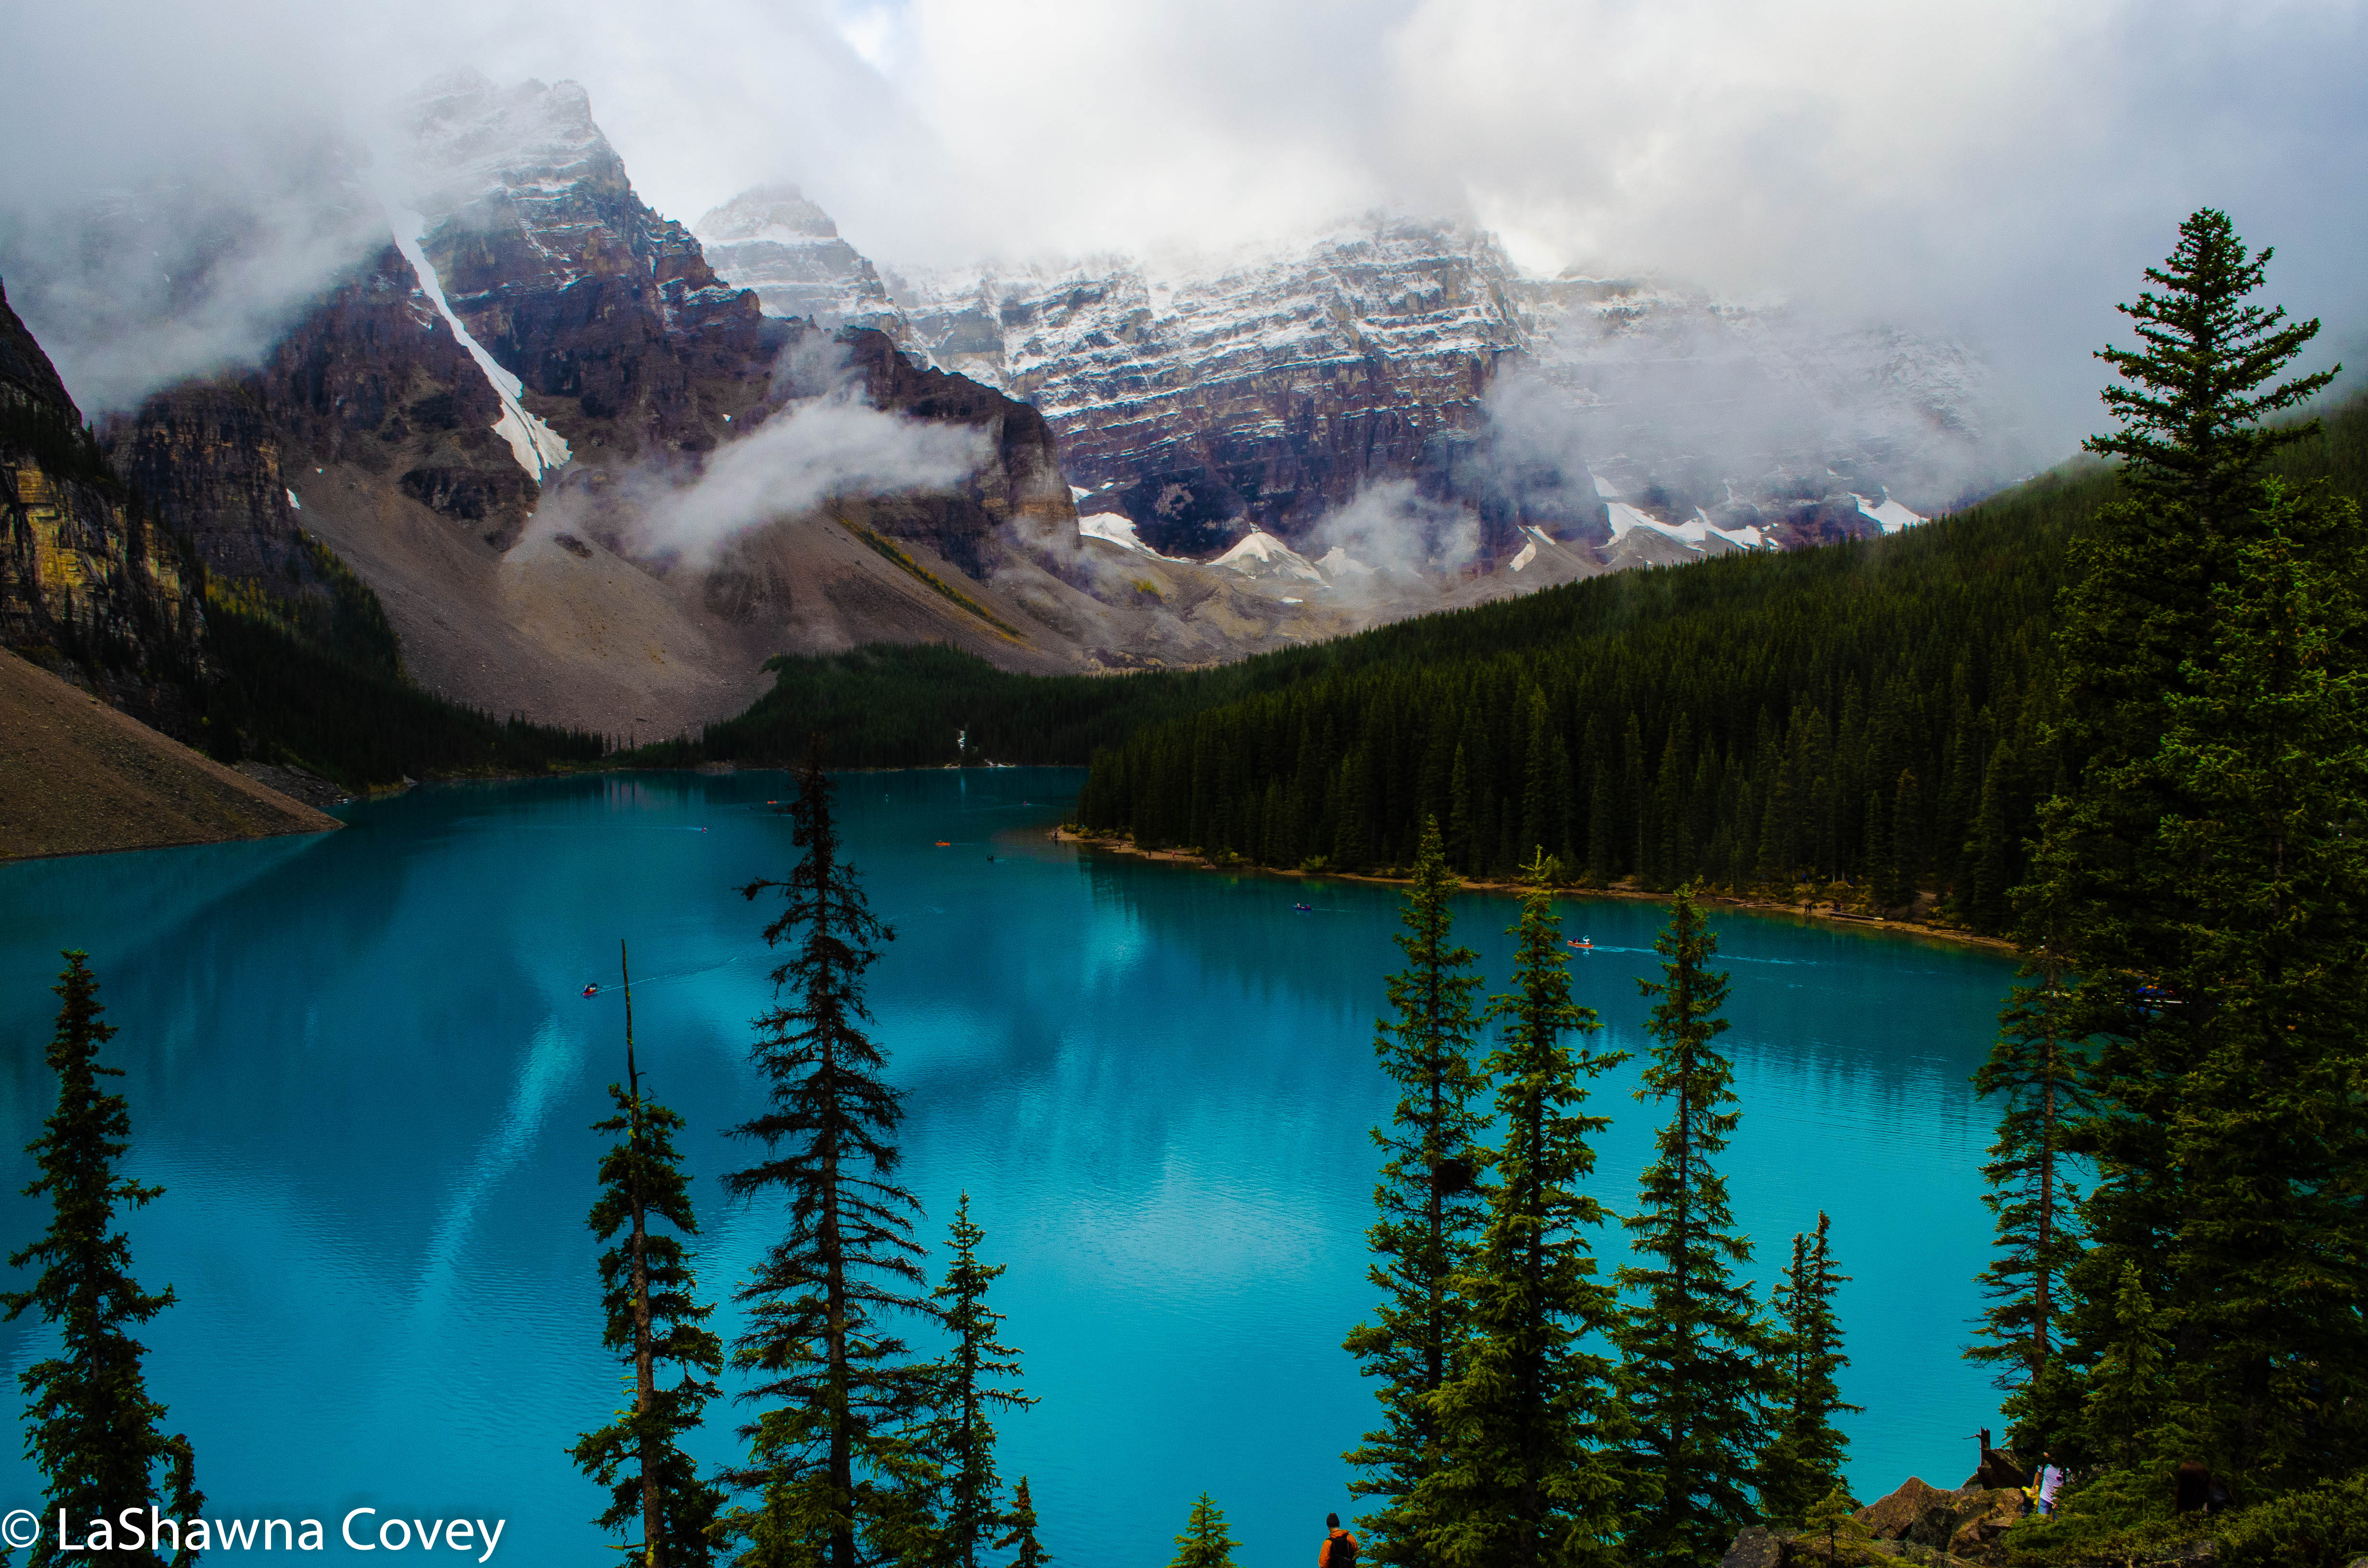
My final, final stop on my day trip to Yoho National Park was Emerald Lake itself. It is another example of a blue-green lake in the area that is such an eye popping color because of the glacial rock powder at the bottom of the lake, much like Lake Louise and Lake Moraine . By this point, it was getting late in the day, and I knew there were only a couple more hours of daylight to enjoy everything.

Yoho National Park-14Yoho National Park-13

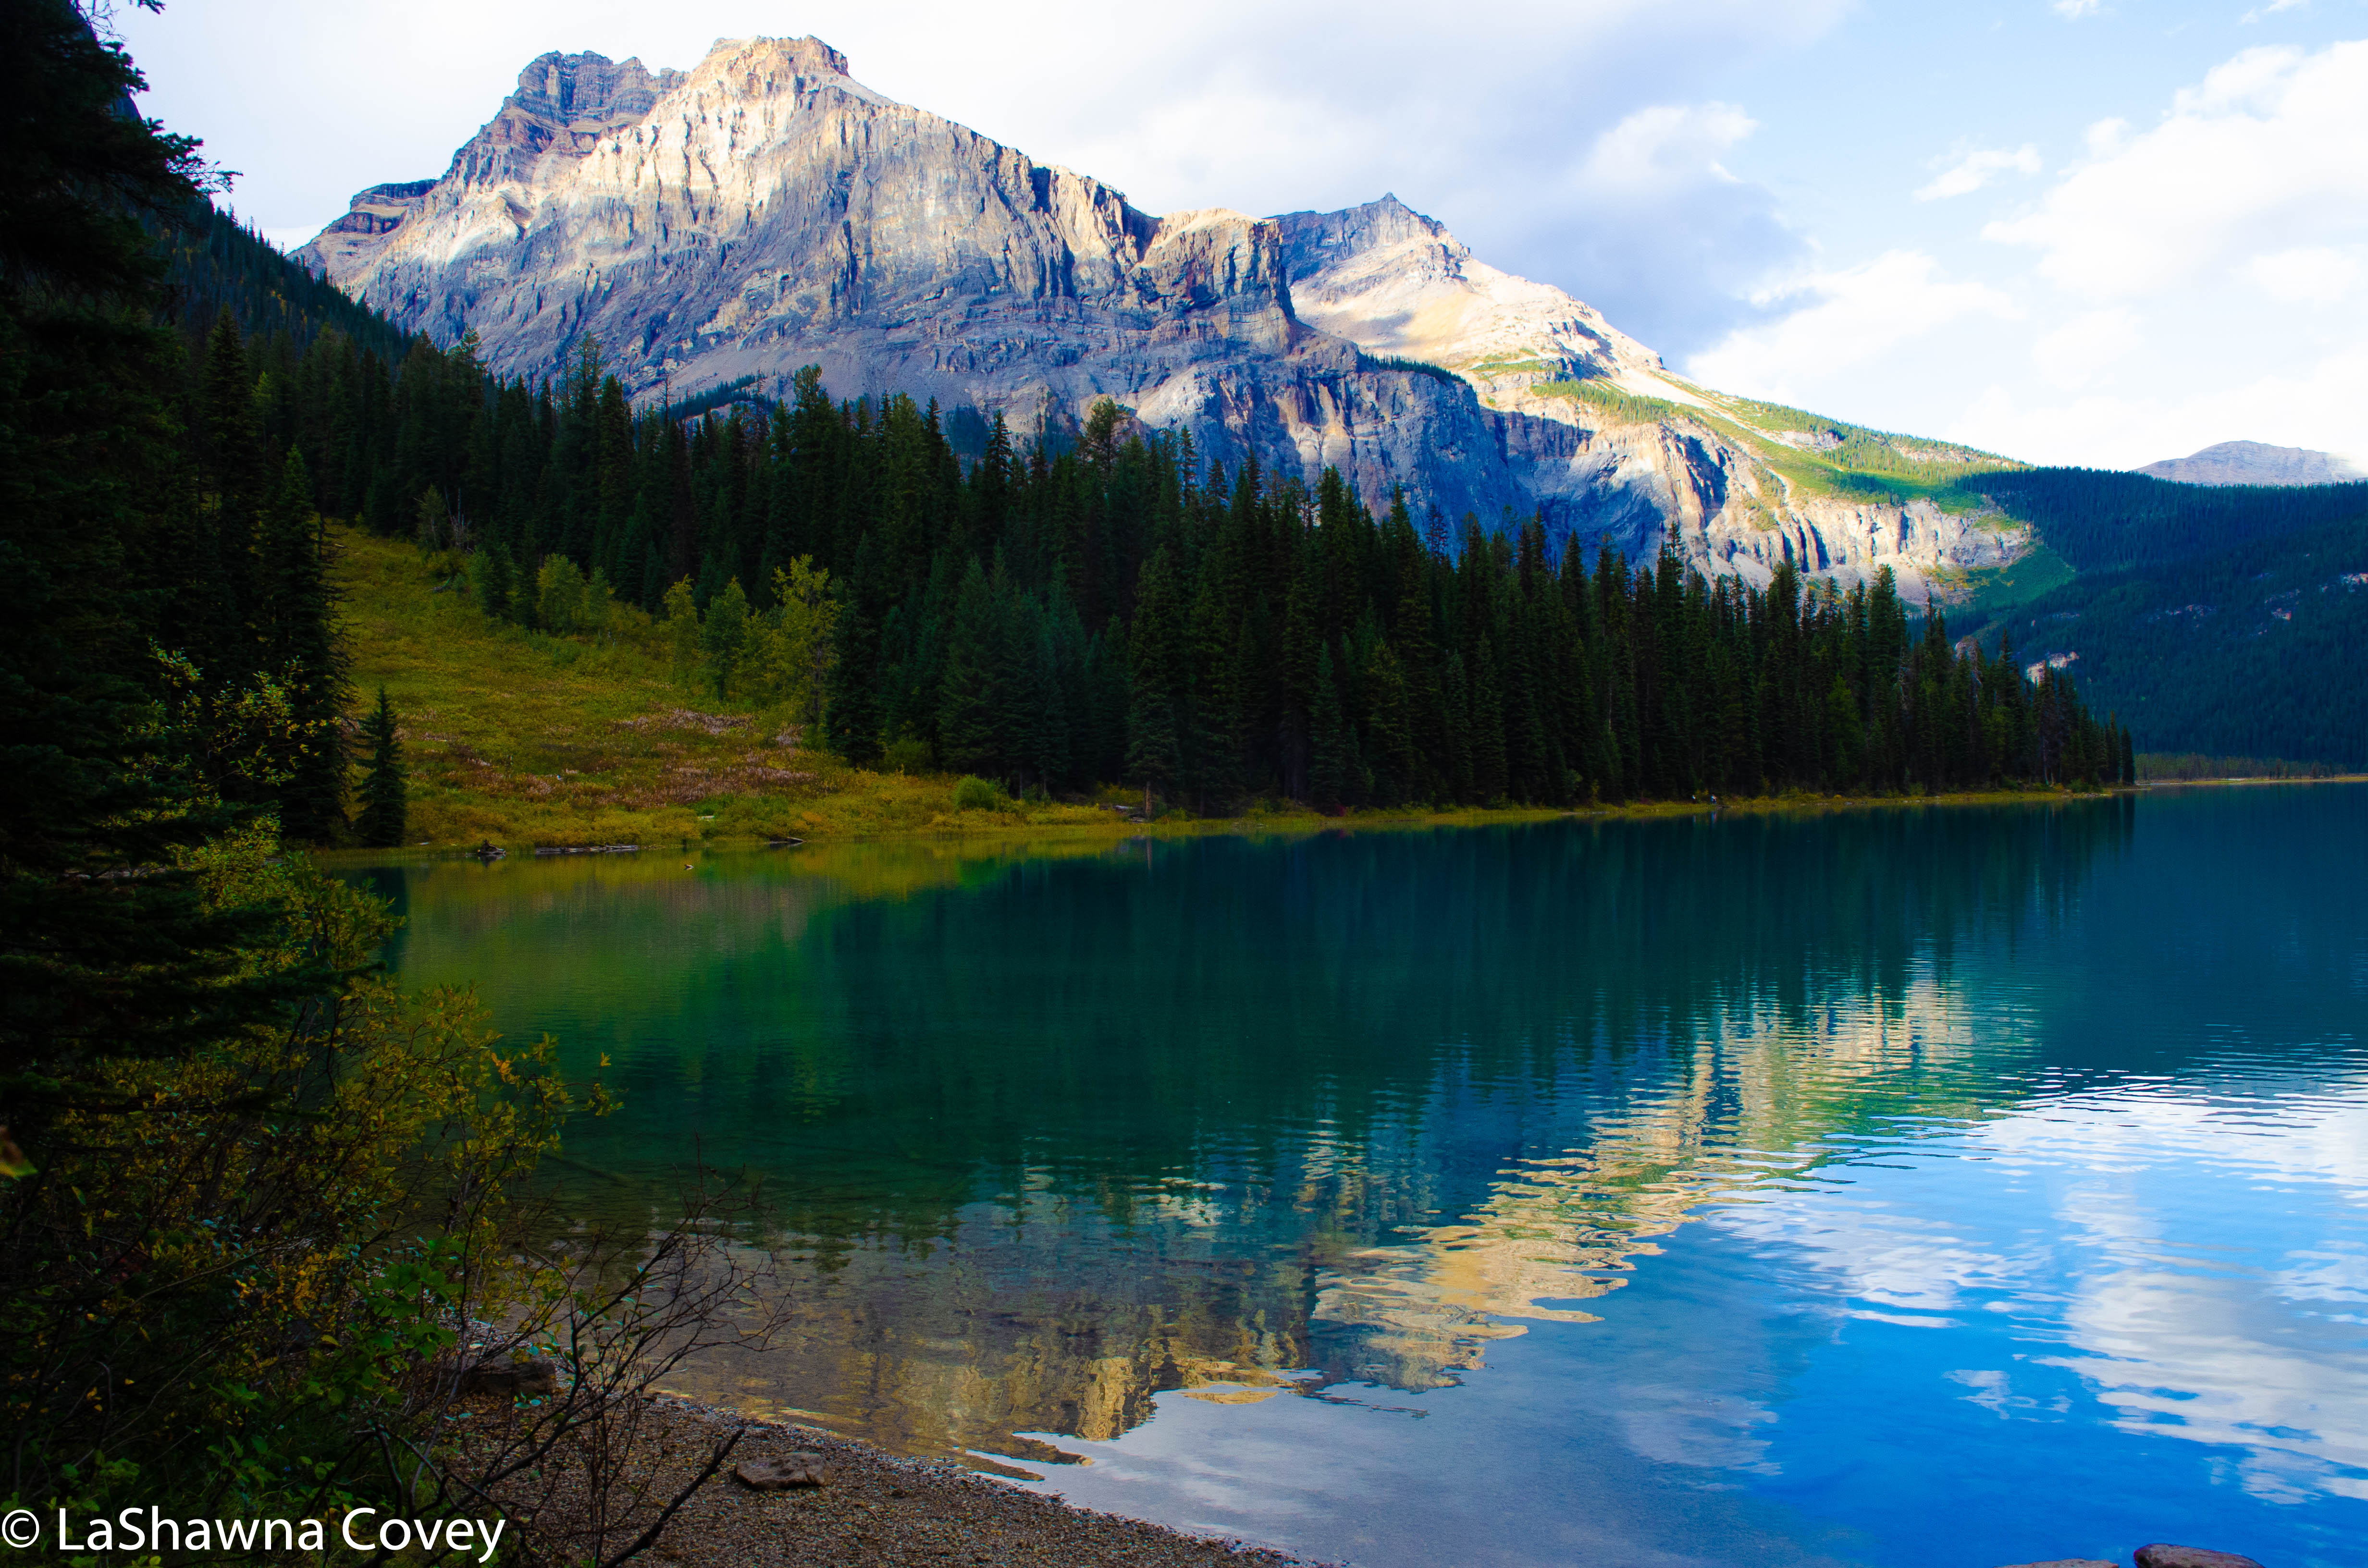
Emerald Lake has a lodge and a restaurant (though it was closed for a private function the day I visited). It also has a trail that circumnavigates the lake and makes for a nice walk. Though there were plenty of tourists at some of the sites nearest to the parking lot, soon enough I almost had the trail to myself (or at least only a few tourists).

Yoho National Park-17Yoho National Park-18

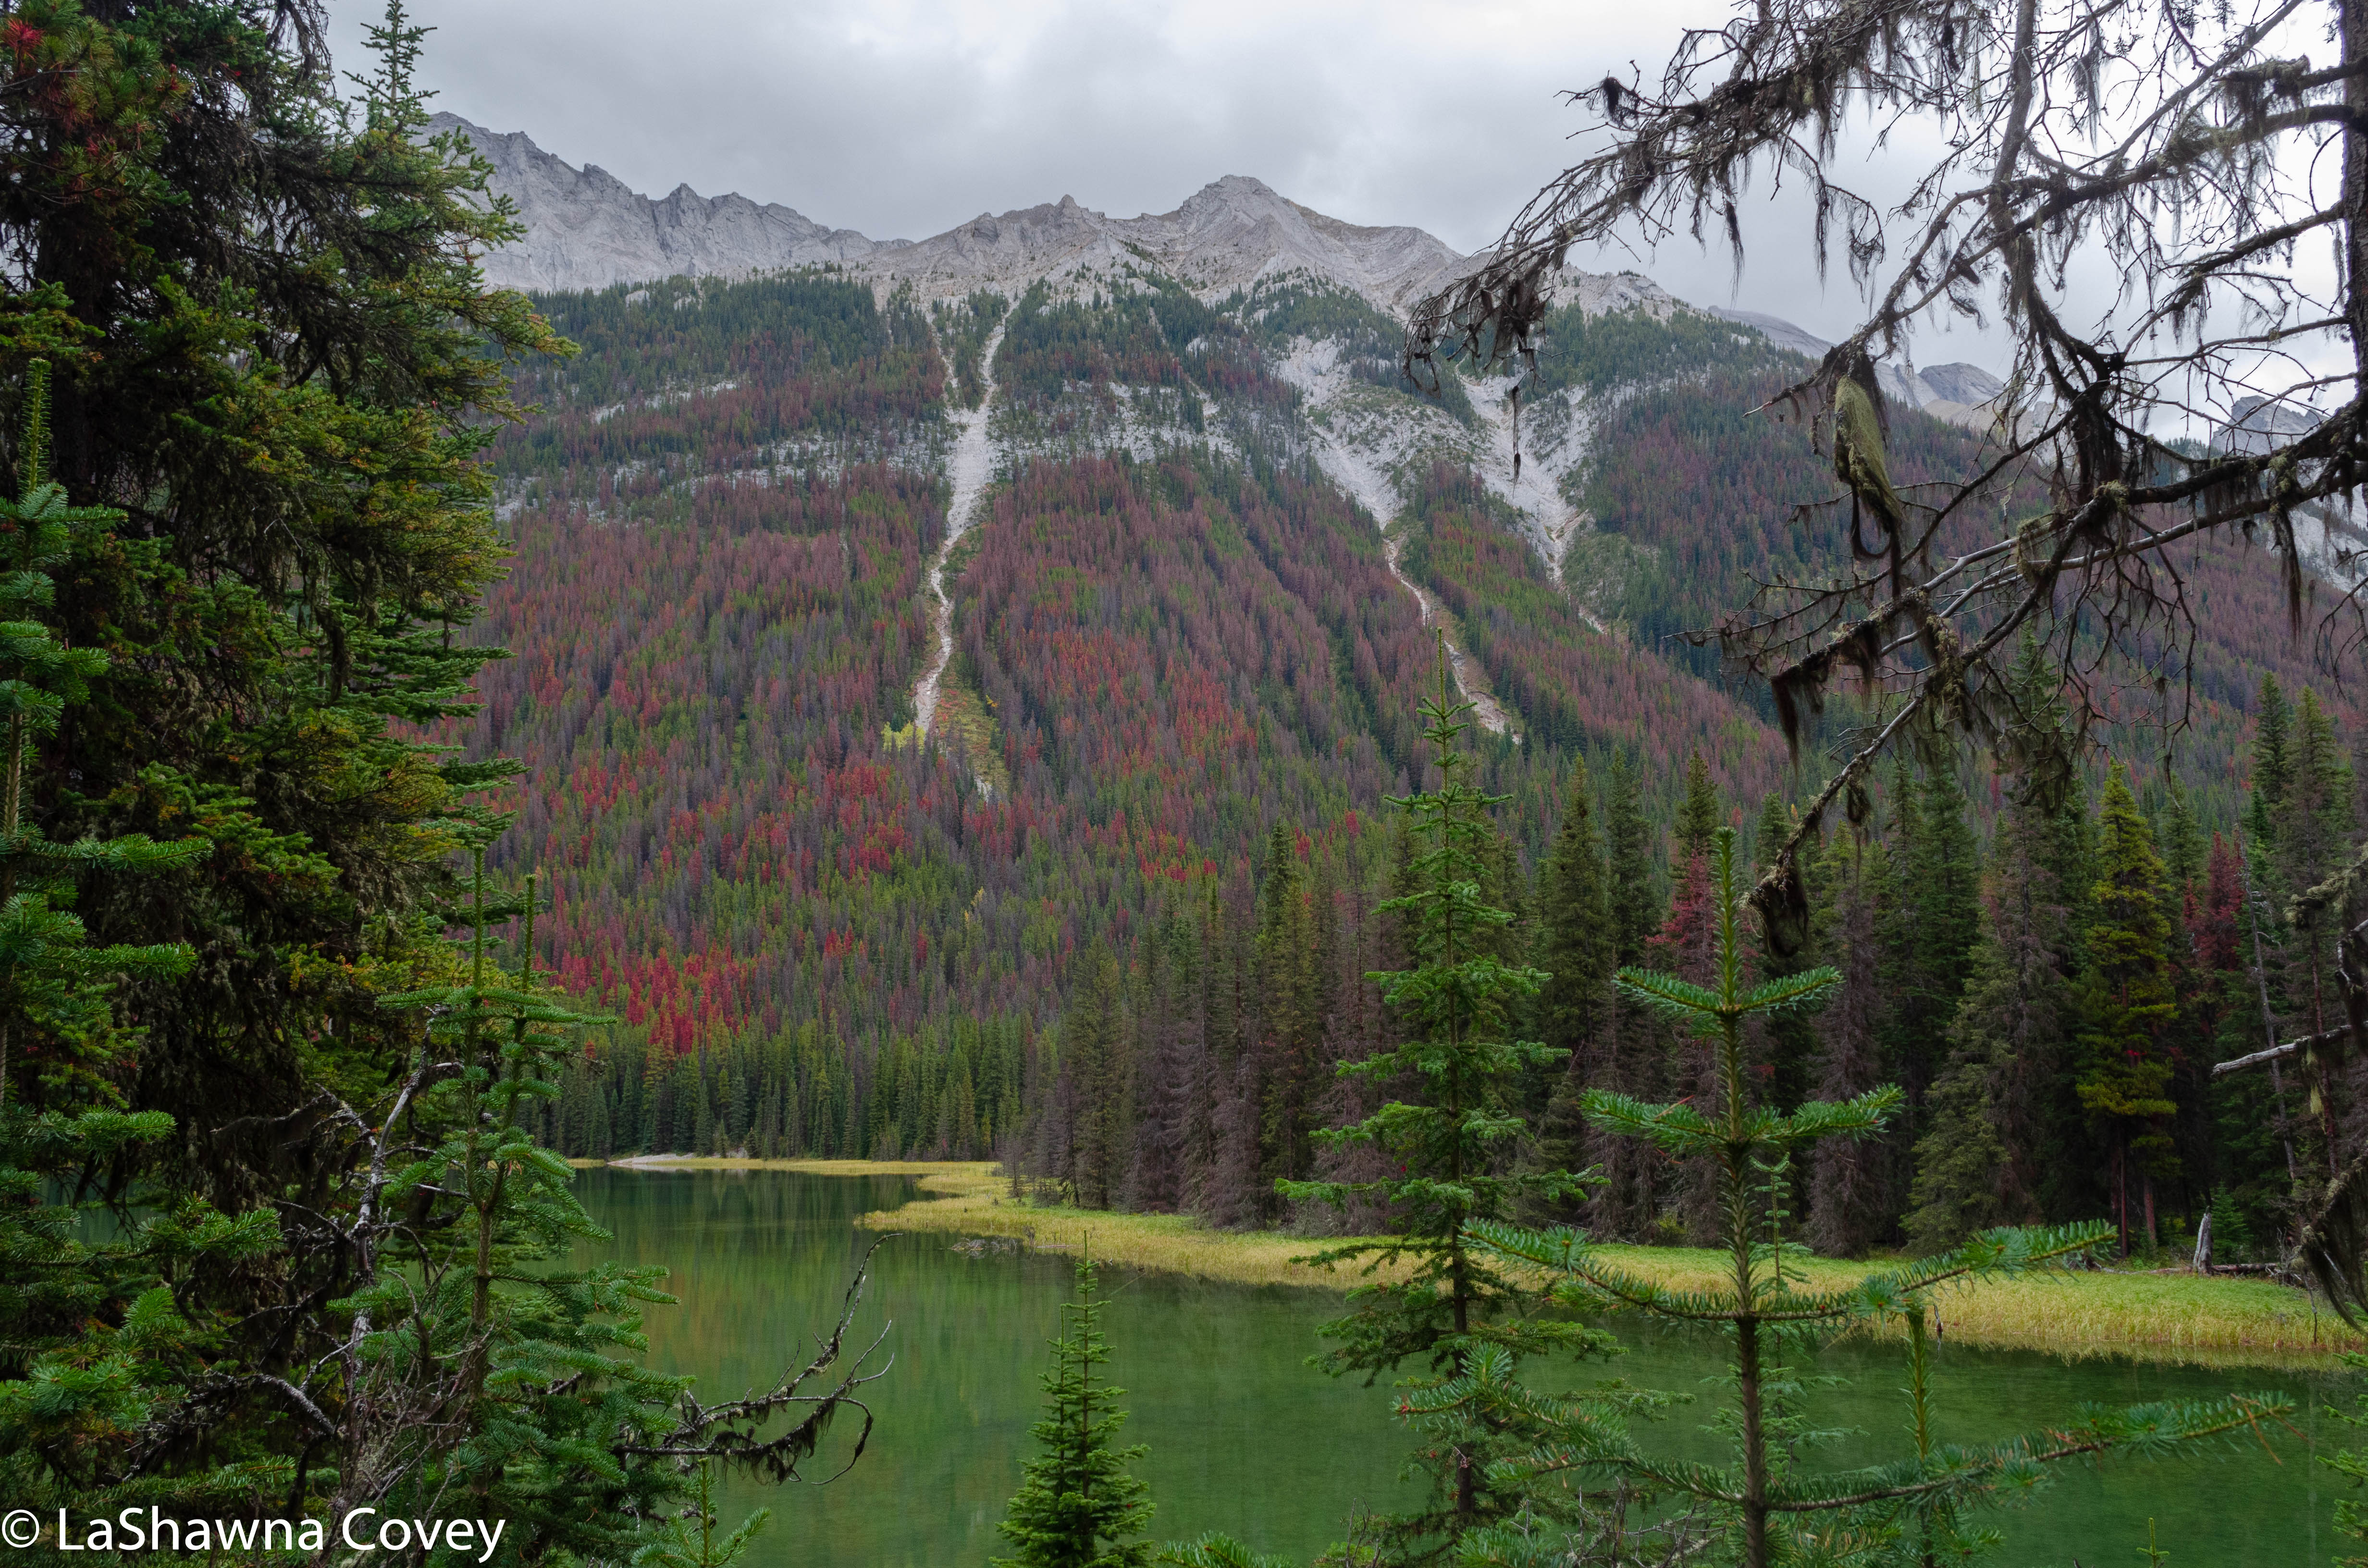
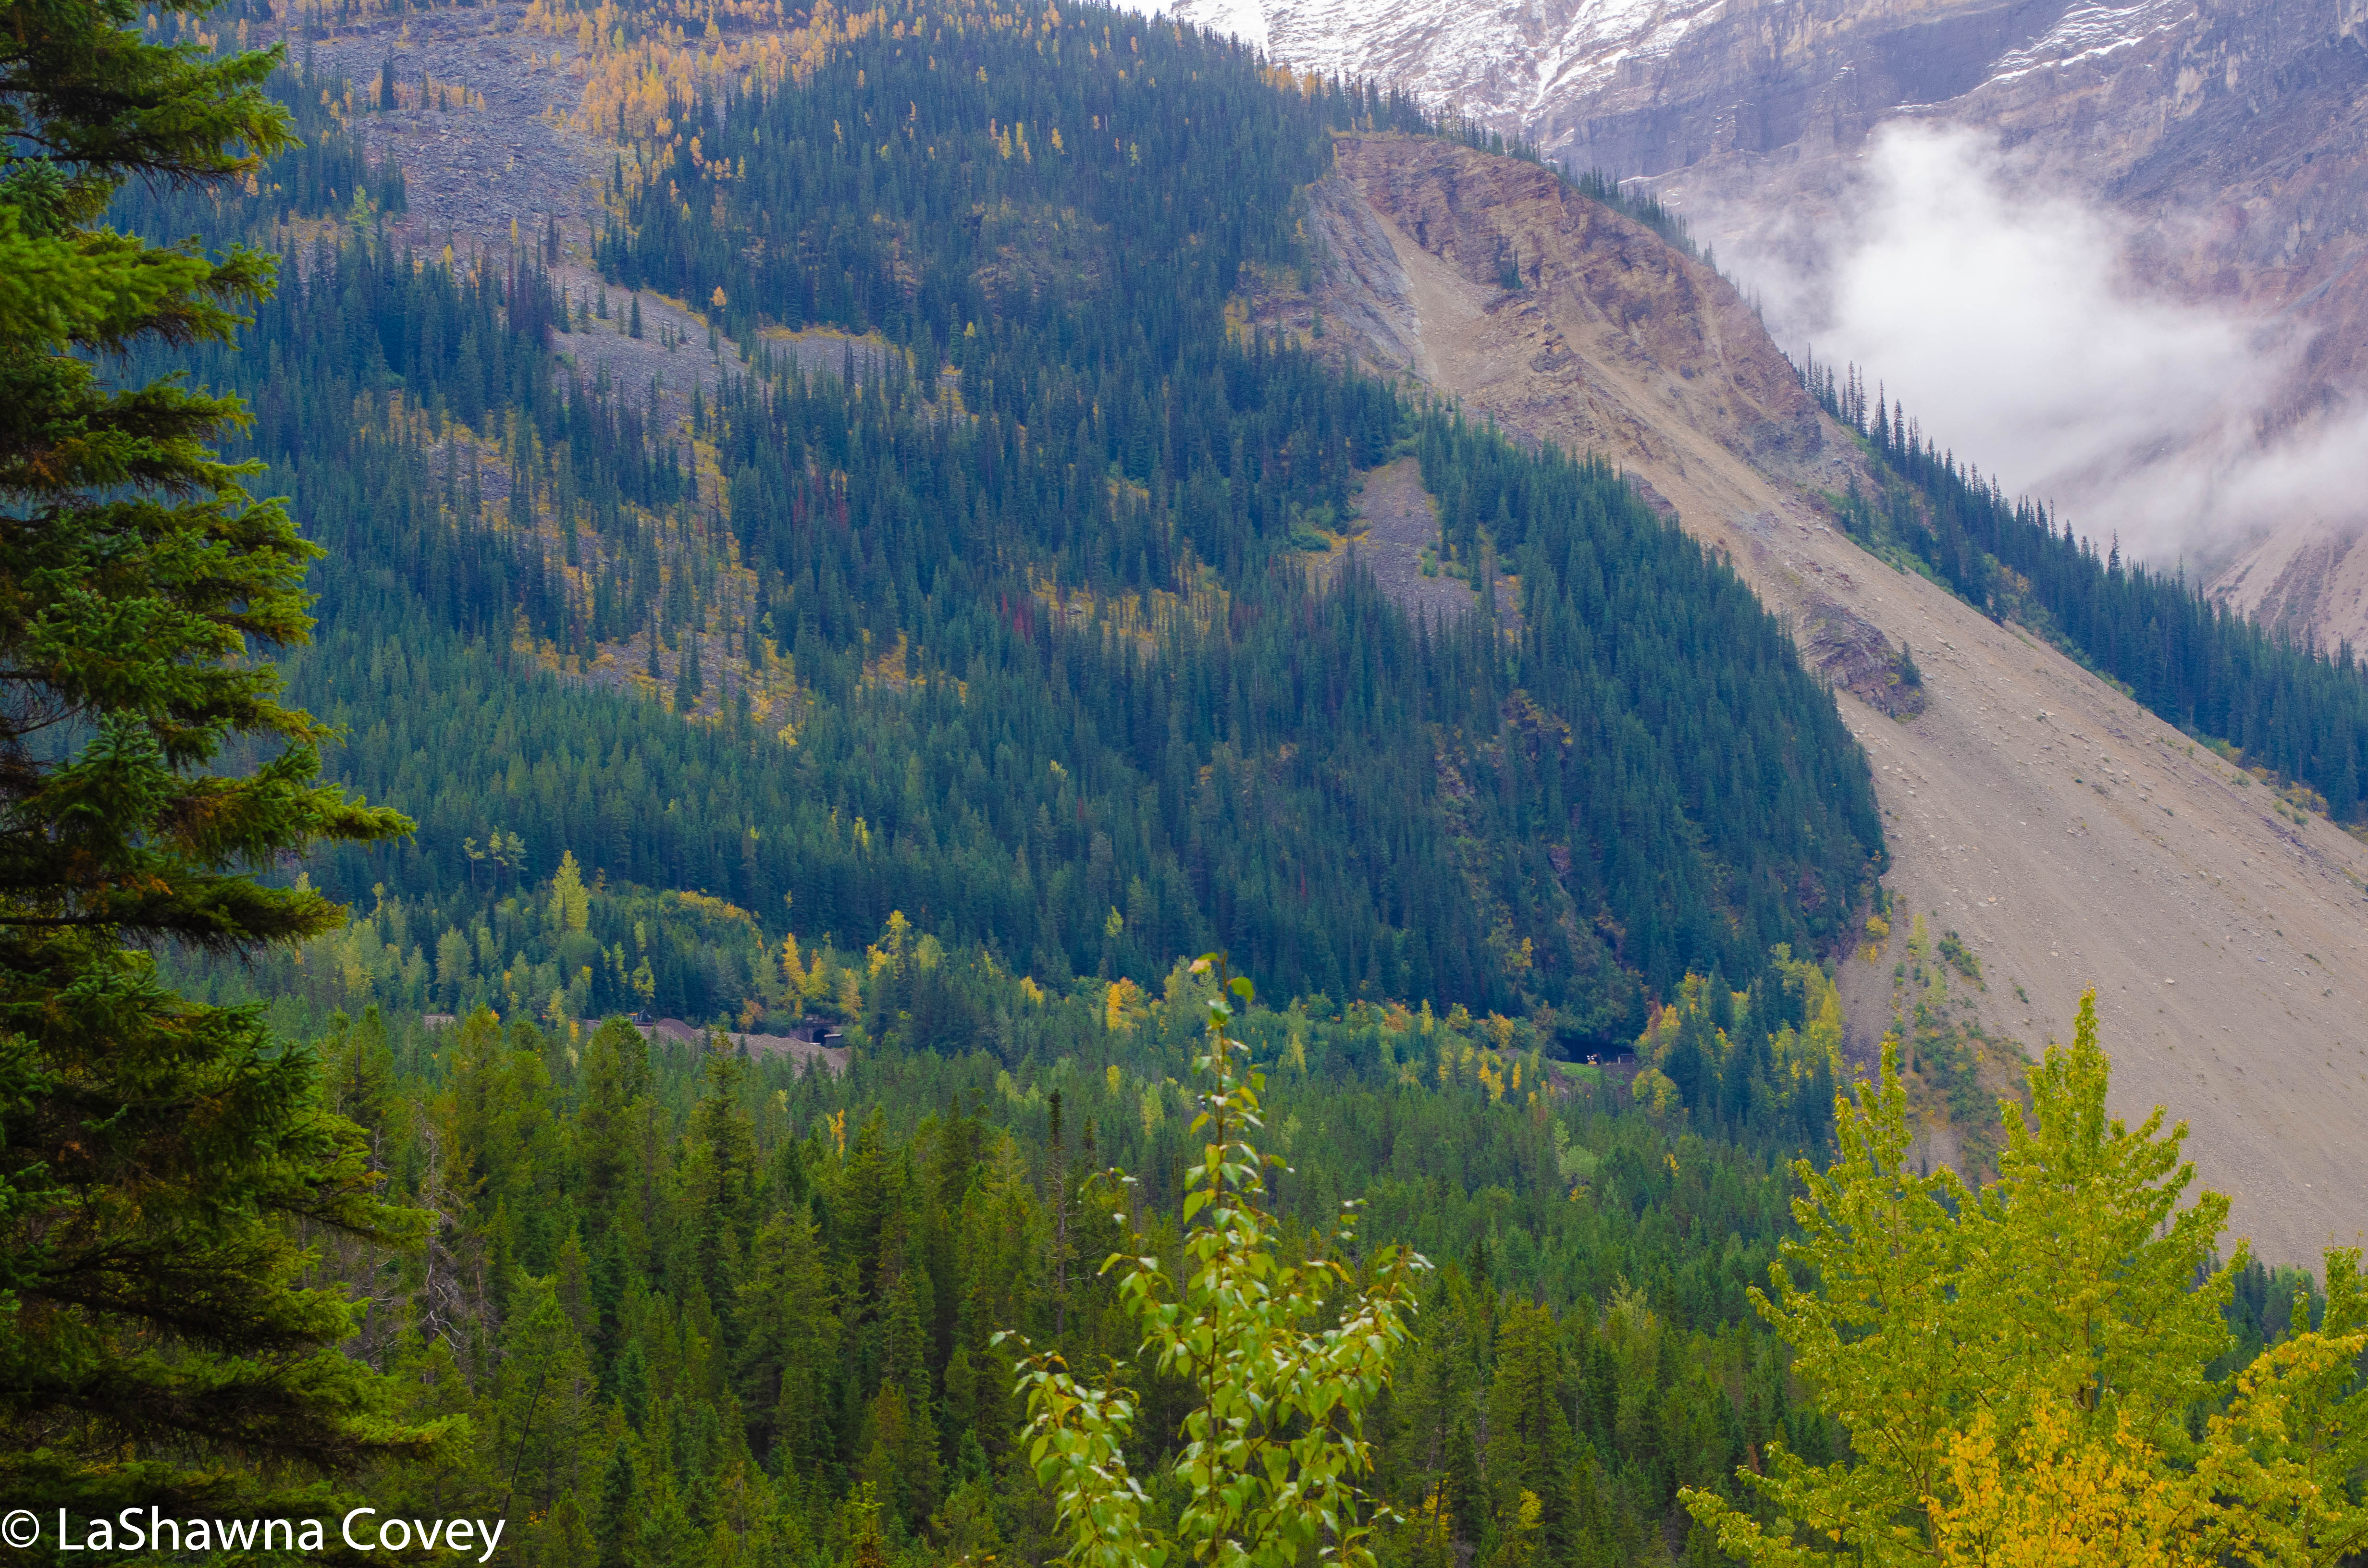
The trail took me through an avalanche path, which makes for some nice illustration of the environmental effects of avalanches. But for the most part, the trail is flat, level, and gave many opportunities to sit on a bench and take in the smooth lake and the surrounding high mountains. 

Yoho National Park-16

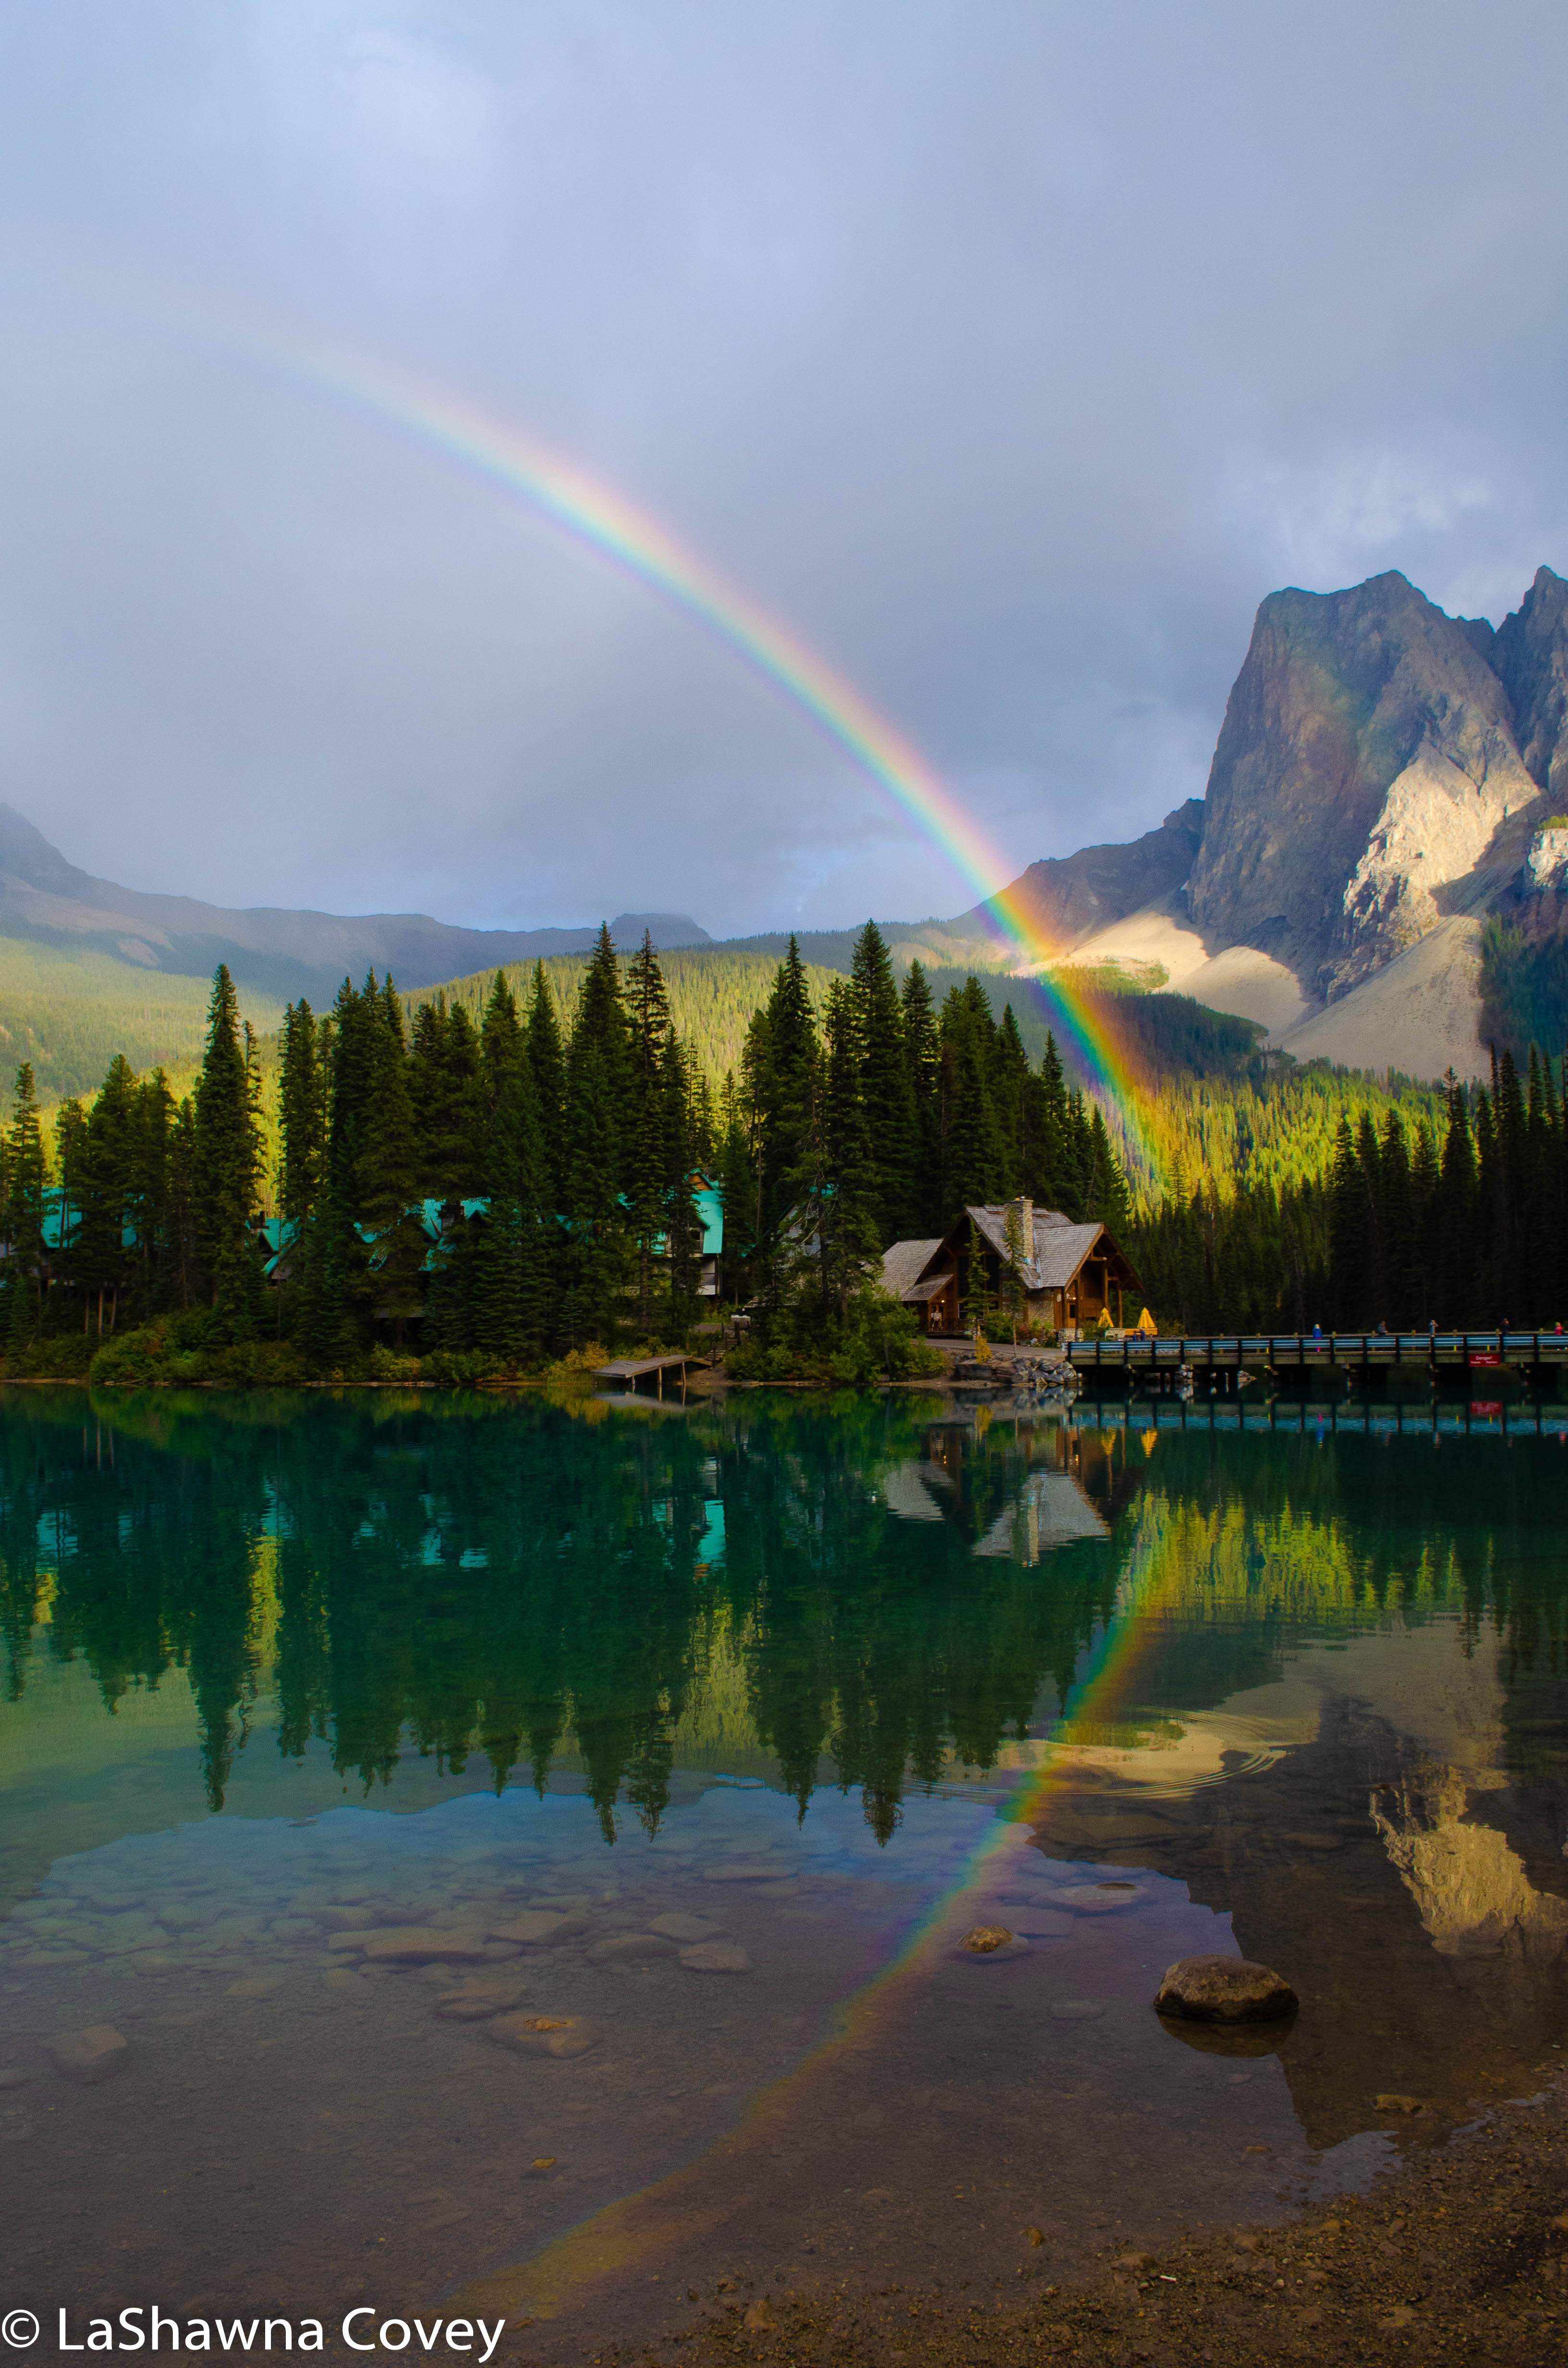
On my way back to my car, it started to rain for a few minutes (certainly not uncommon in these parts of Canada in September), but what could have been just an annoyance proved to be a photographic opportunity when a rainbow broke out, and the clear, flat surface of the lake provided a nice mirror image of the rainbow. It made for a very pleasing end to a long, but successful day.

Yoho National Park-19

If you are staying in Banff National Park for several days, definitely consider a visit to Yoho National Park. It is very easy to reach, especially if you are based out of the Lake Louise area, and it offers many natural pleasures, including my favorite- waterfalls, to behold. 

Athabasca Glacier- A Walk on Ancient Ice

Athabasca Glacier-4

Mid vacation, I made an adjustment to my itinerary when I decided only to do one Lake Louise hike and not two, so I was left wondering what to do with my free day. After some consideration, I decided to take a day trip out to Athabasca Glacier. It is a large glacier (though receding) as part of the Columbia Icefield, and the trip takes you out to walk on part of the glacier and then to a viewpoint overlooking the valley. I did some hemming about this, because the glacier is a stop along the Icefield Parkway, which I knew I was going to be driving in a few days’ time. But a visit out to the glacier (as opposed to just looking at it) and the viewpoint are really only available through a tour. It doesn’t have to be a formal tour bus tour from another city, and you can make arrangements at the glacier visitor’s center. I decided to do a tour to give me a break from driving, so I could focus on the sights around me, and the glacier and viewpoint tour (and lunch, always a plus) were included. 

Icefields Parkway-2Icefields Parkway-3

It’s a full day tour starting in the morning pickup at Lake Louise with some stops along the Icefields Parkway for views, such as Bow Lake and Howse Pass. This was my first look at the amazing scenery along the Icefields Parkway and gave me a preview of what I was going to see and what other stops I’d want to make on my own. The weather was pretty good that day, and it was another sunny day that showed off the mountains and surrounding countryside in the best light. Everywhere I looked, the natural beauty was just awe-inspiring. 

Athabasca Glacier-1

The visitor center is called Columbia Icefield Centre is large and packed with people, especially midday. It seems to cater more toward the large tourist groups like mine, though you could come as an independent traveler and join one of their tours to the glacier. If you want to visit during high season, it would probably be best to go with a tour group, or at least buy your ticket in advance. The centre is only open from May to October, though the summer months are the most popular. 

Athabasca Glacier-6

Athabasca Glacier-3


The view of the glacier is pretty good from the visitor center, though obviously it is a more distant view. To get a closer look, you can either park across the road and walk up to the edge of the glacier via some walking trails, or to get an even better view (though obviously you have to pay for it) take the tour that takes you out to the glacier to walk on.

Athabasca Glacier-2Icefields Parkway-6

The trip out to the glacier was in a specially designed super truck with massive tires that can crunch along the glacier ice safely. Once out in the glacier field, you are allowed to walk around a specially designated area that has been treated so you can walk on it safely. You can look around and basically see yourself surrounded by glacier ice and a nice view of the valley. The glacier ice was reasonably easy to walk on, as long as you were careful and not stupid. 

Athabasca Glacier-7Athabasca Glacier-5

After the trip back from the glacier, you make another stop at a specially constructed viewpoint over the valley. It is called the Glacier Skywalk, which is just a tad misleading, because it is not near the glacier, and you can’t even see it from the viewpoint, since it is further along the valley.

Icefields Parkway-7Icefields Parkway-12

But the view itself is worth it. It’s a little unnerving walking out on the skywalk, because it is one of those massive structures that jut over open air with clear plastic for floors (like the skywalk at the Grand Canyon). You know it’s safe, but I did keep wondering what was the maximum capacity of people allowed on the skywalk at any one time. It wasn’t crowded or anything by that point, since we were later in the afternoon, but it was a bit windy, which rocked the skywalk a bit. 

Icefields Parkway-8Icefields Parkway-10

I was entranced by the view, because it was over a tree lined valley and I could see numerous waterfalls dot the valley, and flow into the river. The walkway is suspended over the Sunwapta River and the surrounding Mt. Kitchener. 

Icefields Parkway-11Icefields Parkway-9

Overall it was a nice way to spend the day. It is certainly not a cheap way to spend the day, because a day long tour in the Banff area is not cheap. If you want to see the same sights, but save some money, I recommend starting a tour directly from the visitor’s center, and buy your tickets in advance during high tourist season.

Beautiful Views and Larch Trees on the Plain of Six Glaciers Hike

Plains of Six Glaciers-1

If there is one place tourists are likely to stop in Banff National Park, it is Lake Louise. I had to keep reminding myself that even though I was 30 minutes’ drive away from Banff town, I was still in the Banff National Park. I based myself out of Lake Louise for several days, because there is just so much to see and do in the area, and it’s just easier to cut down on driving. It also allows me to get ahead of the hordes of tourists. And it’s funny that I say hordes of tourists, because yes there were so many tourists when I visited in mid September, but I also know there are so many MORE in the summer time, which is one of the reasons I would never want to visit Banff in the heights of summer. 

Plains of Six Glaciers-2

The traffic is managed fairly well (though for some odd reason, they don’t have a light at a couple main intersections, and instead have actual people conducting traffic during daylight hours), and there are signs when you enter the area informing you of the parking situation (i.e. if the parking lots at the lake are full and you need to park and take the shuttle up there). The parking situation isn’t quite as dire as Lake Moraine, because the parking lot at Lake Louise is huge. But it is so popular, that while you might not need to be up at the lake by 0630 to get a good parking spot, you should be there by 0800, or it is liable to be full. There are plenty of paths that go from Lake Louise toward the village, so some people choose to park and walk, and you see groups of people walking back to their cars in the afternoon. 

Plains of Six Glaciers-12

When I was putting my itinerary together for the Lake Louise area, I originally had two different days scheduled for two different popular hikes in the area. But the weather was iffy for one of the days, and I again had to rethink my fitness level, since both hikes would involve over 1000 feet of elevation over a few miles. And both of them have similar, though not identical views. Then I thought maybe I could combine both hikes, since there is a connecting trail, and decided I’d play it by ear and see how my body felt during the hike. 

Plains of Six Glaciers-6

So having to choose which hike to start with (and thus being the only hike completed if my body rebelled), I decided to start with the Plain of the Six Glaciers Hike. The hike on its own is a little bit longer than the other one, with a bit less elevation gain. But if I had to choose just one hike, this one sounded like it was the one for me, because it starts by skirting Lake Louise and then climbing through the valley toward the glacier ice field, stopping at a tea house among gorgeous larch trees. I figured this hike would give me the most bang for my buck view wise. 

Plains of Six Glaciers-11

As always, I started relatively early, though there were plenty of people ahead of me that morning. The morning was clear and bright and the reflections of the mountains on the lake were just awe inspiring, since the lack of wind meant the lake surface looked like glass. The first couple miles of the hike are flat and easy, because it is along the lake shore.

Once you get to the end of the lake, the real hiking begins as the path ascends fairly steeply, so you gain a lot of elevation pretty quickly. Every so often, I’d stop, take a breath (or many breaths), have some water, and just take in the countryside around me. The valley narrows with mountains surrounding it, and the lake view got farther and farther away as I hiked up and away. 

Plains of Six Glaciers-3

I’d be lying if I said I didn’t feel it, and even needed to break out my walking sticks, because the path was a bit rocky at times and could be steep. I kept a decent pace for me, though I was often passed by fitter and faster hiking groups. But since I had blocked the entire day for this, and wasn’t on anyone’s timetable, I didn’t mind taking my time. 

Plains of Six Glaciers-7

There was a point in the hike when the path just kept climbing up and up and every switchback would lead to another switchback, that I was starting to wonder just when this hike was going to end. I passed a descending hiker who said the tea house (the typical end point for this hike) was just a few minutes away, but I always hear that when hiking, so I didn’t know if that was actually true. But lo and behold, it really was only a couple minutes later when I emerged into the tree field and realized I had reached the tea house and could really relax.

Plains of Six Glaciers-9

The view of the surrounding countryside was marvelous. The glacier that I could see at the start of the hike was so much closer. The larch trees surrounded me in all their golden gloriousness. The day was absolutely gorgeous with a clear, blue sky (somewhat rare for this vacation), and it all felt good and peaceful. I made decent time for me, and then I could make a decision about what to do next.

Plains of Six Glaciers-8

I knew that even though the hike officially ends at the tea house, I could hike even closer to the glacier along a narrow path, and even ascend a slippery, rocky moraine to enter a small cave up on a cliff. I figured that I had come this far, why not hike a bit farther to see what the views offered?

Plains of Six Glaciers-10

There is a sign that the official trail has ended and what lies beyond is not maintained. That means that the path narrows and there are some washouts and large rocks in places, but I kept going. I made it all the way to the rocky outcropping that gave me a commanding view of the valley and a more intimate view of the main glacier. I saw a steady line of people walking past it and along a narrow ridge line to the moraine, but I decided against it. My body was pretty tired by that point, and I just didn’t have the energy to climb up a shifting moraine of rocks, and figured the views I captured were good enough. So after getting my fill of the valley views, I made my way back to the tea house (the return hike felt so much shorter, like what always happens on hikes).

Plains of Six Glaciers-4

Once I was descending I decided not to take the connecting trail to the other hike and Lake Agnes destination. I knew the lake and tea house were supposed to be beautiful, but I also knew the connecting trail meant some serious steep uphill, and I was just tapped out. I was good and had my daily fill of larch trees, glaciers, and sunny lake views.

Plains of Six Glaciers-5

Going on a multi-day hiking vacation (not like one multi-day hike, but many days of day hikes) definitely taxed my physical fitness. I knew I was in decent (though not great) shape, and the hiking would help me. But it definitely tired me as well, and I had to make some adjustments to do shorter hikes, rather than the long slogs. 

Plains of Six Glaciers-13

If you have time and energy, I would probably recommend doing both hikes, even if they are on different days. But if you only can do one, you could do worse than the Plain of Six Glaciers. This hike will afford more Lake Louise shoreline, more glaciers, and some fabulous larch trees (a bright golden yellow in the fall). I definitely felt like I earned my dinner that night, and a very long sleep as well. 

Plains of Six Glaciers-14

The Misty Mystery of Lake Moraine

Lake Moiraine-2

If you visit the Lake Louise area, I highly recommend basing out of Lake Louise, and not doing it as a day trip from Banff. Sure, the drive is only about 30 minutes along good highway from Banff town proper, but that is extra driving you don’t really NEED to do. Plus, due to the popularity of some sights and the limited parking, you are going to have to get up even earlier if you want to get a parking spot and not have to use the shuttle. 

Lake Moiraine-1

Lake Moraine is one such tourist spot. Lake Moraine is another beautiful mountain lake set in the Lake Louise area, though at a higher elevation and in a much more remote area than Lake Louise. It’s so remote, that the road is closed from the end of October to March due to snow. It’s also an area that is popular with bears during bear season, which could affect your hiking plans if you go during that time (basically the summer time to early September). And yes, Lake Moraine has very limited parking considering its popularity. The basic guidance given in my research is to be there by 0630 if you hope to get a parking space at all. Because unlike other areas, they don’t let you park alongside the road, and the road is blocked for ingress at the Lake Moraine turnoff from the main road once the parking lot is full (and yes, there are signs and people out there guarding that road and letting you know if you can go). As it is, I got there a little after 0630, and there were only a few spots left open for normal cars (there were still some spots for RVs and tour buses). It’s one of those things you just have to laugh at and take in stride. I normally hate getting up early in the morning, but I will get up before sunrise (because at that time of year, the sun didn’t rise until after 0730) just so I could get a parking spot and have the freedom of maneuver a car brings. 

Lake Moiraine-5

So after arriving, I could sit back, relax and take a breath, and enjoy a breakfast in peace while waiting for the sun to rise. The morning I was there, the weather wasn’t that great, and there were a lot of clouds early on. Some cloud cover adds to the mysterious and remote beauty of the lake, sort of giving it a Gothic romanticism to the vista. But too much cloud cover just blocks the steep mountains that surround the lake. 

Lake Moiraine-6

Since I planned to spend most of the day at Lake Moraine, I wasn’t in any hurry. I started my day by walking along the Lake Moraine shoreline, which goes down the lake a couple kilometers before ending at a boardwalk viewpoint in front of the rushing creek that feeds into the lake. It was still somewhat grey and the clouds were lurking overhead, though the wind was quick enough that the clouds never lingered for too long.

Lake Moiraine-3

Even though it was cloudy, it was still bright enough to see the gorgeous blue water, which is formed by light reflecting off the glacial rock powder that sits at the bottom of the lake. It’s the astounding lake color, along with the surrounding mountains that makes Lake Moraine such as must do in the Lake Louise area. 

Lake Moiraine-4

After walking back, the clouds were lifting a bit, even if the sun hadn’t emerged from the clouds. Right next to the lake shore is a steep pile of rocks that you can walk up to and give you the iconic views over the lake that you have likely seen in professional photographs. The walk isn’t long, though it is on the steep side. But said steepness is still fairly short, and the view is absolutely worth it. By this point in the morning, the tour buses were disgorging hordes of tourists armed with cameras and jockeying for a good camera spot. You kind of just have to ignore them and do your own thing. And remind yourself that they will move along shortly (they are probably on a timetable if they are on a tour bus), and you will be able to take your pictures and enjoy your view. 

Lake Moiraine-7

After that, I debated whether or not to go on a hike as I intended. There are two popular hikes that originate from Lake Moraine- Larch Valley and Consolation Lakes hikes. Larch Valley is considered more moderate (which again, depending on your fitness level, could easily veer more towards the strenuous). It’s much longer, and steeper, and ends higher in the mountains among the gorgeous, golden yellow larch trees that are so prevalent this time of year in the higher mountain elevations. You can see fields and fields of these trees from good vantage points, but seeing them up close and personal requires much more hiking, since they only exist at higher elevations. 

Lake Moiraine-14

Having taken a pretty good measure of my physical fitness by this point, I decided Larch Valley was just a bit out of my fitness range, so I decided to do the Consolation Lakes hike. It is considered an easier hike, much more level, with much less elevation gain, and plenty of gorgeous views. 

Lake Moiraine-13

One of the interesting things about Lake Moraine like I mentioned earlier, is that it is popular with bears during bear feeding season when they are fattening themselves up for the winter’s hibernation. During high bear season, people MUST hike in close groups of four or more in certain areas, the Lake Moraine hikes (away from the lake shore) included. This is one of those things that is emphasized over and over again in guide books. Trails are monitored during that time of year for compliance, and hefty fines can happen for those who don’t comply. This of course can be a challenge when you are a solo hiker like myself and don’t fancy hiking in groups (who probably all hike faster than me) or just cozying up to strangers to tag along (again, people who likely walk much faster than me, since most hikers do). Thankfully, high bear season was over with by the time I got there (something I had taken into consideration when planning this vacation), and it was only recommended you hike in groups, and not mandated. 

Lake Moiraine-12

The start to the Consolation Lakes hike is a relatively narrow, very rocky path along the backside of the rock pile. It doesn’t look an obvious start to a popular hike, and if there wasn’t a sign clearly marking it, I would have assumed it was some goat trail. I personally hate very rocky paths, because I spend so much time looking at my feet, and I seem to still trip a fair amount. But the rocky path doesn’t last too long, and soon I was in the forest, where now I had roots and some mud to contend with and not just rocks. 

Lake Moiraine-11

The path is fairly level, though there are some uphills in places. The path is pretty wide and wends its way through the forest and then starts paralleling a babbling creek named Babel Creek (you hear the rushing water minutes before you can see it through the trees), that offers a few side paths to go down to the water. I kept climbing gently through the forest and left the sound of the water behind me. 

Lake Moiraine-8

I knew I was pretty much done when I entered a wide valley, surrounded on three sides by mountains that are filled with trees (including wide swaths of bright yellow larch trees up on the mountainside). The path sort of just…ends after nearly 2 miles of hiking. I mean the ostensible goal of this hike is the lakes at the end of it, but the path ends once I hit the large field of large rocks. From there, I could choose to navigate my way carefully down closer to the water’s edge, or just relax on a rock and take in the view. If I was sure footed and agile, I probably would have chosen to hop from rock to rock and get closer to the lake’s edge,  like some other fleet footed hikers. But I am not, and a field of rocks with no clear walking path is basically just asking for me to fall or sprain my ankles. Besides, the view I had by the river was pretty enough, even if it wasn’t at the actual edge of the lake. 

Lake Moiraine-10

After enjoying the view for a while, it was an easy walk back to the trail head. All those uphills that caused me to huff and puff a bit (certainly more than I would like) were just easy downhills. Even the rocky path that started (and now ended) my hike wasn’t as annoying, because the view was really pretty on the return hike, and I knew it was almost over.

Lake Moiraine-9

Since the sun had come out at this point, I decided to hike back up the short, steep path overlooking the lake again, and I did not regret it. Even in cloudy weather, the lake is a beautiful blue. But in sunlight, the blue just glistens and sparkles, and adds some real magic to the gorgeous vista. It really did look like so many of the photographs that beckon you to come and visit Lake Moraine. 

Lake Moiraine-15

If you do want to visit Lake Moraine, you could drive up yourself or take the shuttle buses that run until late afternoon. If you want to sleep in, and don’t want to get out of bed when it is still dark out, a shuttle is pretty much your only option. Unless you are willing to wait until very late afternoon/early evening when the parking lot clears enough for the road to be reopened. Just know that the sun will likely set earlier later in the season, and you don’t leave a lot of time for viewing, photographing, and hiking. Or you could do like I did, and get up super early and then congratulate yourself on getting a parking space that gives you the freedom to do what you want, when you want. Just know that you will not be doing it alone, since this is a VERY popular stop in the Lake Louise area.